# Enabling Single Sign-On for a Workato workspace
Workato supports authentication using SAML-based Single Sign-On (SSO), allowing you to provide authorized access to Workato for multiple workspace members.
Along with just-in-time (JIT) provisioning, you can streamline onboarding by eliminating the need to pre-provision Workato accounts.
ENFORCE SAML AUTHENTICATION
You can enforce SAML SSO for your workspace. When you enforce SAML SSO, all members of the workspace (except for the workspace account owner) must authenticate through your identity provider. They cannot access the workspace and its resources by logging in with a Workato username and password.
Note that the account owner of the workspace cannot use SAML-based SSO to authenticate with the workspace. They must log in with their username and password instead.
# Prerequisites
To fully configure SSO for Workato, you must have the following:
SAML SSO privileges in Workato.
Knowledge of which Workato data center supports your account. The values for some configuration settings vary depending on your account's data center.
For the following data centers, the URLs for configuring a SAML app begin with:
- US Data Center (USDC):
https://www.workato.com - European Union Data Center (EUDC):
https://app.eu.workato.com - Japan Data Center (JPDC):
https://app.jp.workato.com - Singapore Data Center (SGDC):
https://app.sg.workato.com - Australia Data Center (AUDC):
https://app.au.workato.com
- US Data Center (USDC):
Privileges in your SAML provider that enable you to complete the following actions.
- Create and modify SAML applications.
- Assign applications to users.
# Step 1: Create a Workato SAML Application
The first step to enabling SSO for Workato is creating a SAML application for Workato in your SAML provider.
To get started, locate the instructions for your SAML provider:
KNOW YOUR WORKATO DATA CENTER?
Before proceeding, verify the data center your Workato account is in.
When setting up your SAML application, make sure to use the SSO URLs for your data center.
# Google G Suite
VIEW GOOGLE G SUITE INSTRUCTIONS
Refer to the Google Workspace Admin documentation (opens new window) for more details.
# In Workato:
Navigate to Workspace admin > Settings > Authentication & provisioning.
Fill in the following fields:
Authentication method
Select SAML based SSO.
SAML provider
Select Other SAML IdP.
Copy the Service provider (SP) entity ID.
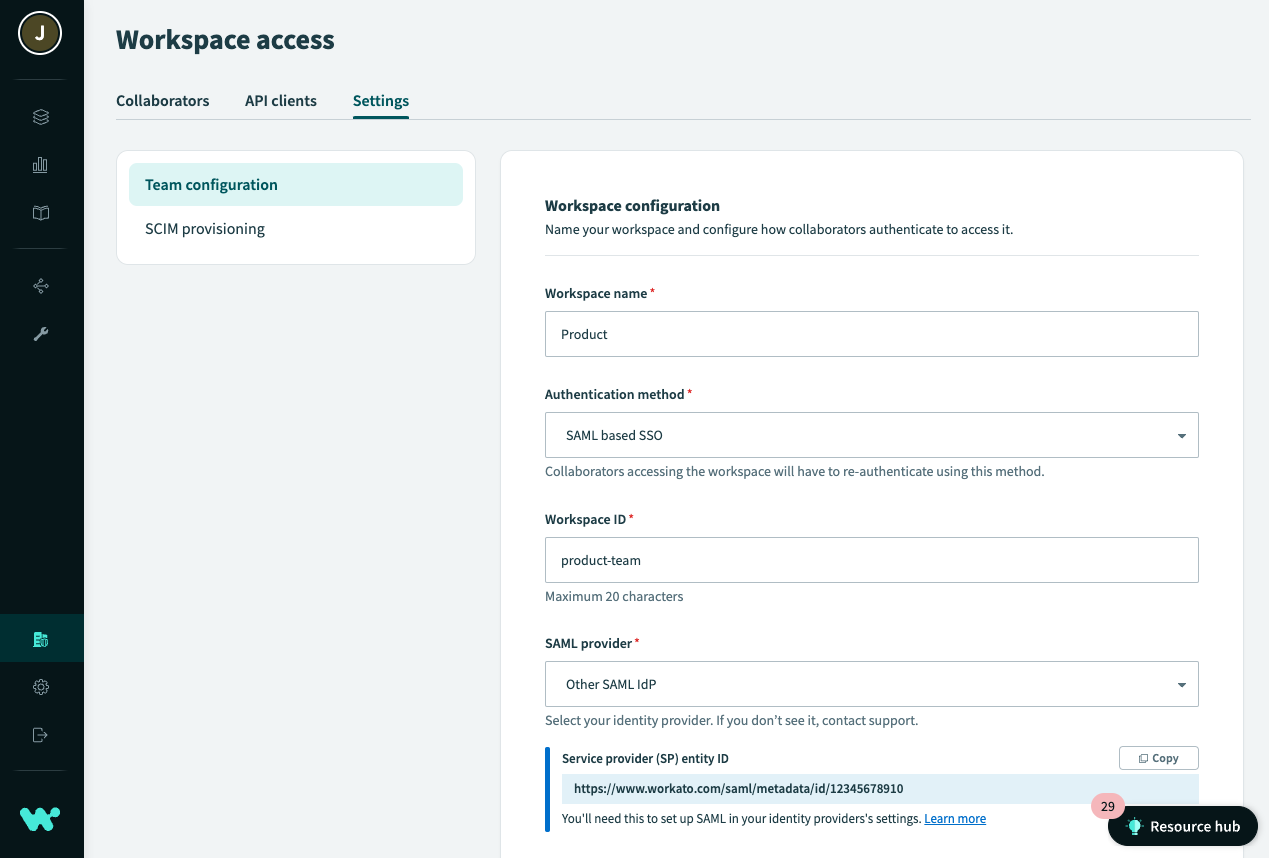 Retrieve entity ID
# In your Google Admin console:
Navigate to Apps > Web and mobile apps.
Click Add App > Add custom SAML app.
In the Service Provider Details window, fill in the configuration details as follows:
- ACS URL
- Use the URL for your Workato data center:
- US data center:
https://www.workato.com/saml/consume - EU data center:
https://app.eu.workato.com/saml/consume - JP data center:
https://app.jp.workato.com/saml/consume - SG data center:
https://app.sg.workato.com/saml/consume - AU data center:
https://app.au.workato.com/saml/consume - Entity ID
- Enter in the Service provider (SP) entity ID obtained from Workato.
- Start URL
- Use the URL for your Workato data center:
- US data center:
https://www.workato.com/saml/consume - EU data center:
https://app.eu.workato.com/saml/consume - JP data center:
https://app.jp.workato.com/saml/consume - SG data center:
https://app.sg.workato.com/saml/consume - AU data center:
https://app.au.workato.com/saml/consume
Finish configuring the app, defining settings as needed.
After you've finished the preceding steps, move on to the next step to complete the setup.
# Microsoft Azure Active Directory (AD)
VIEW AZURE AD INSTRUCTIONS
Follow the Microsoft documentation for a complete step-by-step guide on configuring SAML-based SSO in Azure AD (opens new window).
In your Workato account:
Navigate to Navigate to Workspace admin > Settings > Authentication & provisioning.
Enter your Workspace ID.
Select SAML based SSO for the Authentication method.
Select Azure Active Directory for the SAML provider.
Copy the Service provider (SP) entity ID:
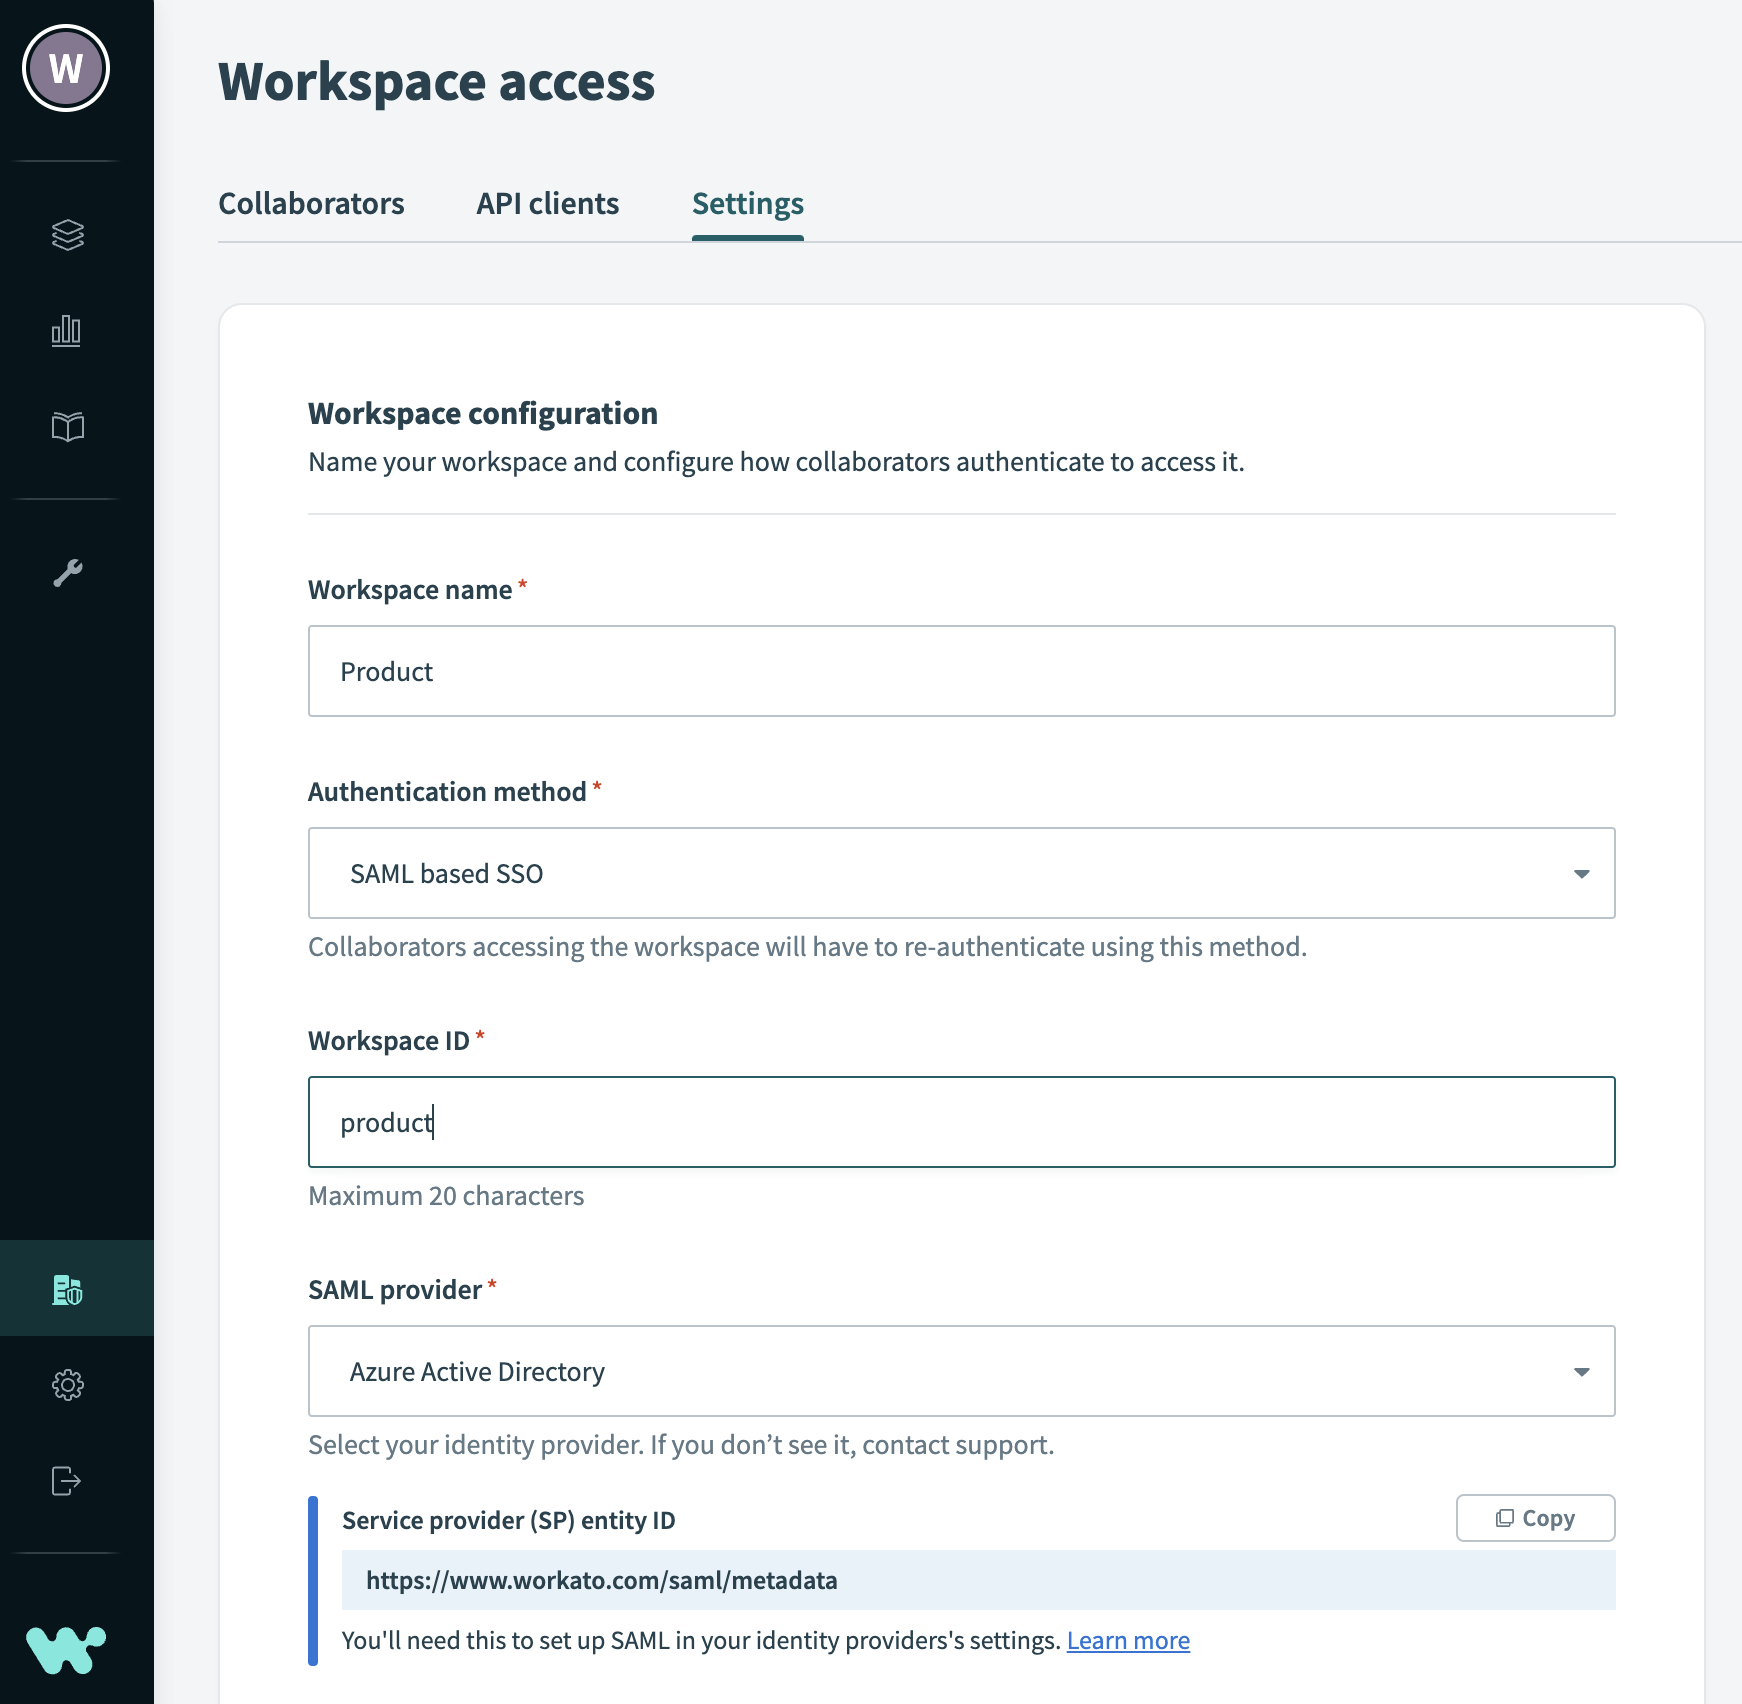 Retrieve entity ID
In your Azure portal:
Create a Non-gallery application to connect Azure AD SSO to Workato:
- Select Azure Active Directory > Enterprise applications.
- Create a New application and choose Non-gallery application.
Refer to the Azure documentation (opens new window) for more details.
Navigate to the new application's Single sign-on tab and select SAML.
Fill in the configuration details as follows:
Identifier (Entity ID):
The Entity ID from Workato, generated in Step 1.
Reply URL (Assertion Consumer Service URL):
Use the URL for your Workato data center:
US Data Center:
https://www.workato.com/saml/consumeEU Data Center:
https://app.eu.workato.com/saml/consumeJP Data Center:
https://app.jp.workato.com/saml/consumeSG Data Center:
https://app.sg.workato.com/saml/consumeAU Data Center:
https://app.au.workato.com/saml/consume
Sign on URL:
Locate your Workspace ID in Workato. Then, configure the URL for the data center you use, replacing
workspace-idwith your Workspace ID, for example:acme-dev-1:US Data Center:
https://www.workato.com/saml/init?team_handle=workspace-idEU Data Center:
https://app.eu.workato.com/saml/init?team_handle=workspace-idJP Data Center:
https://app.jp.workato.com/saml/init?team_handle=workspace-idSG Data Center:
https://app.sg.workato.com/saml/init?team_handle=workspace-idAU Data Center:
https://app.au.workato.com/saml/init?team_handle=workspace-id
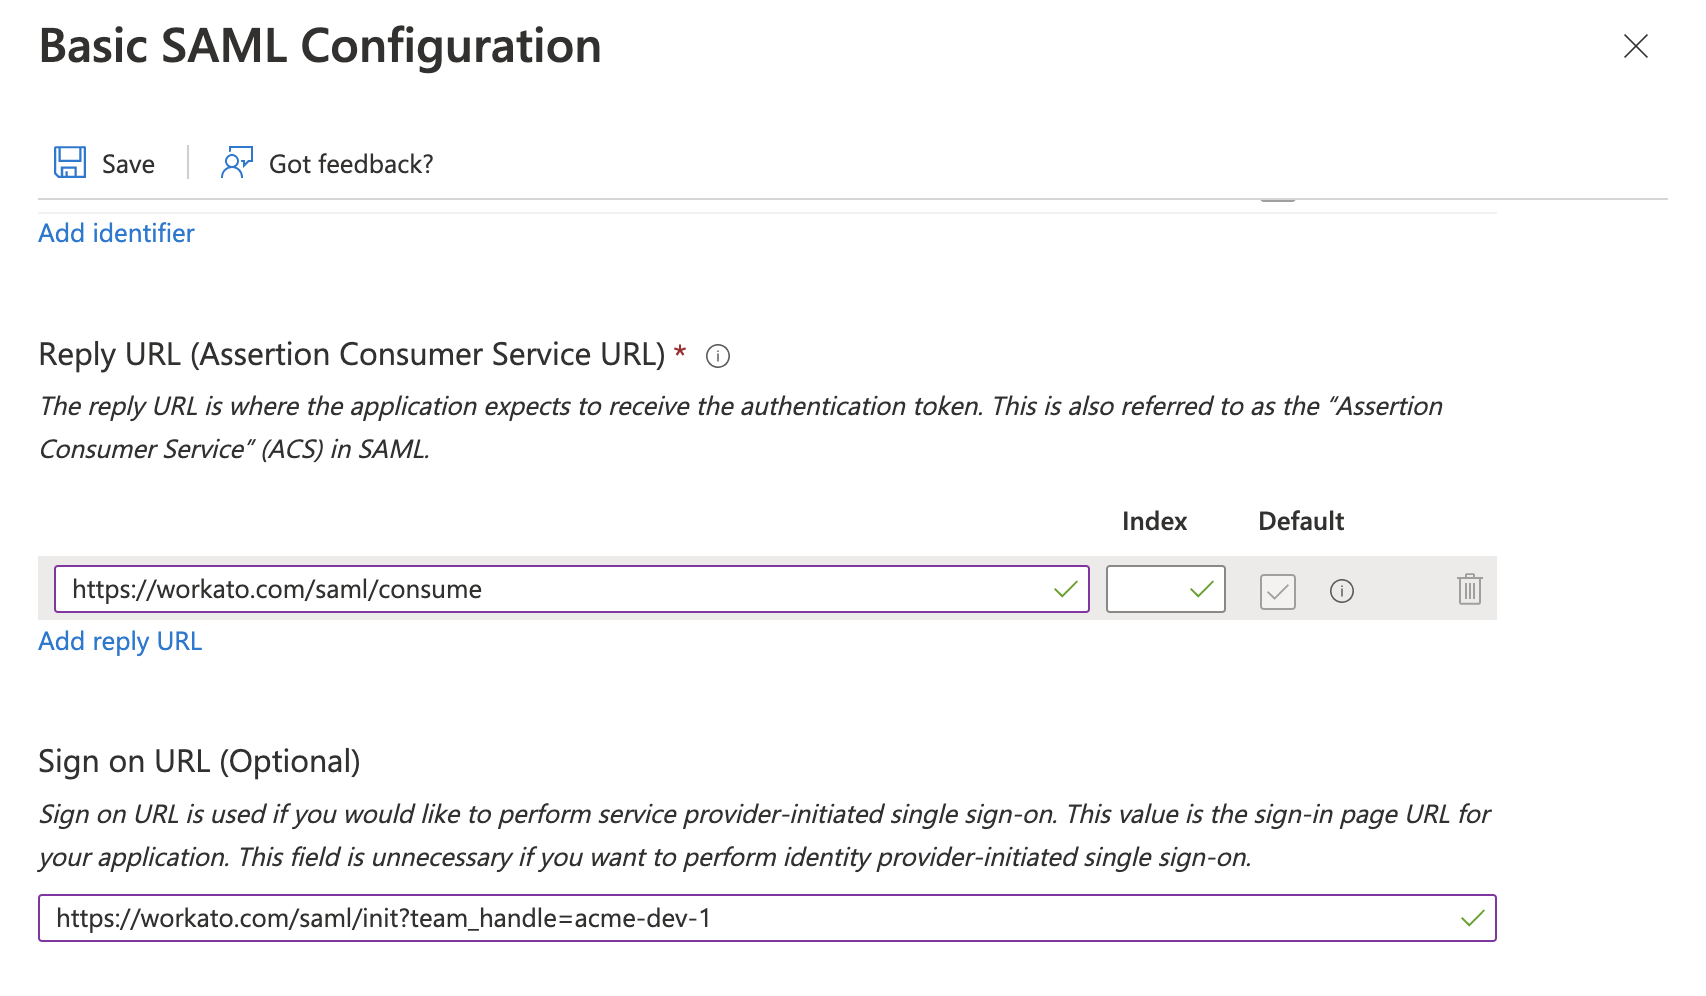 Azure SAML Configuration
Save your settings.
Next, you'll obtain your Azure AD Metadata URL. This is needed to complete the SSO setup in Workato.
In Single sign-on, find the details of the SAML Certificate.
Copy the App Federation Metadata URL from the menu.
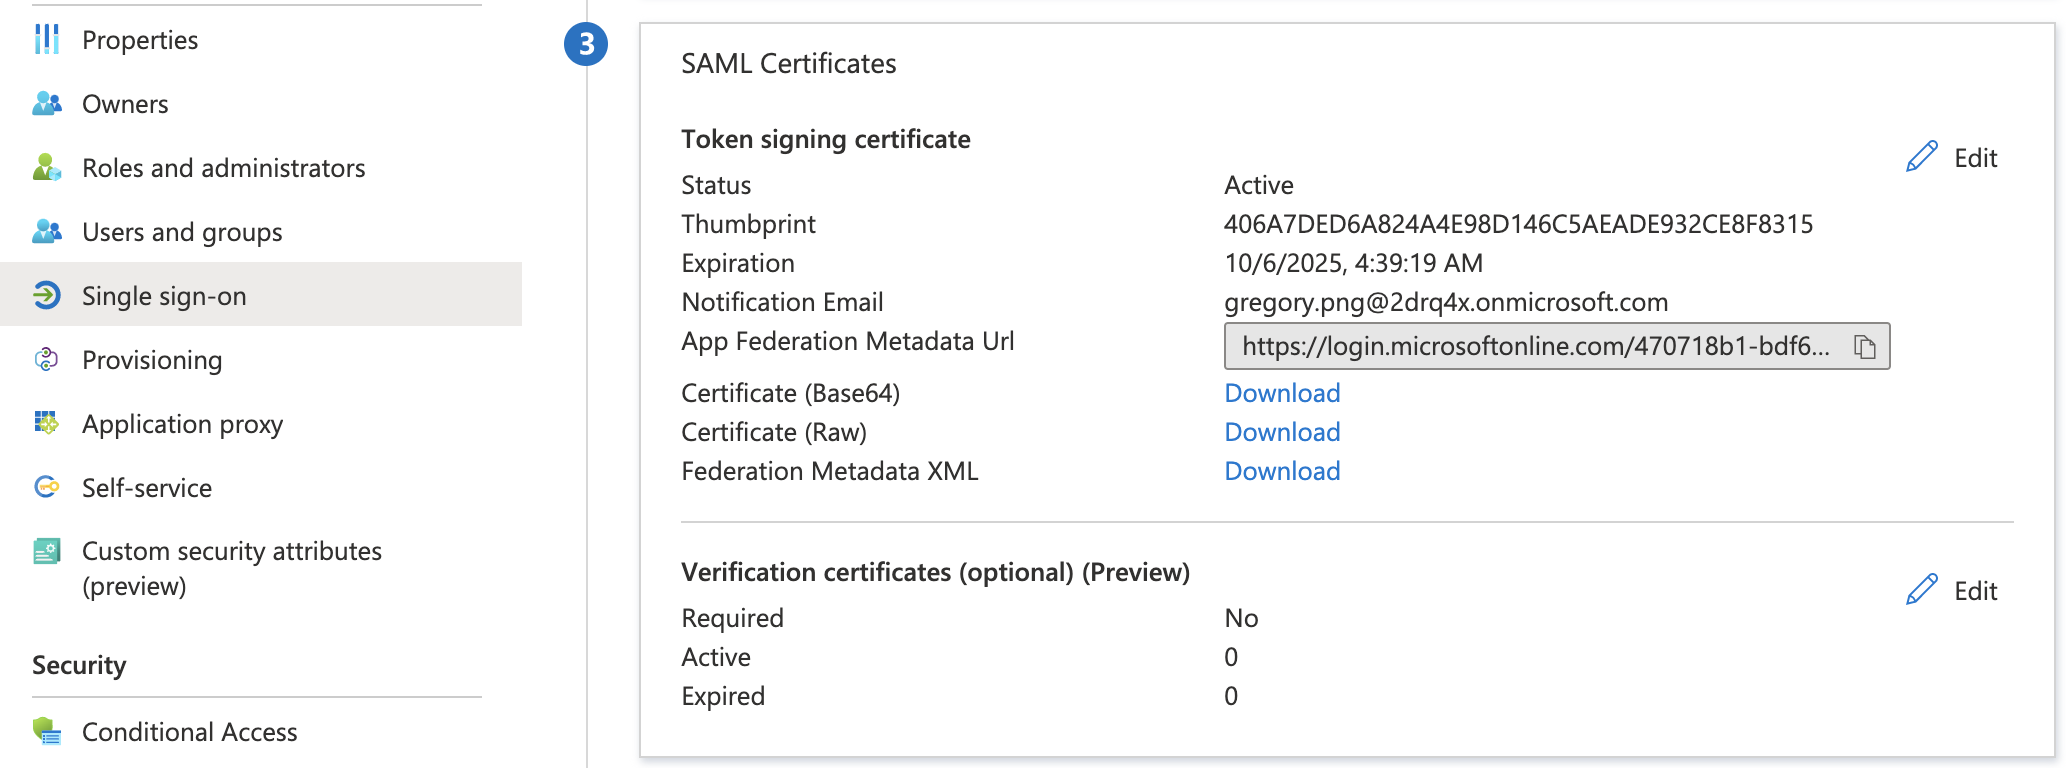 Azure AD metadata URL
After you've finished the above steps, move on to the next step to complete the setup.
# CyberArk Idaptive
VIEW CYBERARK IDAPTIVE INSTRUCTIONS
Log in to your CyberArk Idaptive admin console.
Navigate to the Apps & Widgets sidebar and select Add custom SAML app.
Name the application Workato.
Click Trust to configure SAML Settings.
Navigate to the Service Provider Configuration section and select Manual Configuration.
Provide the SAML settings as follows:
- Audience: Use the URL for your Workato data center:
- US data center:
https://www.workato.com/saml/metadata - EU data center:
https://app.eu.workato.com/saml/metadata - JP data center:
https://app.jp.workato.com/saml/metadata - SG data center:
https://app.sg.workato.com/saml/metadata - AU data center:
https://app.au.workato.com/saml/metadata
- US data center:
- Recipient: Use the URL for your Workato data center:
- US data center:
https://www.workato.com/saml/consume - EU data center:
https://app.eu.workato.com/saml/consume - JP data center:
https://app.jp.workato.com/saml/consume - SG data center:
https://app.sg.workato.com/saml/consume - AU data center:
https://app.au.workato.com/saml/consume
- US data center:
- ACS (Consumer) URL Validator: Use the URL for your Workato data center:
- US data center:
^https:\/\/www.workato.com\/saml\/*$ - EU data center:
^https:\/\/app.eu.workato.com\/saml\/*$ - JP data center:
^https:\/\/app.jp.workato.com\/saml\/*$ - SG data center:
^https:\/\/app.sg.workato.com\/saml\/*$ - AU data center:
^https:\/\/app.au.workato.com\/saml\/*$
- US data center:
- ACS (Consumer) URL: Use the URL for your Workato data center:
- US data center:
https://www.workato.com/saml/consume - EU data center:
https://app.eu.workato.com/saml/consume - JP data center:
https://app.jp.workato.com/saml/consume - SG data center:
https://app.sg.workato.com/saml/consume - AU data center:
https://app.au.workato.com/saml/consume
- US data center:
Select Assertion.
Leave other settings as default unless otherwise specified by your Workato implementation details.
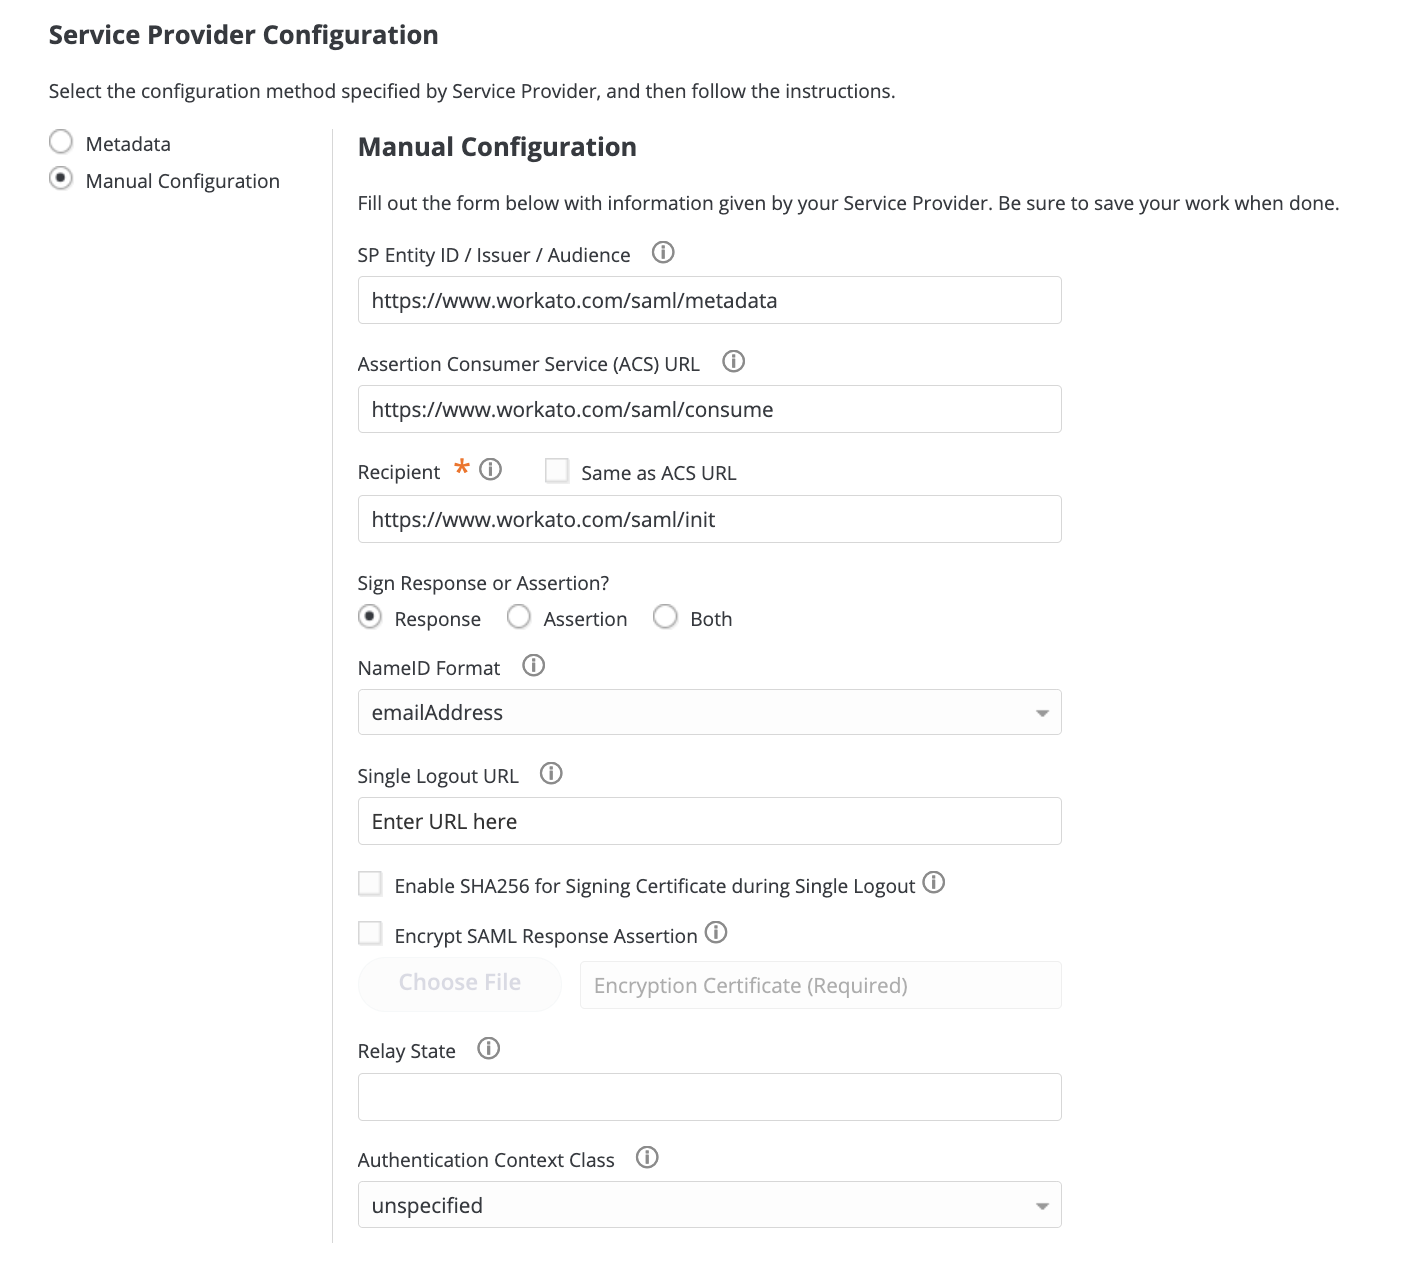 CyberArk Idaptive service provider configuration
Save your settings.
Locate and copy the Metadata URL provided by CyberArk Idaptive. This is needed to complete the SSO setup in Workato.
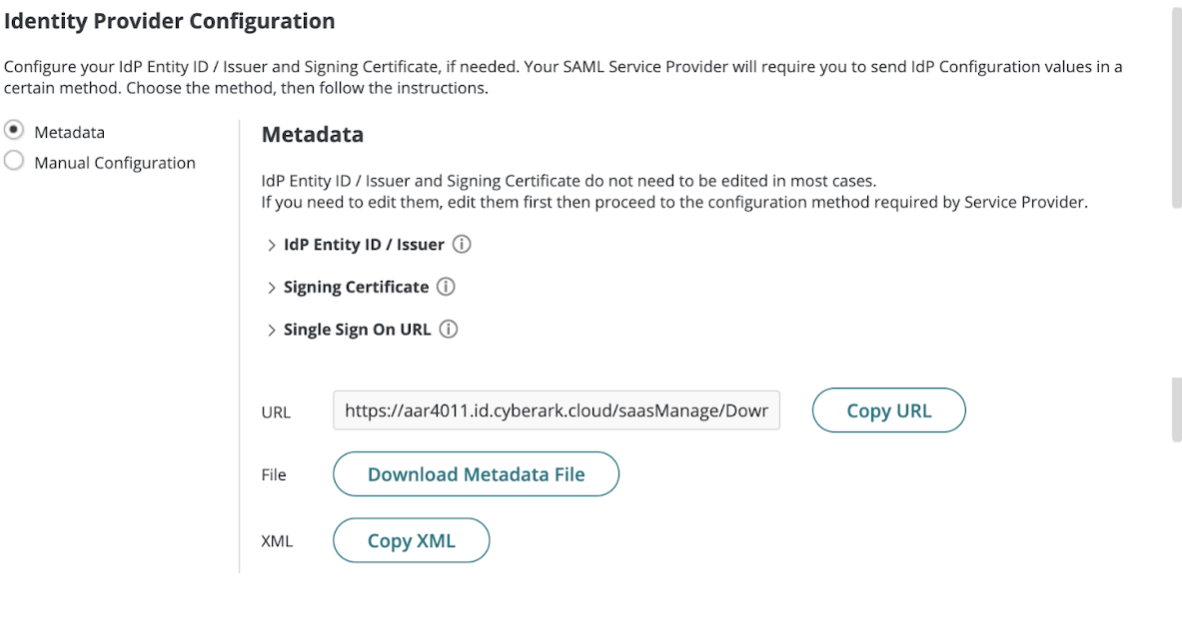 CyberArk Idaptive metadata URL configuration
Obtain your Identity provider single sign-on URL, Identity provider issuer, and Signing certificate from CyberArk Idaptive. These values are required to complete the SSO setup in Workato.
Deploy the Workato SAML app to make it available to users within CyberArk Idaptive:
Log in to your CyberArk Idaptive admin console.
Navigate to the Permissions section in the admin console.
Click Add and select a user, typically a system administrator tasked with managing the app deployment.
Confirm the deployment by clicking Save.
Assign the Workato SAML app to role permissions in CyberArk Idaptive:
Log in to your CyberArk Idaptive admin console.
Navigate to Core Services > Roles.
Select Add Role and name it "Workato Users" to define the permissions for users who will use Workato.
Under Assigned Applications, locate the Workato SAML app, select it, and click Add to associate it with the "Workato Users" role.
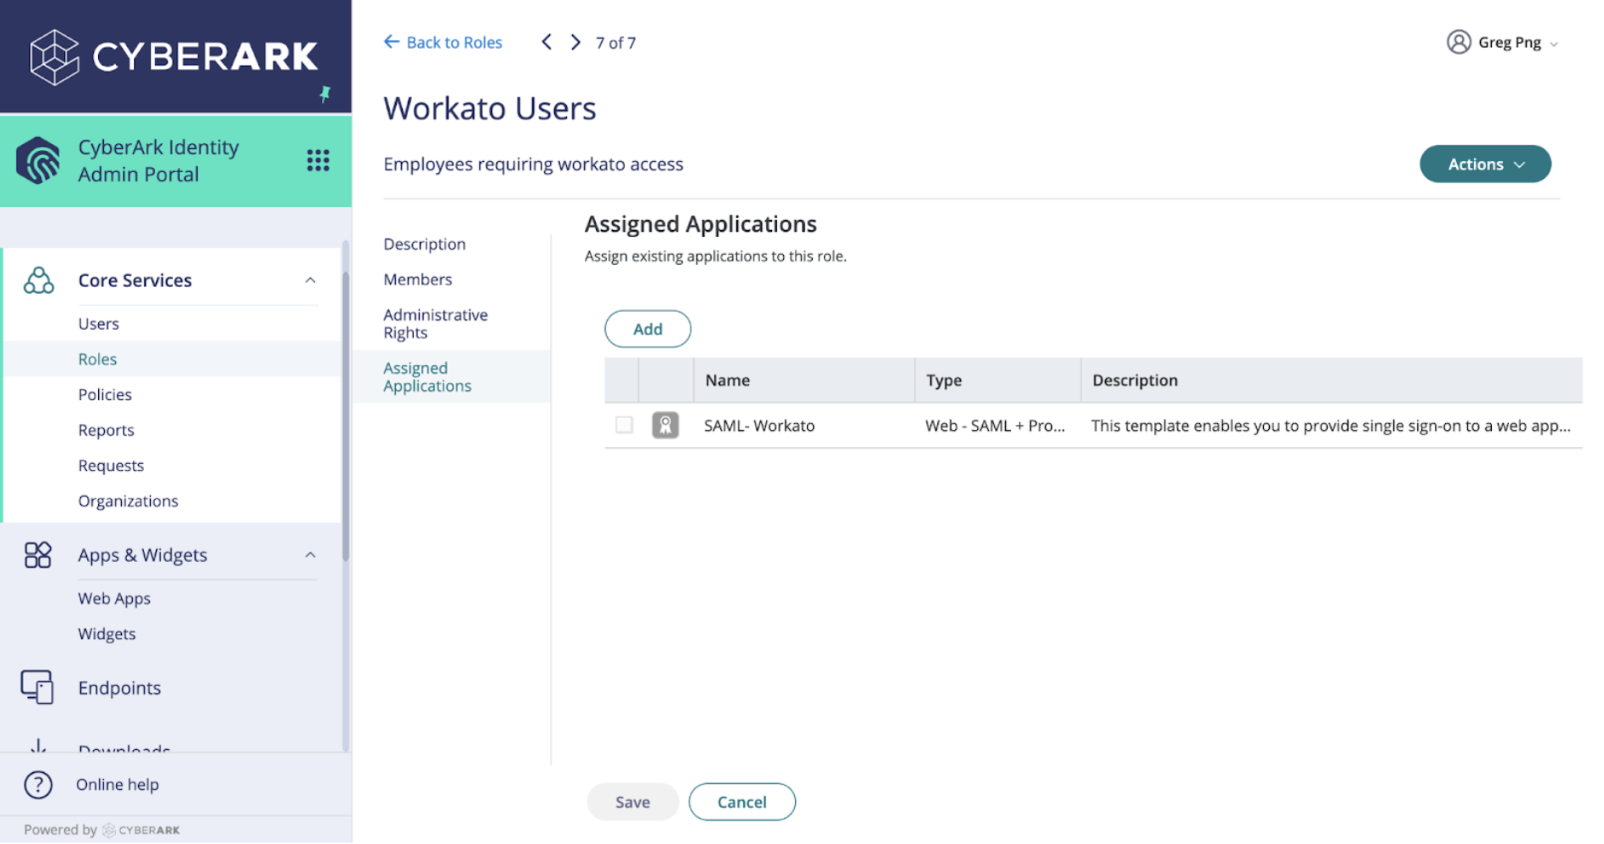 Assign the Workato SAML app to roles
Click Save to confirm the role assignments and complete the setup process.
Users assigned the Workato Users role can find the Workato SAML app in their CyberArk Idaptive user portal. Clicking this app enables them to log into Workato and automatically provisions their account.
After you've finished the preceding steps, continue to the next step to complete the setup in Workato.
# Okta
VIEW OKTA INSTRUCTIONS
Log in to your Okta instance.
Navigate to Applications > Applications.
Click Create App Integration.
 Add application on Okta
Refer to the Okta documentation (opens new window) for more information.
Select SAML 2.0 for the Sign on method in the window that displays.
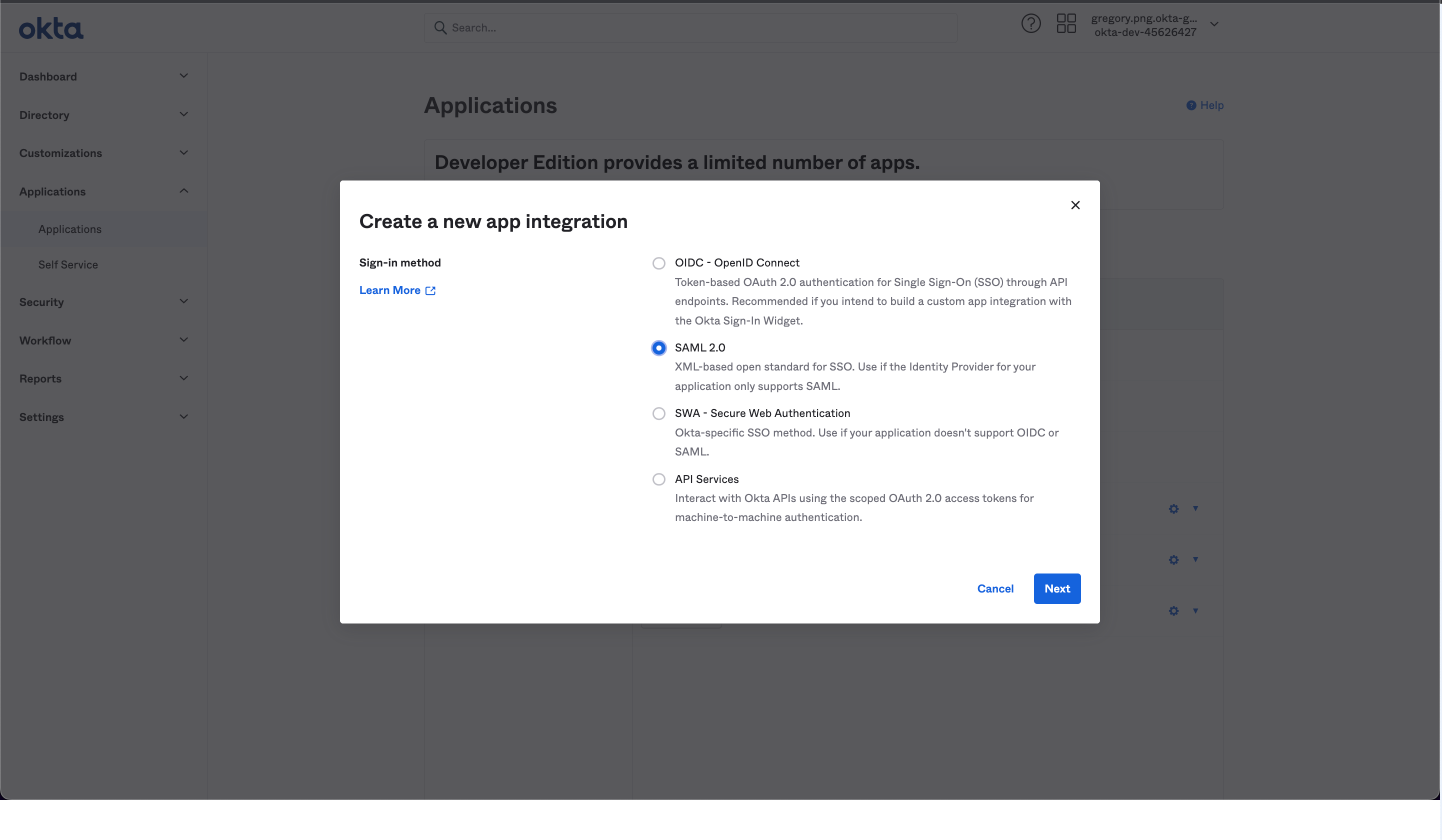 Create a new application on Okta
Locate the Configure SAML tab and provide the Single Sign-On URL for your Workato data center:
- US data center:
https://www.workato.com/saml/metadata - EU data center:
https://app.eu.workato.com/saml/metadata - JP data center:
https://app.jp.workato.com/saml/metadata - SG data center:
https://app.sg.workato.com/saml/metadata - AU data center:
https://app.au.workato.com/saml/metadata
Set Application username to Custom and enter the following expression. This expression converts the user email to lowercase:
toLowerCase(user.email)
 Set Application username* to Custom
Select the Use this for Recipient URL and Destination URL check box.
Provide the Audience URI (SP Entity ID) for your Workato data center:
- US data center:
https://www.workato.com/saml/metadata - EU data center:
https://app.eu.workato.com/saml/metadata - JP data center:
https://app.jp.workato.com/saml/metadata - SG data center:
https://app.sg.workato.com/saml/metadata - AU data center:
https://app.au.workato.com/saml/metadata
Click Other Requestable SSO URLs > Show Advanced Settings > Add Another and provide your Workato data center:
- US data center:
https://www.workato.com/saml/consume - EU data center:
https://app.eu.workato.com/saml/consume - JP data center:
https://app.jp.workato.com/saml/consume - SG data center:
https://app.sg.workato.com/saml/consume - AU data center:
https://app.au.workato.com/saml/consume
Find your Identity provider single sign-on URL, Identity provider issuer, and X.509 certificate in Okta. These values are required to complete the SSO setup in Workato.
Log in to your Okta account, navigate to Applications, and select the newly-created application's page.
Go to the Sign On interface.
Click View SAML setup instructions, located in the right sidebar.
Copy the following values for use in Workato:
- Identity provider single sign-on URL
- Identity provider issuer
- X.509 certificate
After you've finished the preceding steps, continue to the next step to complete the setup in Workato.
# OneLogin
VIEW ONELOGIN INSTRUCTIONS
Log in to your OneLogin instance.
Navigate to Applications > Applications.
Click Add App.
 Add application on OneLogin
Refer to the OneLogin documentation (opens new window) for more details.
In the search box, enter saml test connector and click it in the results:
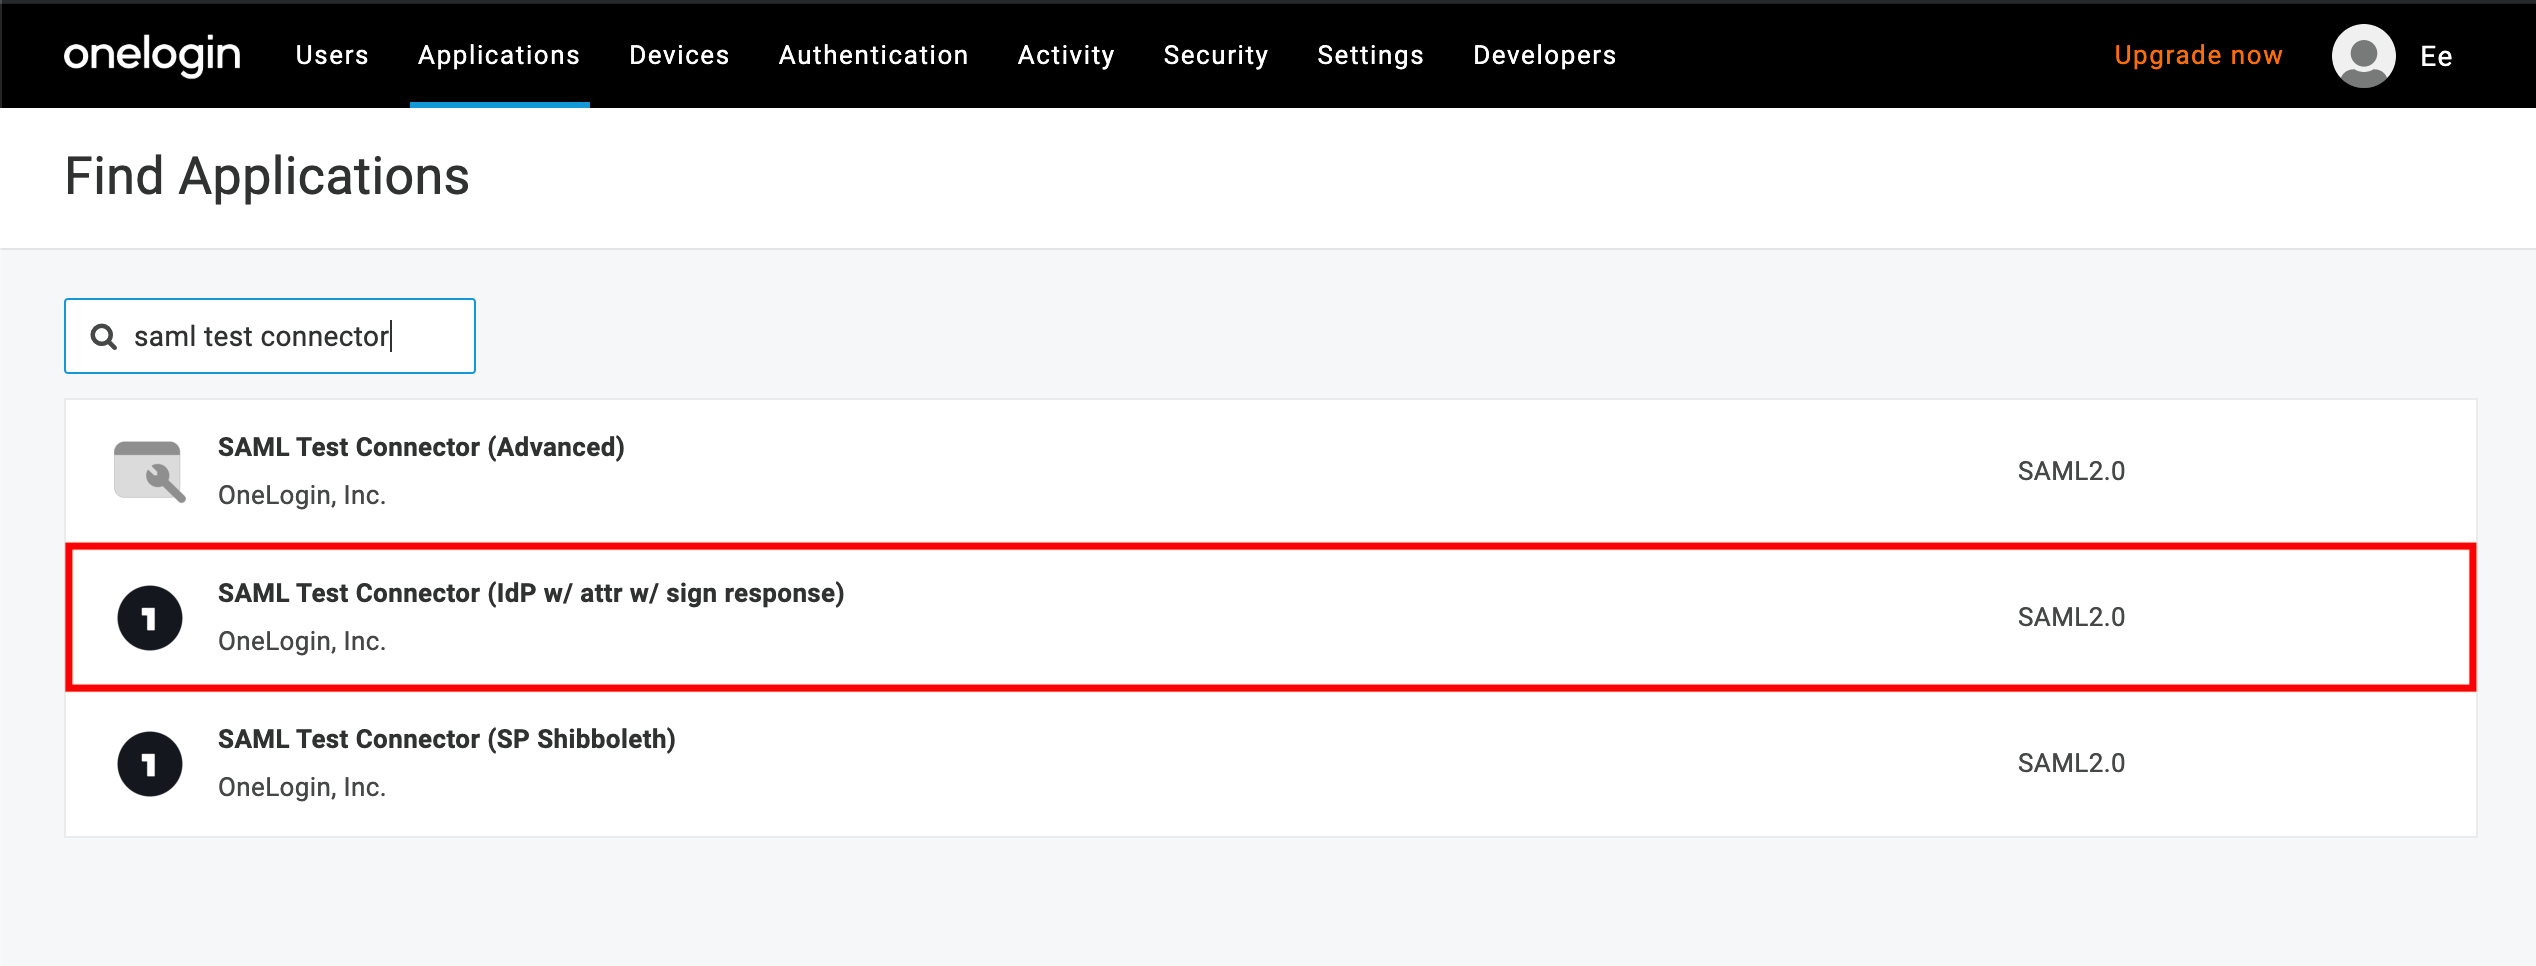 SAML test connector
In the Application details, fill in the configuration details as follows:
- Audience: Use the URL for your Workato data center:
- US data center:
https://www.workato.com/saml/metadata - EU data center:
https://app.eu.workato.com/saml/metadata - JP data center:
https://app.jp.workato.com/saml/metadata - SG data center:
https://app.sg.workato.com/saml/metadata - AU data center:
https://app.au.workato.com/saml/metadata
- US data center:
- Recipient: Use the URL for your Workato data center:
- US data center:
https://www.workato.com/saml/consume - EU data center:
https://app.eu.workato.com/saml/consume - JP data center:
https://app.jp.workato.com/saml/consume - SG data center:
https://app.sg.workato.com/saml/consume - AU data center:
https://app.au.workato.com/saml/consume
- US data center:
- ACS (Consumer) URL Validator: Use the URL for your Workato data center:
- US data center:
^https:\/\/www.workato.com\/saml\/*$ - EU data center:
^https:\/\/app.eu.workato.com\/saml\/*$ - JP data center:
^https:\/\/app.jp.workato.com\/saml\/*$ - SG data center:
^https:\/\/app.sg.workato.com\/saml\/*$ - AU data center:
^https:\/\/app.au.workato.com\/saml\/*$
- US data center:
- ACS (Consumer) URL: Use the URL for your Workato data center:
- US data center:
https://www.workato.com/saml/consume - EU data center:
https://app.eu.workato.com/saml/consume - JP data center:
https://app.jp.workato.com/saml/consume - SG data center:
https://app.sg.workato.com/saml/consume - AU data center:
https://app.au.workato.com/saml/consume
- US data center:
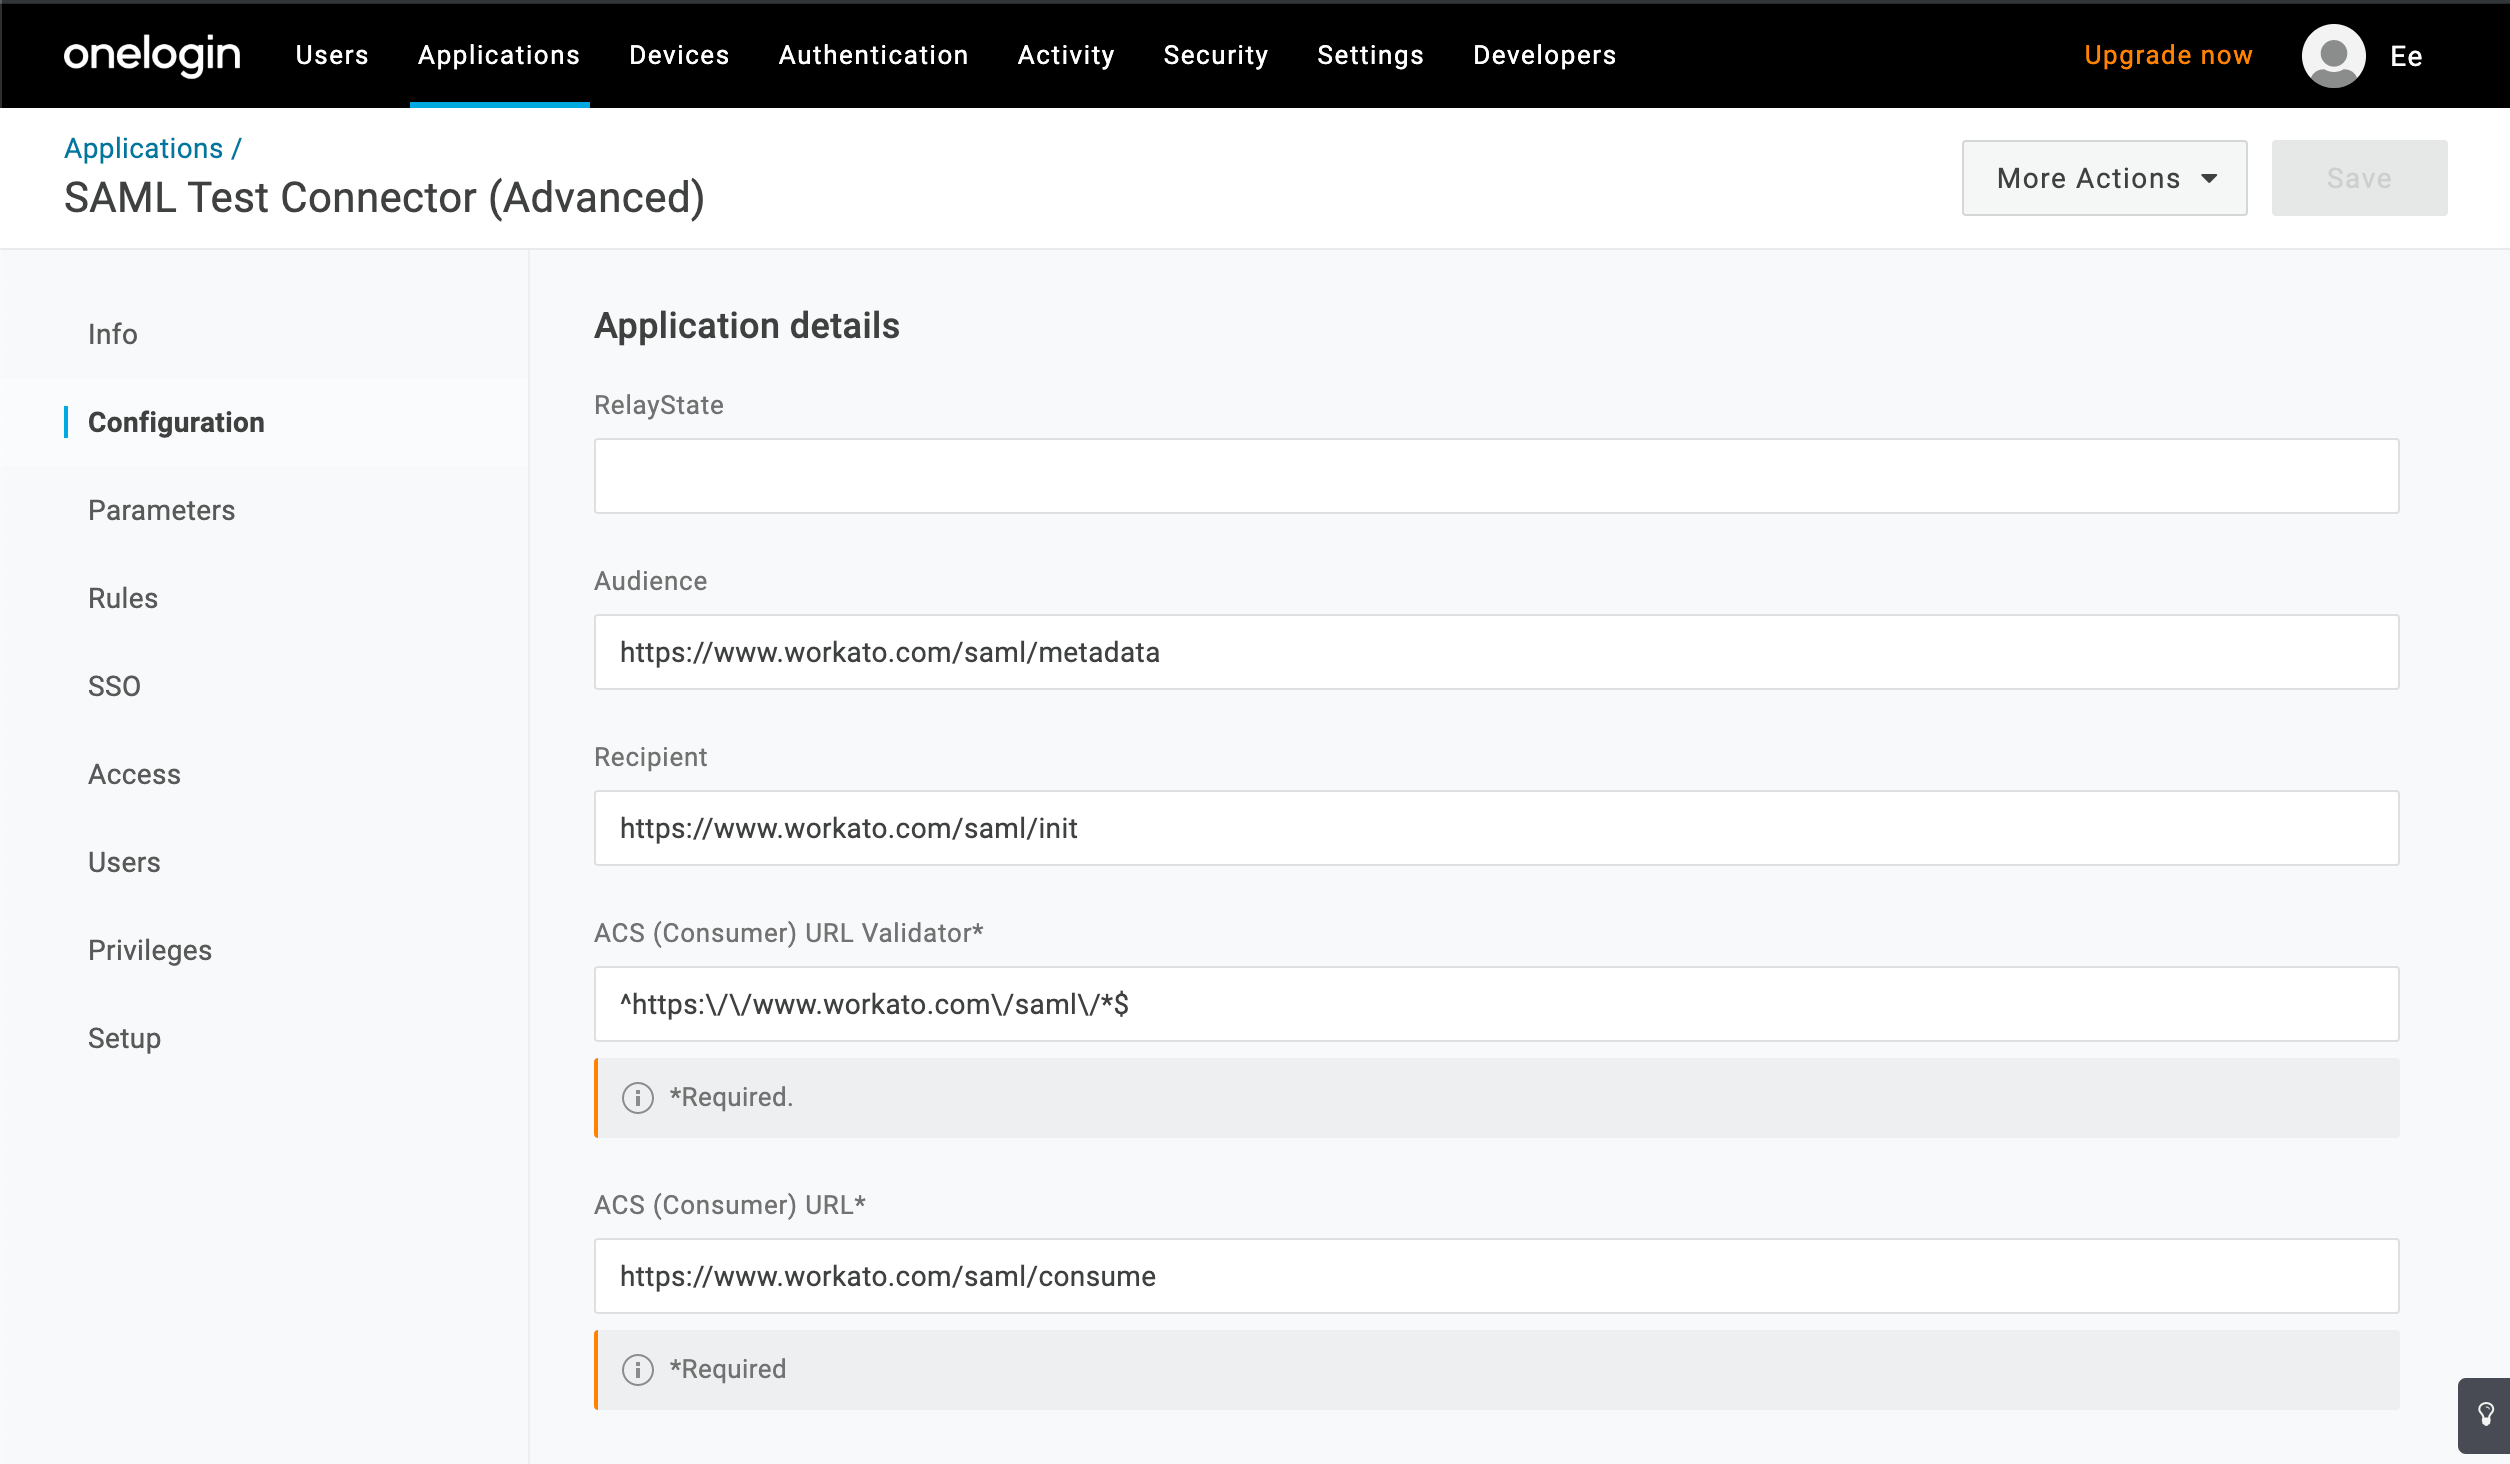 Workato Service Provider settings for OneLogin
Click Save.
Next, you'll retrieve your OneLogin Metadata URL. This is needed to complete the SSO setup in Workato.
On the application's page, click More Actions.
Hover over SAML Metadata, then right-click and select Copy link address:
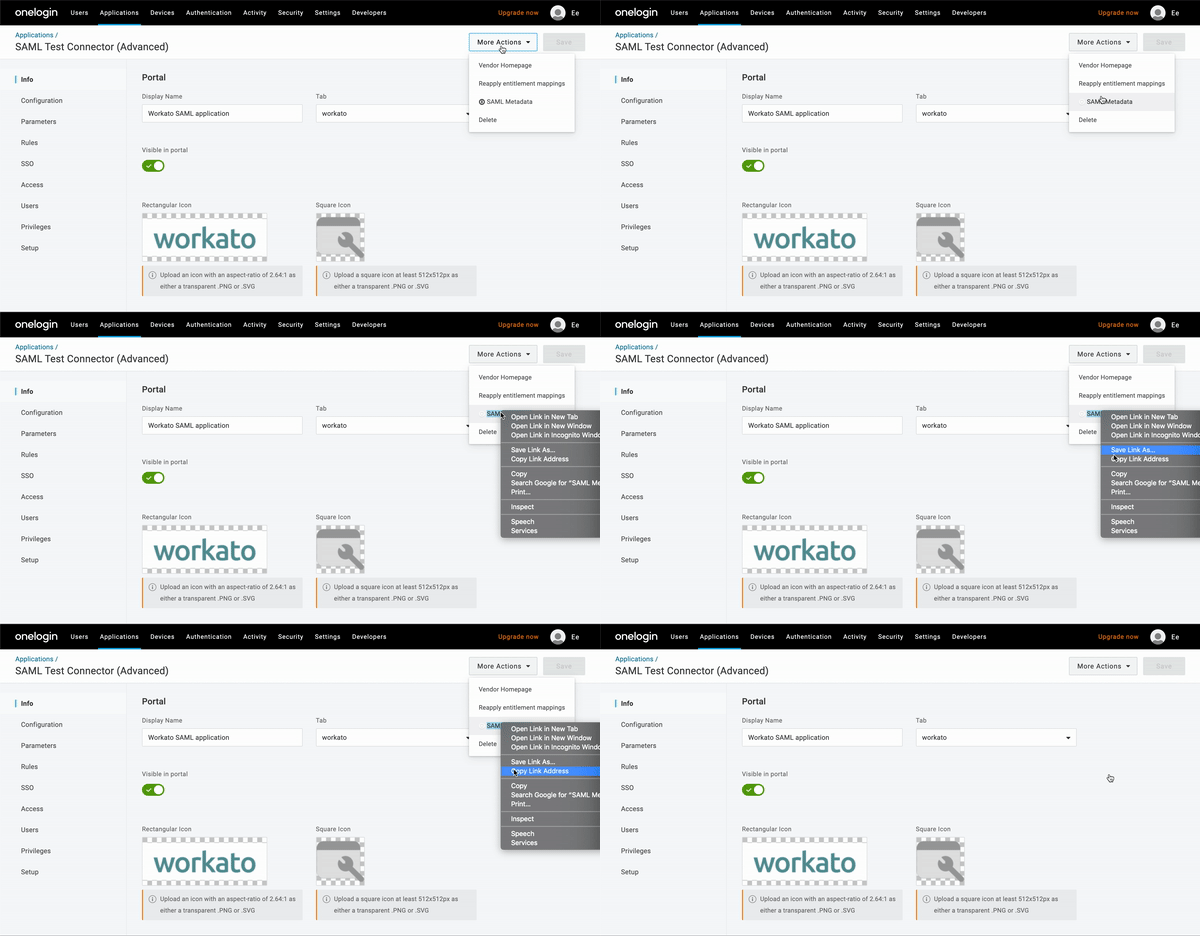 OneLogin metadata URL
After you've finished the above steps, move on to the next step to complete the setup.
# Step 2: Finish setup in Workato
Log in to Workato and navigate to Workspace admin > Settings > Authentication & provisioning.
In the Settings tab, fill in the fields as follows:
Workspace name
Enter a name for the workspace.
Authentication method
Select SAML based SSO.
Workspace ID
Enter a unique ID for the workspace. This is used to identify workspaces on login.
SAML provider
Select your SAML provider from the dropdown menu. If you are using Google G Suite, select Other SAML IdP.
Do you have your identity provider metadata URL?
Okta
If your identity provider is Okta, you must configure your SAML settings manually. Follow the instructions contained in "I don't have my metadata URL".
I have my metadata URL
If you have the metadata URL from your SAML provider:
- Select Yes.
- Paste the metadata URL into the Metadata URL field.
I don't have my metadata URL
If you don't have your metadata URL or plan to configure your SAML settings manually, you must:
- Select No.
- Retrieve the following from your SAML provider:
- Identity provider single sign-on URL
- Identity provider issuer
- X.509 certificate
Enable JIT provisioning
Refer to our Just-in-time provisioning guide for more information.
Enforce SAML Authentication
Enforce SAML SSO for all users. If you must selectively disable SSO for a few collaborators, while enforcing SAML SSO for the majority of your workspace collaborators, you can disable SSO selectively.
Click Validate settings.
VALIDATION ERROR
If you encounter a validation error, perform the following actions:
- Verify that the certificate is valid with a tool like sslshopper (opens new window).
Certificates must start with
-----BEGIN CERTIFICATE-----and end with-----END CERTIFICATE-----. - Verify that your IdP SSO URL/metadata URL is in a valid format. Refer to your identity provider's SAML configuration guide.
After successful validation, click Save.
# Step 3: Assign SAML to users
After the SSO configuration is complete, you can start assigning the SAML application to your workspace members.
We'll use an Okta application as an example.
In Okta, navigate to the newly created SAML application Applications > Workato > Assignments > Assign Users to App.
Okta displays a list of workspace members. Use this list to assign workspace members to the application.
# Log in to an SSO-enabled Workato workspace
WORKSPACE ACCOUNT OWNERS
Workspace owners cannot use SAML-based SSO to authenticate with the workspace. They must use their username and password instead.
When you enable SSO in Workato, access to a Workato workspace is controlled by your SAML provider. You must assign the SAML application to your workspace members in order to grant them access to a Workato workspace. Workspace members can then access their Workato accounts from the SAML provider such as:
- Google G Suite: use your company or organization sign-in URL, for example,
google.com/abc-example - Microsoft Azure Active Directory (AD):
https://myapps.microsoft.com/ - Okta: use your company or organization sign-in URL, for example,
123-example.okta.com - OneLogin: use your company or organization sign-in URL, for example,
xyz-example.onelogin.com
REQUEST THE SSO URL FROM YOUR ADMIN
Reach out to your admin to request the SSO URL for your company or organization.
Steps to log in to an SSO-enabled Workato workspace will vary depending on the SAML provider and the configuration setup by your administrator. For example, Okta and OneLogin accounts typically provide dashboards that allow you to select Workato (and other) applications that have SSO enabled. In the Okta dashboard, you can click the Workato application to log in to Workato:
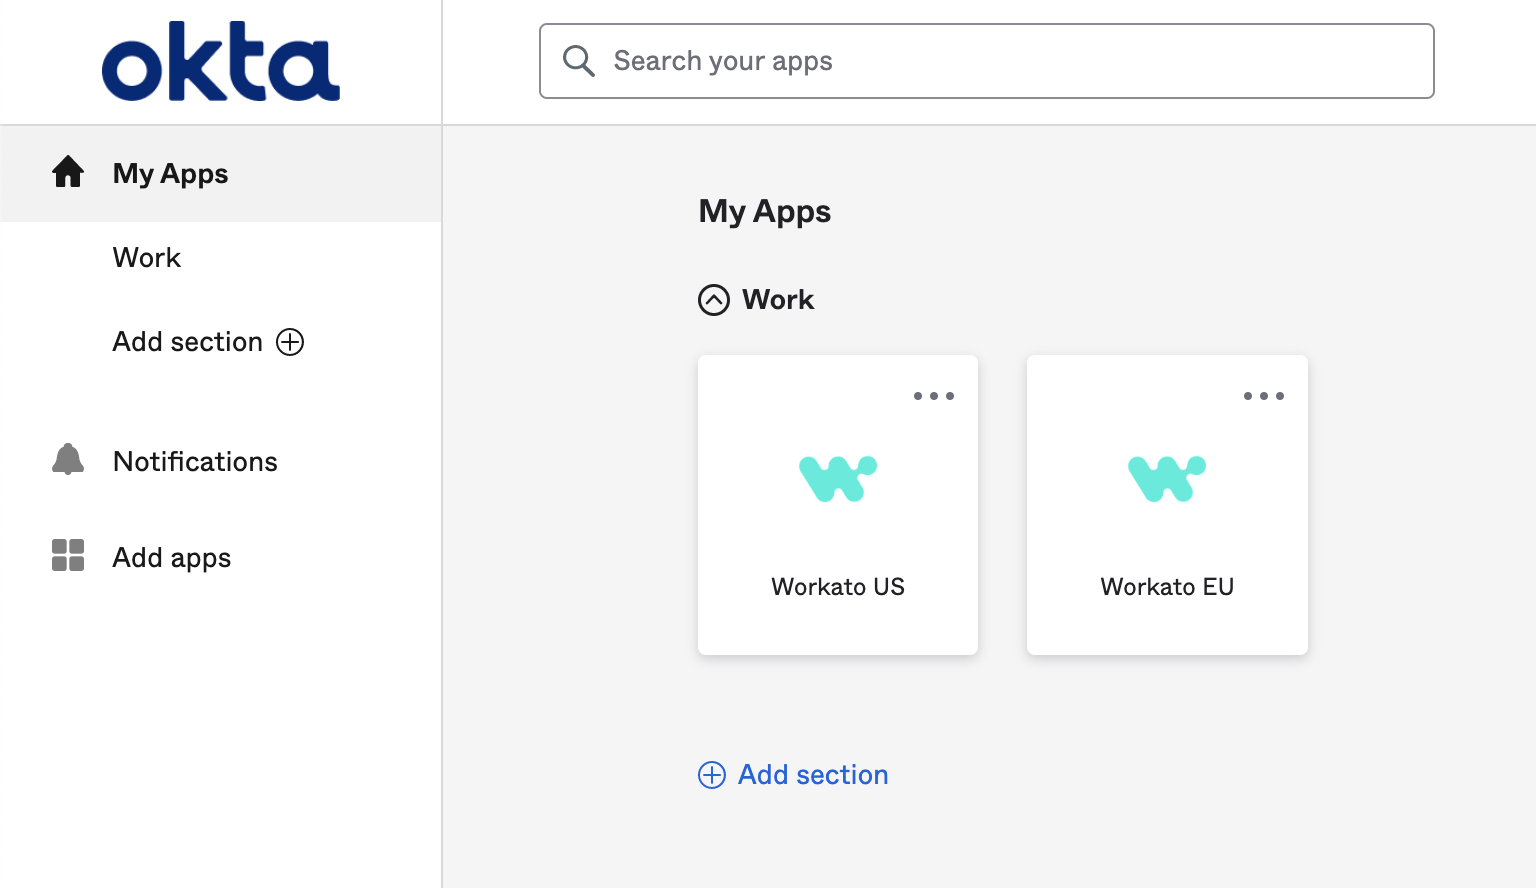 Workato app on Okta
When a workspace member switches from their personal account to an SSO-enabled workspace account, they must authenticate through the SAML provider. This process will vary depending on the SAML provider and the configuration selected by the administrator. The following example demonstrates this process.
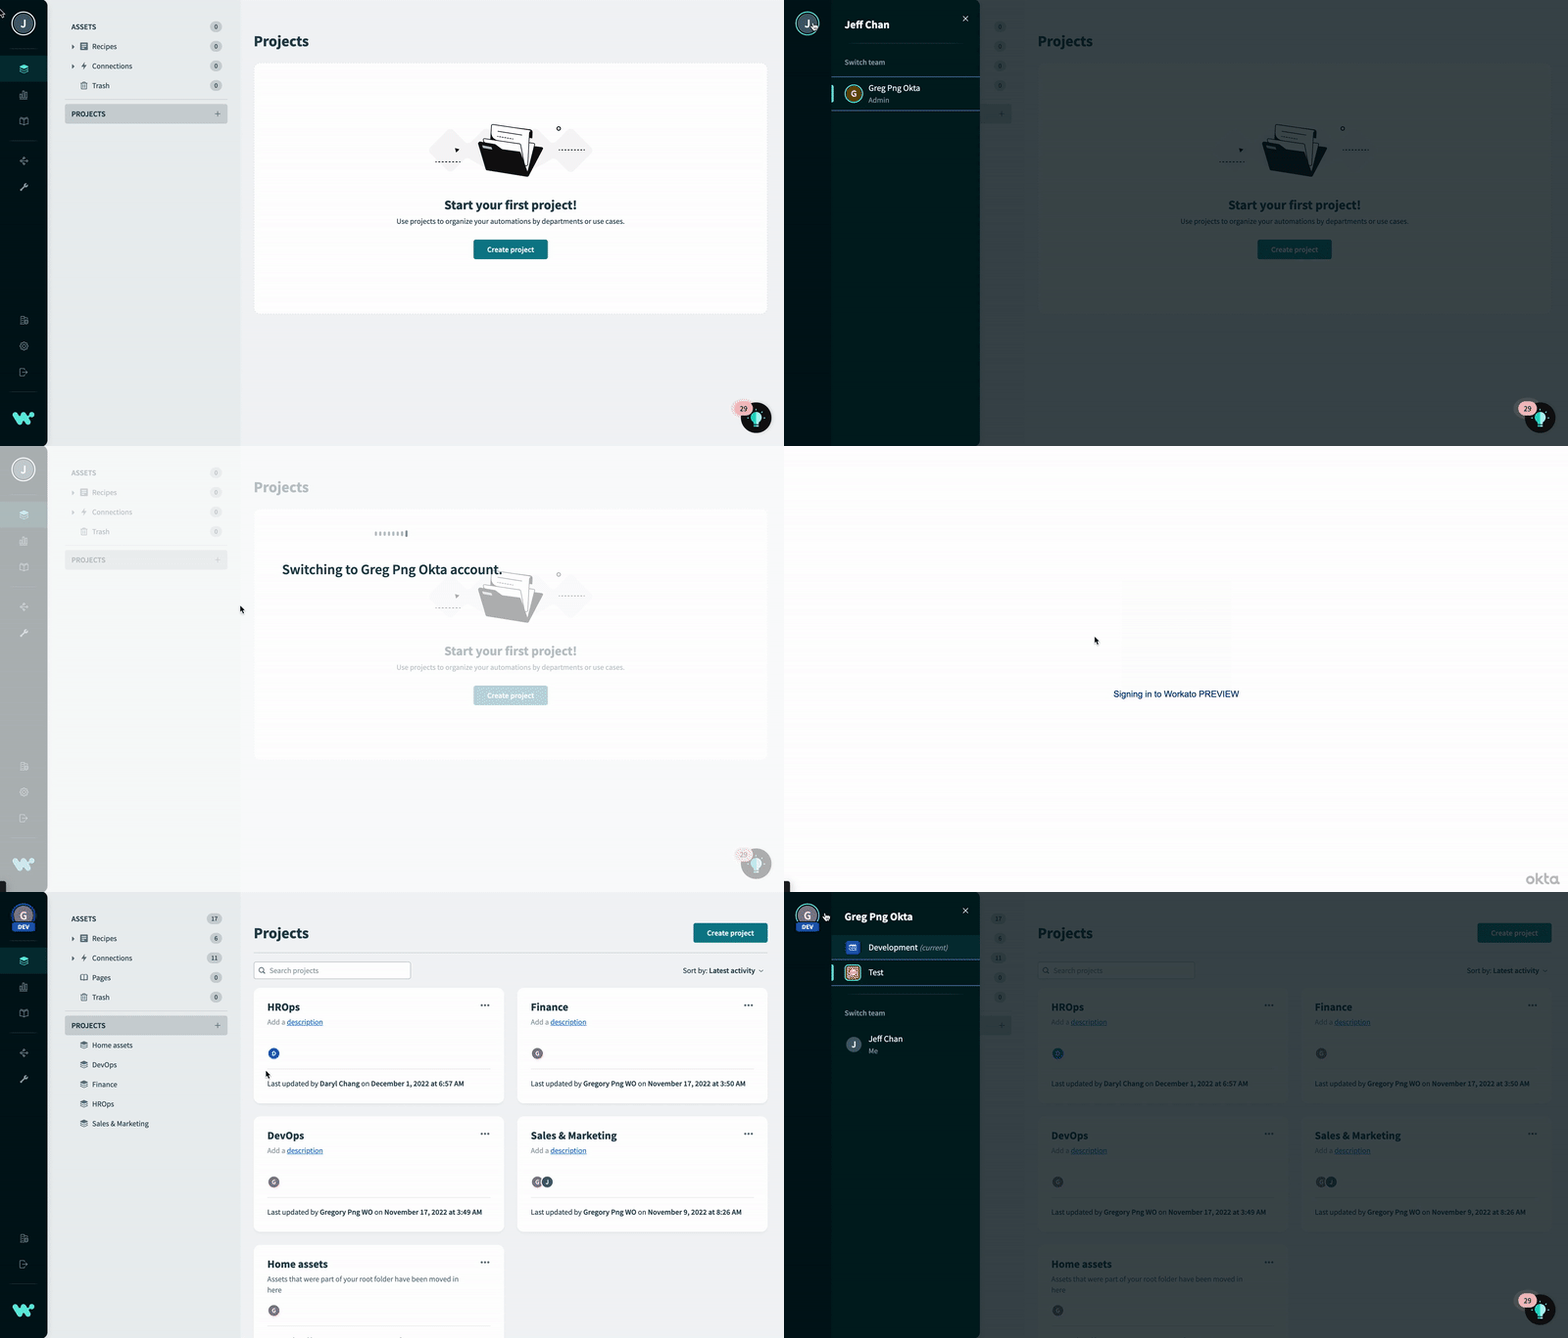 Switch to workspace account with Okta authorization
# Email Verification for SAML JIT Provisioning
For SAML JIT Provisioning, a user logging in for the first time through either SP-initiated SSO or IdP-initiated SSO must verify their email address.
When a user attempts to access the workspace for the first time, they will be prompted to verify their email before they can access the workspace.
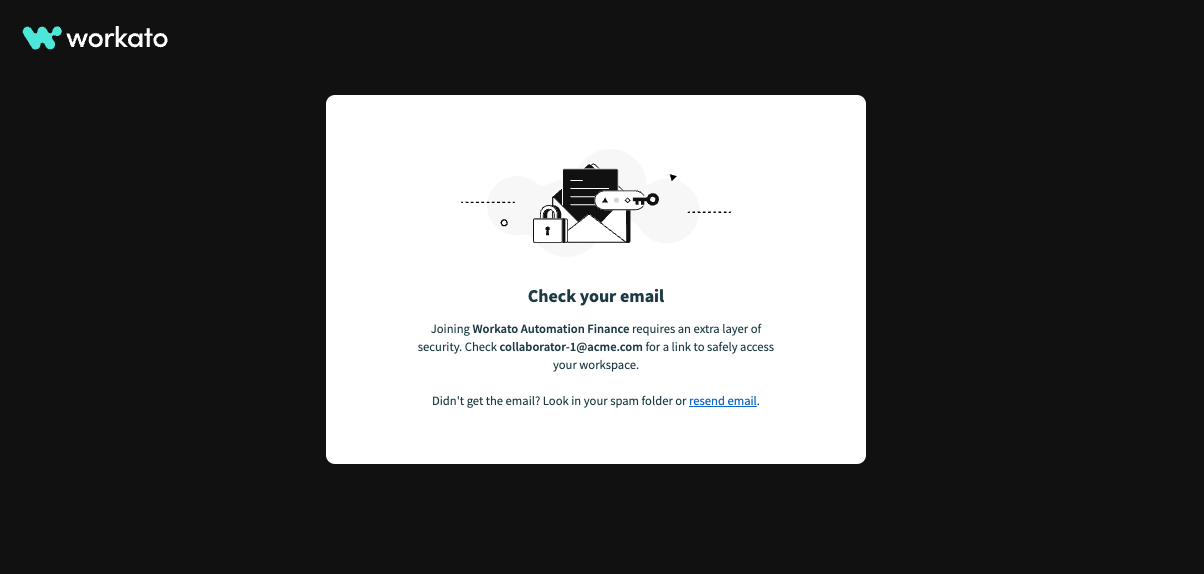
Receive Invitation Email: Workato sends an email invitation to the selected users. Instruct users to click the link in the email to verify their email address:
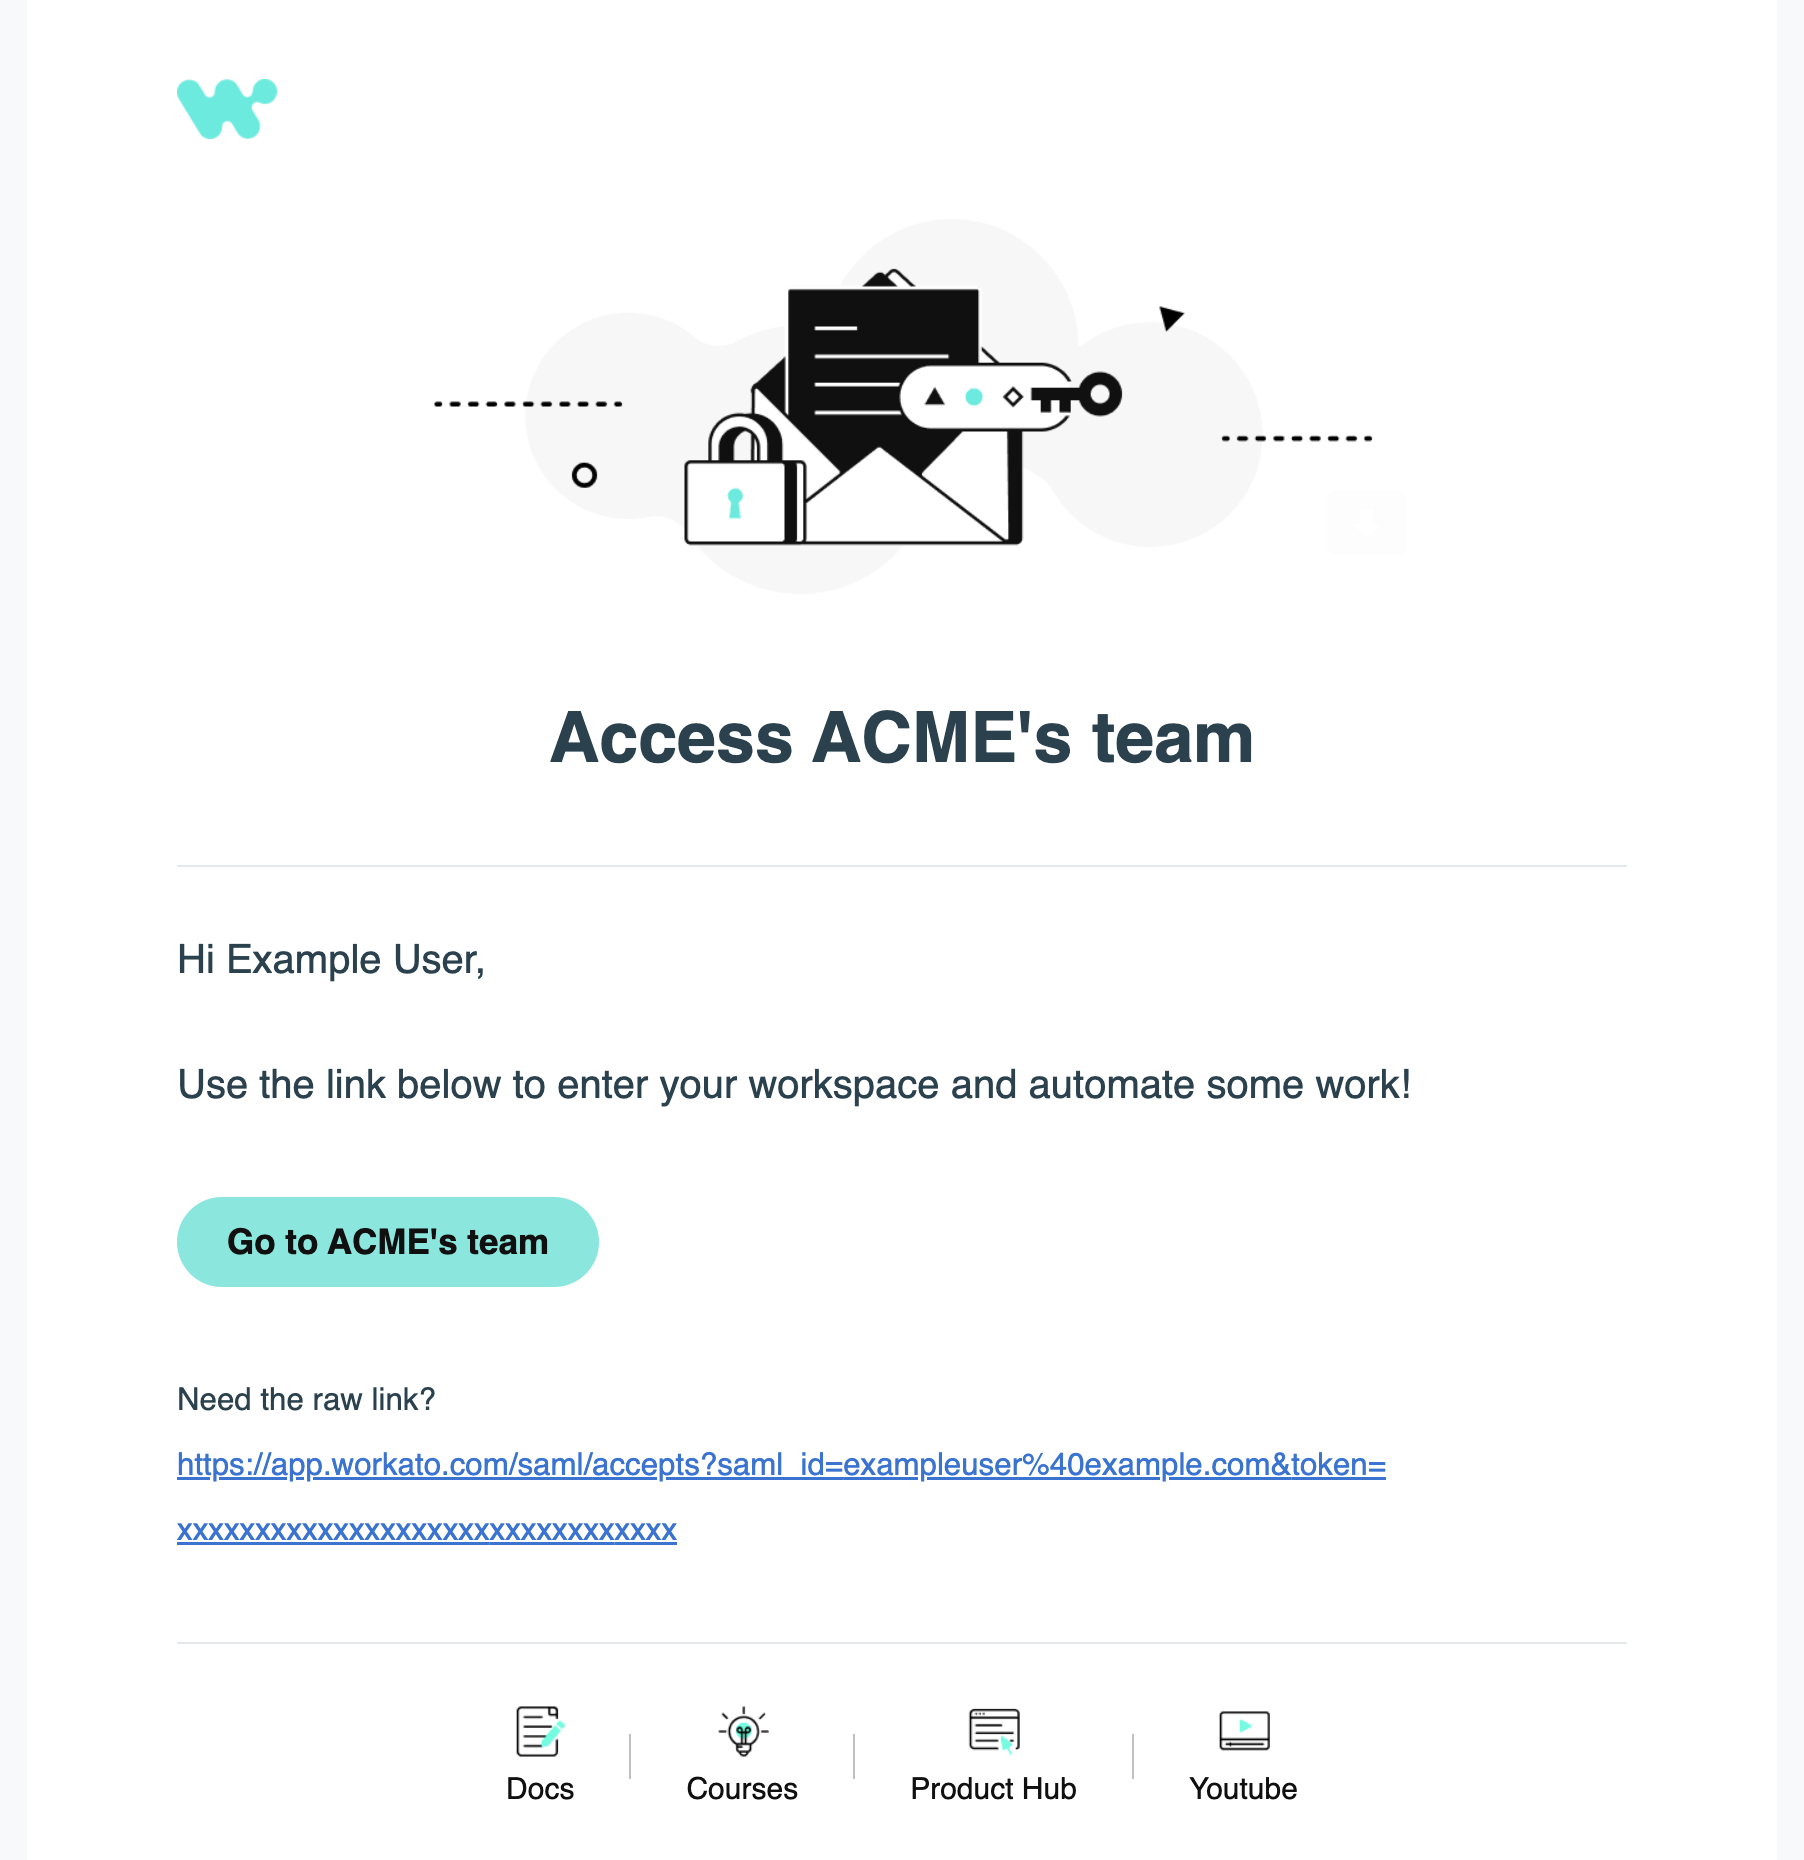 Email invitation to join a workspace
Once they receive the email, users need to access their email account and open the invitation.
The collaborator can then sign in to the assigned workspace with the role(s) you configured.
TROUBLESHOOTING
If clicking on the invitation email redirects you to the Workato login page instead of your organization’s workspace, it is likely that you already have a Workato account associated with the same email. If you have forgotten your login credentials, reset your password.
Verify Activity Audit Log: You can check the Workato activity audit log to confirm the addition of the user:
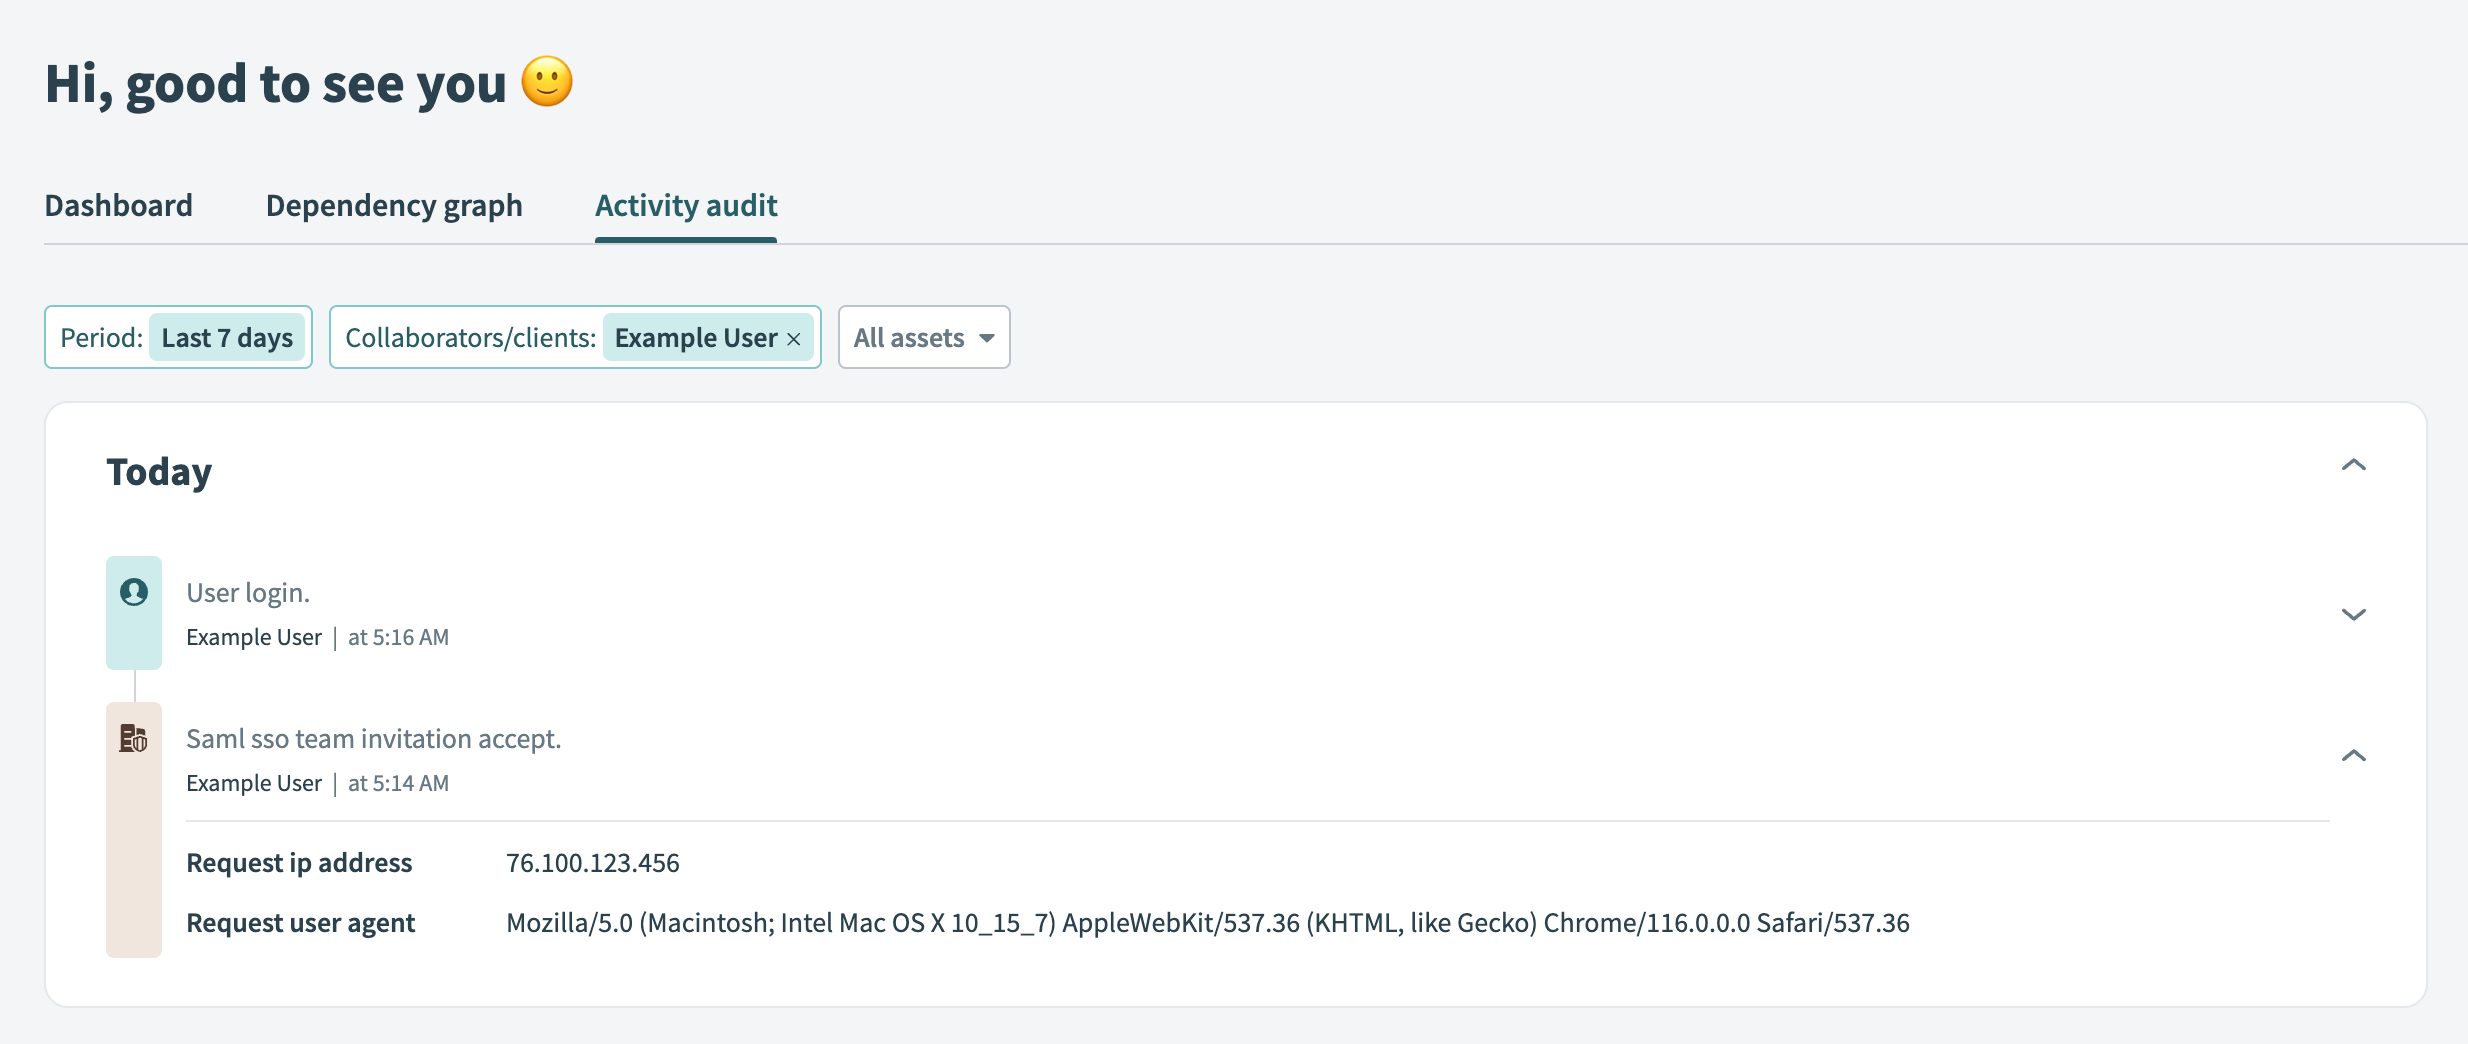 Activity audit log showing that a user has accepted an invitation
# IdP-initiated SSO flow
To execute IdP-initiated flows (accepting SAML Responses directly generated by the IdP), the IdP may provide the team_id as a GET parameter. This allows Workato to identify the workspace the user is trying to access. If Workato does not have the team_id information, the SAML Response is ignored and Workato starts a fresh SP-initiated SSO flow.
So at the IdP, configure the following value:
- ACS URL
- Use the URL for your Workato data center
- US data center:
https://www.workato.com/saml/consume?team_id=TEAMID - EU data center:
https://app.eu.workato.com/saml/consume?team_id=TEAMID - JP data center:
https://app.jp.workato.com/saml/consume?team_id=TEAMID - SG data center:
https://app.sg.workato.com/saml/consume?team_id=TEAMID - AU data center:
https://app.au.workato.com/saml/consume?team_id=TEAMID
Where TEAMID is the Workspace ID configured in Workspace admin > Settings > Authentication & provisioning.
# Disable SSO for select users
In some situations you may need to disable SSO selectively for specific users in your workspace. For example, consider a situation where you must comply with your organization's SSO policies while also granting access to Workato to external users who do not have accounts in your identity provider. In such cases, it is possible to disable SSO for specific users without affecting the SSO settings for the entire workspace.
To disable SSO selectively:
Navigate to Workspace admin > Collaborators.
Click Invite collaborator to invite a new collaborator to your workspace. Alternatively, select an existing collaborator to edit their SSO settings.
Toggle Enable SAML for this collaborator to disable SAML SSO for this user.
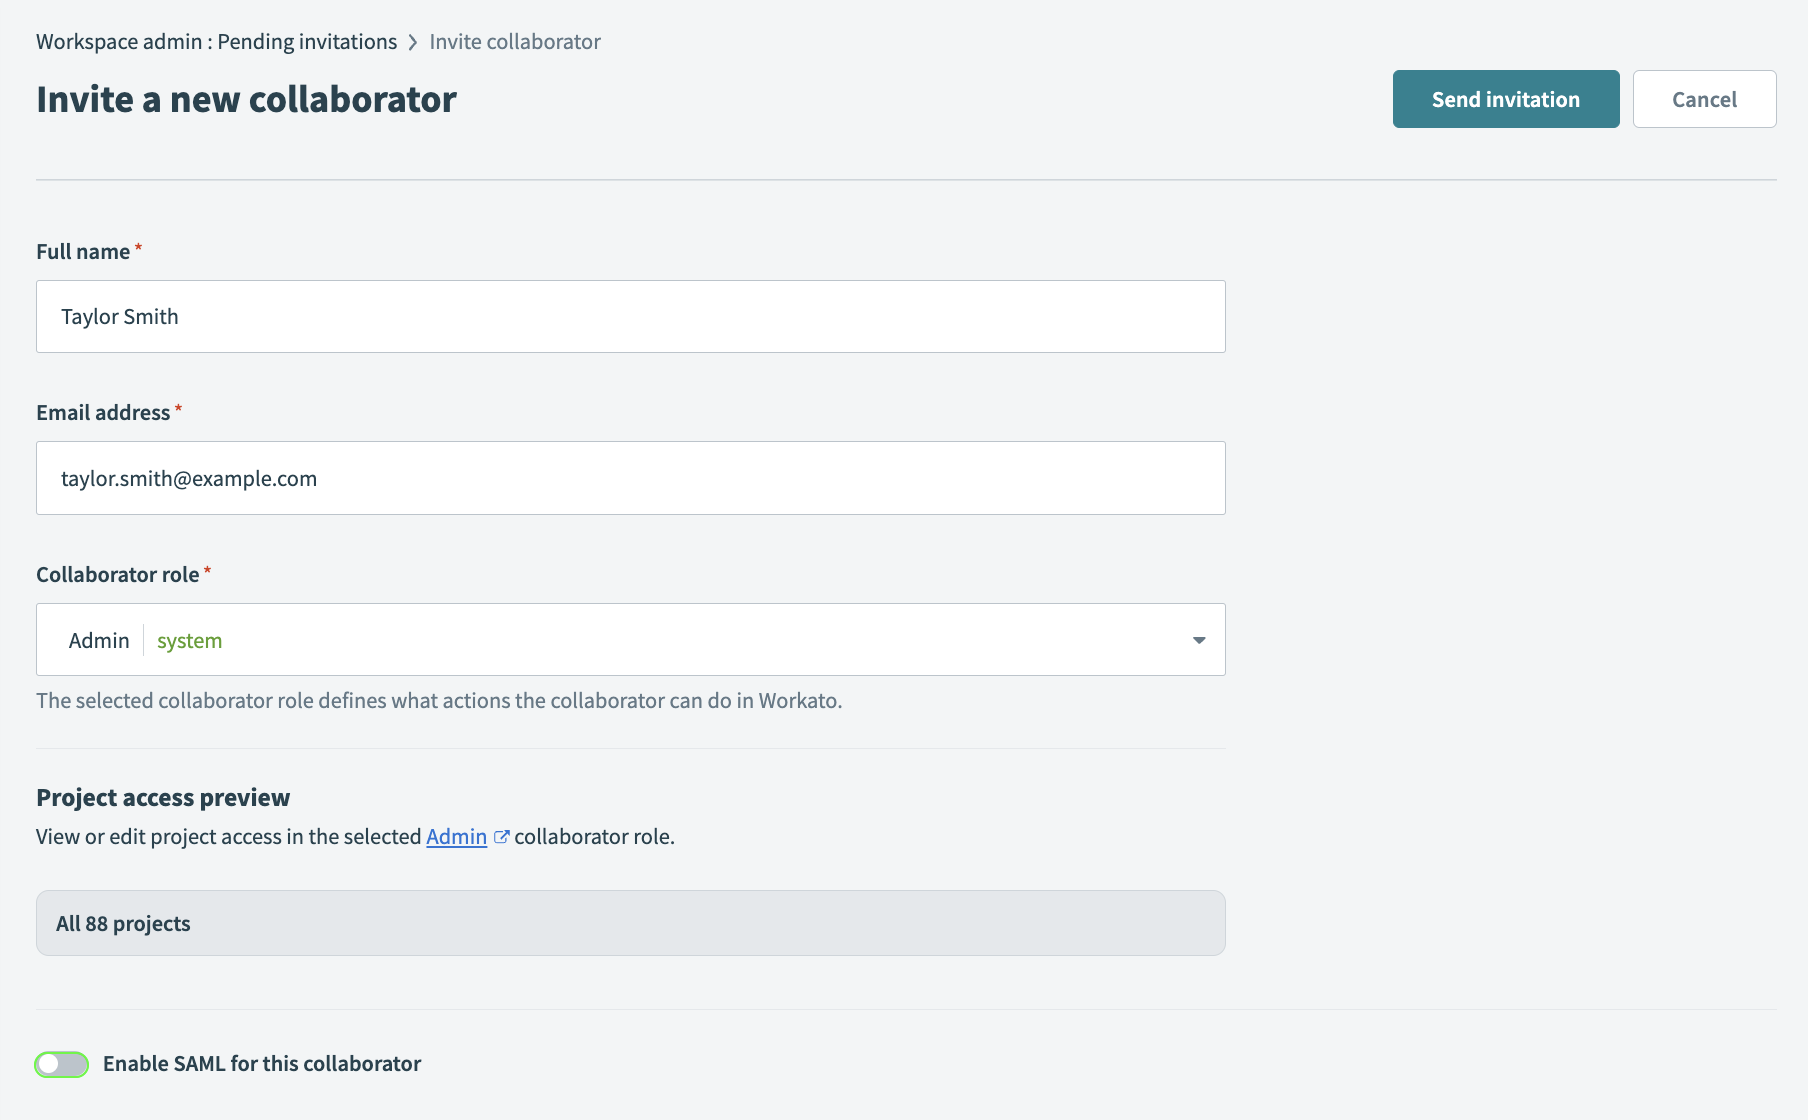 Disable SSO selectively
Click Send invitation or Save changes to save your settings. You can enable SSO for this user at any time by navigating to Workspace admin and adjusting this collaborator's SSO settings.
# Troubleshooting
# "Unable to switch workspace" error message
If you are a workspace account owner and you try to access the workspace by using SAML-based SSO, you will encounter the following error message:
Unable to switch workspace: the user doesn't belong to the workspace
This message means that you cannot authenticate with Workato using SAML-based SSO because you are the workspace account owner. Instead, you must log in to the workspace using your username and password.
Last updated: 3/11/2024, 6:17:04 AM