# Okta SAML role sync configuration
When using Okta as your identity provider, you can sync role configurations both for users and for groups.
Here, we configure role sync for basic Workato environments: DEV (default), PROD, and TEST.
# Prerequisites
- Configure the SAML SSO for your Okta tenant.
- Enable just-in-time provisioning in the Workato UI.
- Enforce SAML SSO for your team or organization.
# Add custom Workato Role attributes to the Workato user profile in Okta
In Okta, navigate to Directory >> Profile Editor >> Workato App >> Create a new user attribute.
Add a new workato_role attribute to the Workato user profile.
Specify the fields of the workato_role interface:
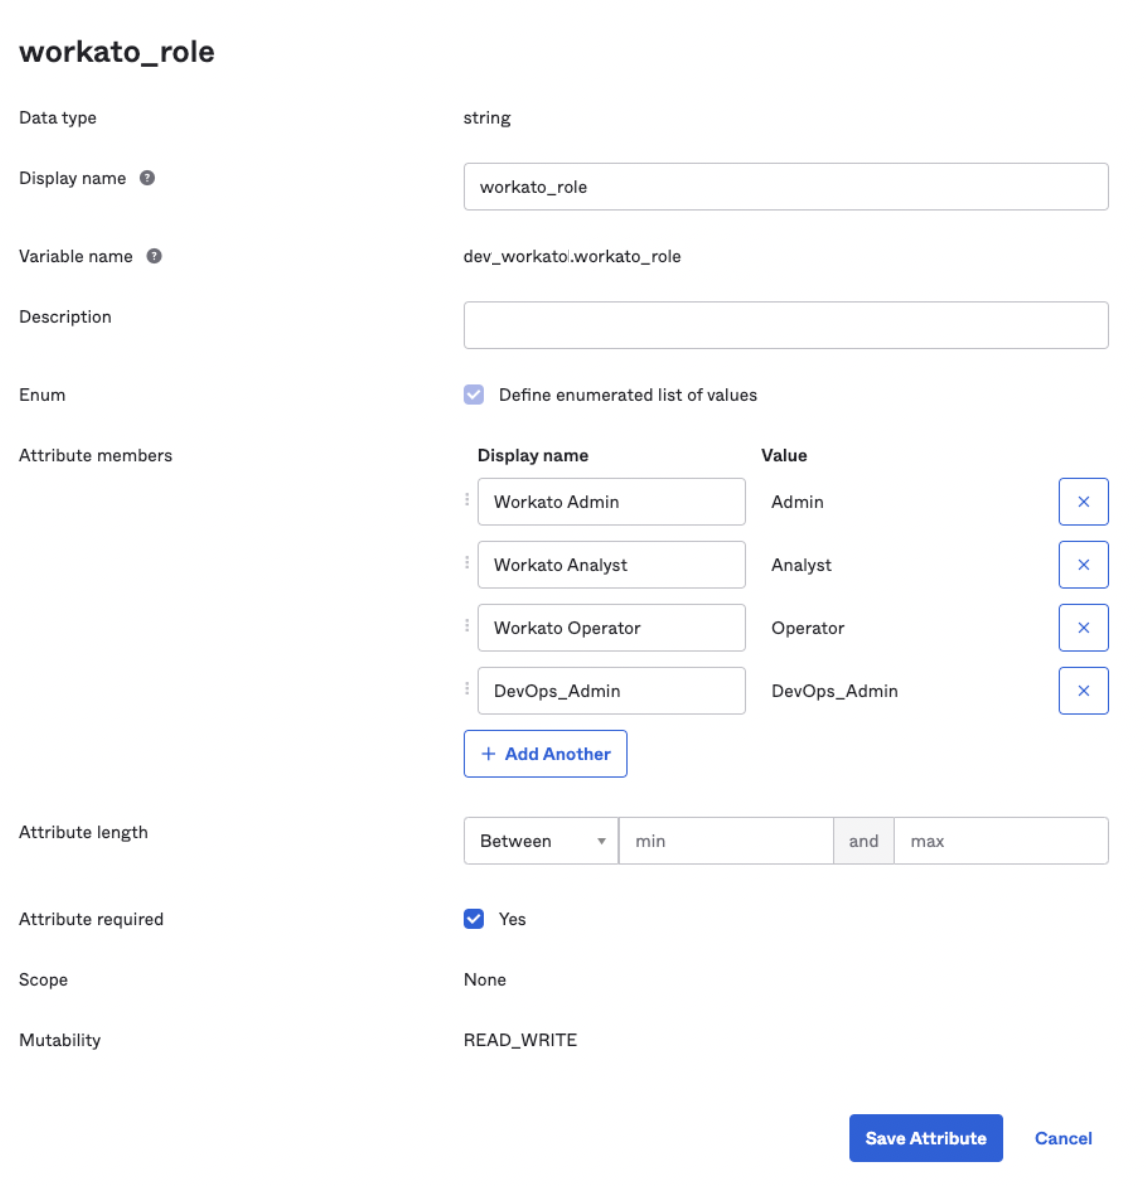 Workato role definition in Okta
- Display name
- The name of the new role; use
workato_role. - Description
- An optional description for the role
- Enum
- Select "Define enumerated list of values".
- Attribute members
- Add the following Display name and Value pairs. You can also add Workato system roles and custom-defined roles here.
- Click + Add Another to add more entries to the list, or click the delete icon on an existing entry to remove it. Note that values are case-sensitive.
- In this example, we are adding a custom role _DevOps_Admin_. You may use additional entries to specify all custom Workato roles in your system.
- Workato Admin
- Admin
- Workato Analyst
- Analyst
- Workato Operator
- Operator
- No Access
- NoAccess
- DevOps_Admin
- DevOps_Admin
- Attribute length
- Define the length parameters of the attribute.
- Attribute required
- Select Yes.
- Scope
- Leave as None.
- Mutability
- Ensure that this value is
READ_WRITE.
Click Save Attribute.
Repeat these steps for all the environments you use in Workato. Be sure to follow the environment naming conventions that we specify.
# Configure environment-specific Workato roles in Okta
If you have the Lifecycle Management add-on enabled in your Workato instance, you have an option of six (6) new configurable role attributes, depending on your environment and business requirements.
Specify multiple Environments by name, with their corresponding SAML Attribute.
- Dev (main)
- workato_role
- Test
- workato_role_test
- Prod
- workato_role_prod
- Sandbox
- workato_role_sandbox
- UAT
- workato_role_UAT
- Stage
- workato_role_stage
- Pre-prod
- workato_role_preprod
# Configure SAML attribute statements
To include workato_role attribute values each time a users signs into Workato through SAML Single Sign On, you must configure the SAML attribute statements.
In Okta, navigate to Application >> Workato >> General >> SAML Settings >> Edit >> Next >> Configure SAML >> Attribute Statement.
Set the values to appuser.workato_role, as demonstrated in this interface:
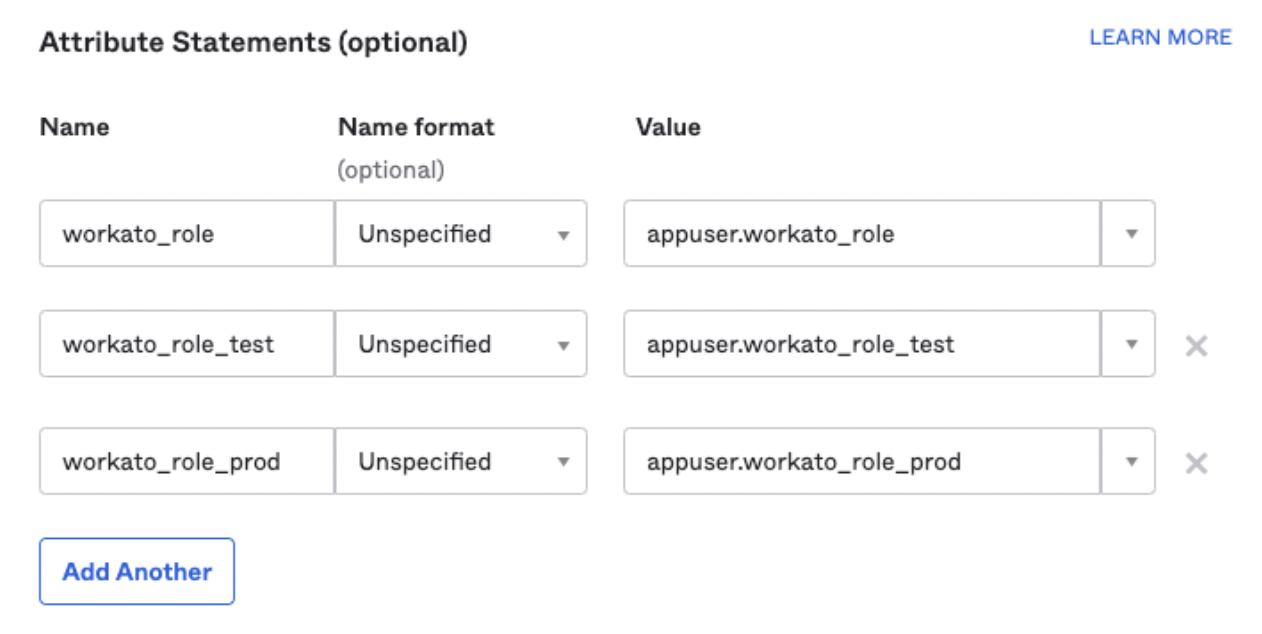 Attribute Statements for workato_role in Okta
Be sure to use the following Name and Value pairs. Note that the Name format field is optional.
- workato_role
- appuser.workato_role
- workato_role_test
- appuser.workato_role_test
- workato_role_prod
- appuser.workato_role_prod
# Assign the application to a user
Follow these steps to assign the Workato application to an individual user:
In Okta, navigate to Directory >> Users >> Select User >> Assign Application >> Workato.
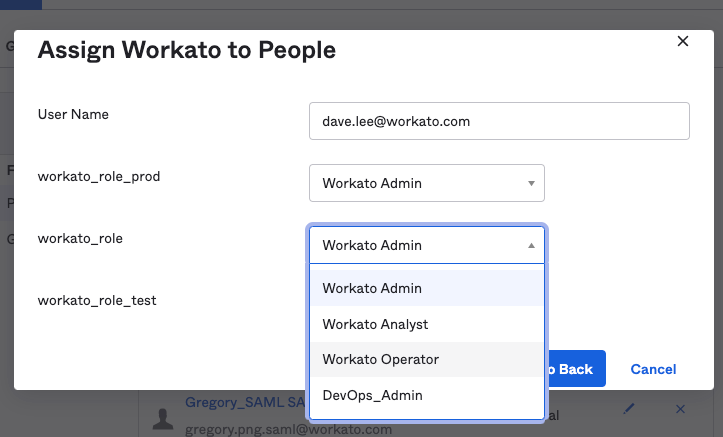 Assign the application to the user
Select the Workato roles to assign to the user:
- User Name
- This is the user's email. It appears in the interface by default.
- workato_role_prod
- Assign the
workato_role_prodfrom the list. We specified these options earlier: Workato Admin, Workato Analyst, Workato Operator, or DevOps_Admin. Note that this role is for the PROD environment. - workato_role
- Specify the
workato_rolefrom the list. Note that this role is for the DEV (default) environment. - workato_role_test
- Specify the
workato_role_testfrom the list. Note that this role is for the TEST environment.
Click Save.
# Update the user role
To update a user's role, edit the user’s current role value by making a new selection from the workato_role list. Then click Save.
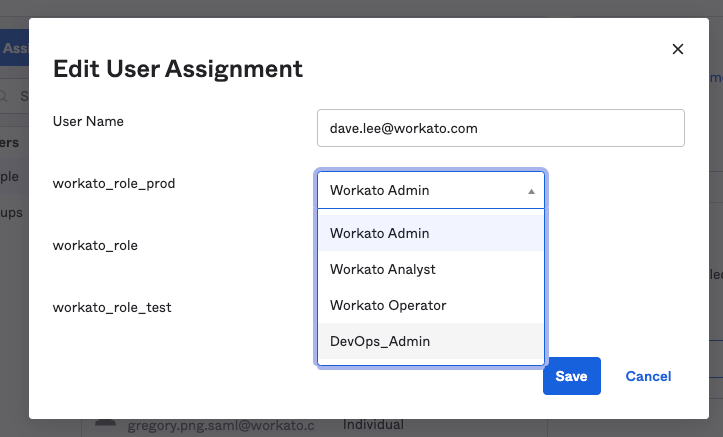 Change the user's role
For example, you can change the workato_role_prod value for the user dave.lee from Workato Admin to a custom DevOps_Admin role.
Undefined roles
If you change a role value of an existing user to a value not defined in Workato, the user retains their existing role.
If using JIT provisioning for a new user, an undefined role value results in the user getting the default Operator role.
# Assign the application to a group
Organizations that manage role assignments through groups can assign Workato roles based on the user’s group membership. Users who are members of multiple groups get role assignment based on group priority. See the Assign attribute group priority (opens new window) article in the Okta help center.
Create a new group for managing users. You may already have a group for this purpose; use that one.
In our example, we are using the group DevOps_Admin.
In Okta, navigate to Directory >> Groups >> select Group >> Applications >> Assign >> select Workato.
During assignment, the system prompts you to specify the workato_role attribute and other environment-specific attributes.
Here, for all members of Workato_DevOps_Admins group to have the custom DevOps_Admin role, we assign the application for roles across the environments: workato_role_prod, workato_role, and workato_role_test.
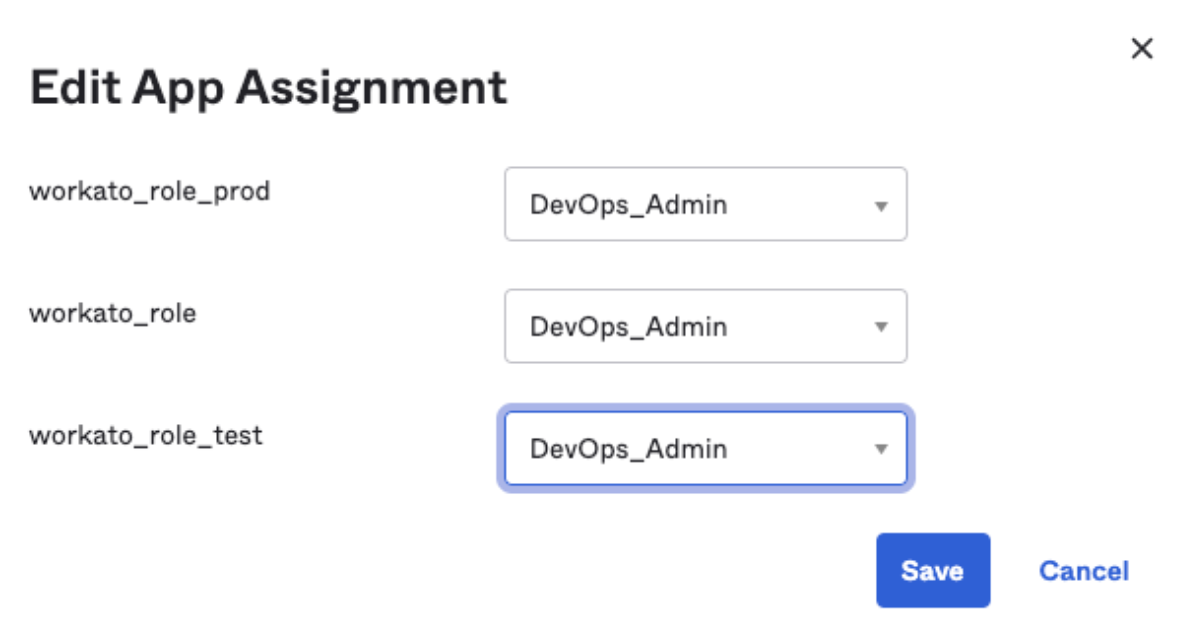 Assign role to group
This assigns all members of the group to the DevOps_Admin role, in all three (3) environments.
Add users to the new (or the existing) group.
To change from user-level role management to group-level role management, you must convert existing user assignments to group assignments.
Navigate to the Applications >> Workato >> Assignments and select Convert Assignmentss.
Search for the user by name, and check the user assignment to verify that they are now managed by a group.
If the user is not managed by a group, and they are eligible for conversion to a group assignment, click Convert selected.
Here, our user dave.lee@workato.com can be managed by Workato_DevOps_Admin group.
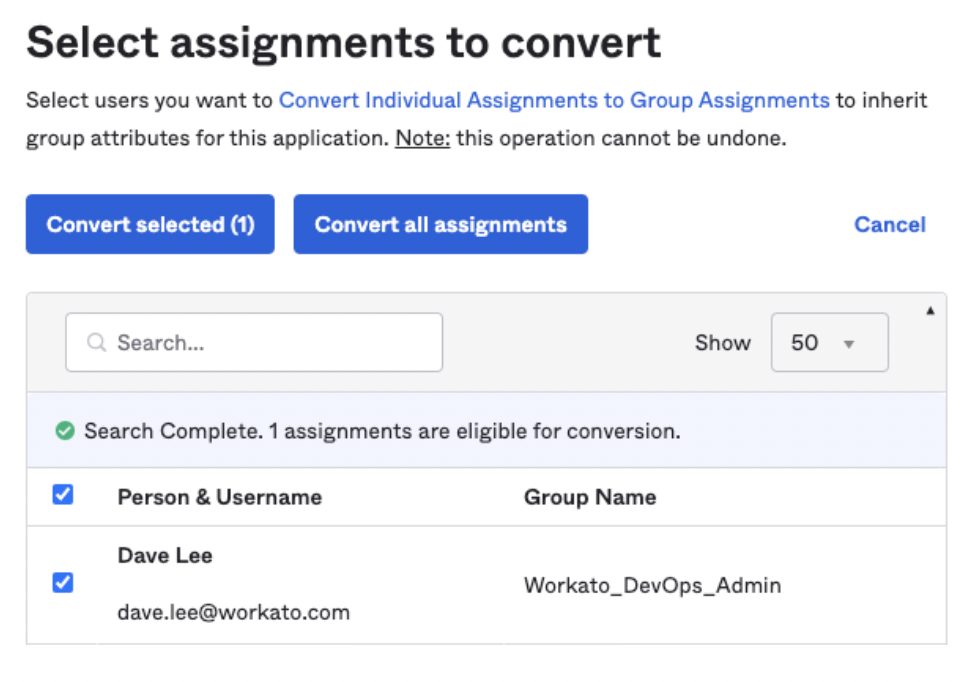 Converting individual user assignments to group assignments
Alternatively, you can Convert all assignments.
To confirm that the user has the correct group assignments, check the Edit User Assignment interface.
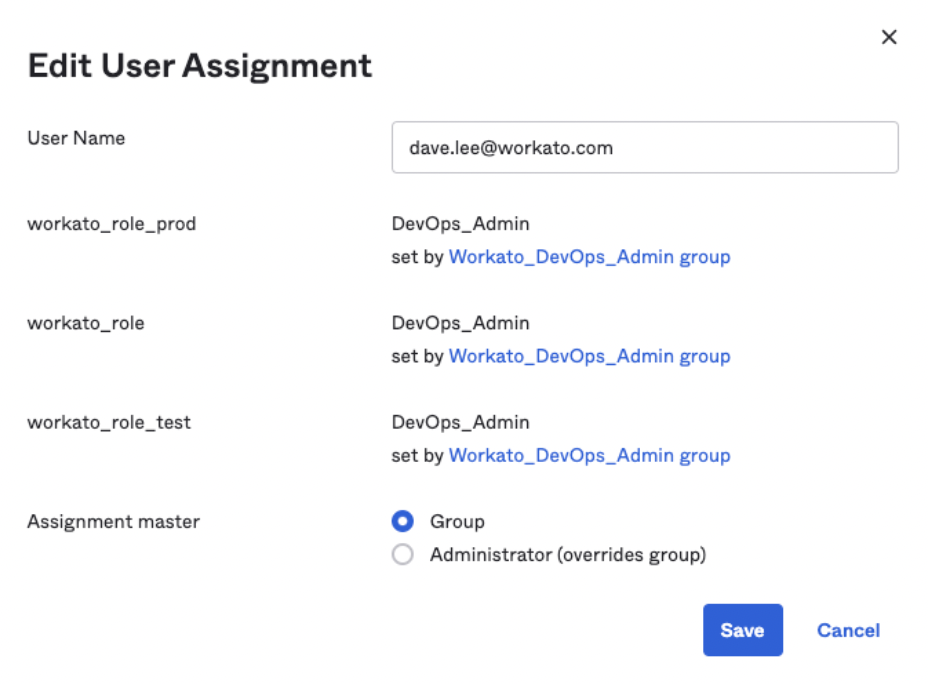 Verifying app assignment management through Groups
# Remove environment access
To remove access to a specific environment that you specified earlier, as we did in the section Set-up environment-specific Workato user role sync, change the user's role for any environment attribute to “NoAccess”.
For example, you can restrict access to the production environment by setting the workato_role_prod attribute to NoAccess.
# Verify role changes
If your organization uses Workato's Activity Audit Logs add-on, you can verify the automatic role sync when the user logs in through SAML SSO.
Role changes triggered by SAML assertions appear under the Source attribute, with the value saml_auto_sync.
Manual role changes made in Workato UI appear have the value user.
You can also see the New Role and Previous Role values.
 SAML roles sync activity audit log
Last updated: 6/9/2023, 11:31:10 PM