# SDK Reference - actions
This section enumerates all the possible keys to define an action.
Quick Overview
The actions key can only be used in both recipes and the debugger console after you have created a successful connection. Actions receive data from earlier steps in a recipe via datapills, send a request to an endpoint and present the response as datapills.
# Structure
    actions: {

      [Unique_action_name]: {
        title: String,

        subtitle: String,

        description: lambda do |input, picklist_label|
          String
        end,

        help: lambda do |input, picklist_label|
          Hash
        end,

        display_priority: Integer,

        batch: Boolean,

        bulk: Boolean,

        deprecated: Boolean,

        config_fields: Array

        input_fields: lambda do |object_definitions, connection, config_fields|
          Array
        end,

        execute: lambda do |connection, input, extended_input_schema, extended_output_schema, continue|
          Hash
        end,

        output_fields: lambda do |object_definitions, connection, config_fields|
          Array
        end,

        sample_output: lambda do |connection, input|
          Hash
        end,

        retry_on_response: Array,

        retry_on_request: Array,

        max_retries: Int,

        summarize_input: Array,

        summarize_output: Array
      },

      [Another_unique_action_name]: {
        ...
      }
    },
# title
| Attribute | Description |
|---|---|
| Key | title |
| Type | String |
| Required | Optional. Defaults to title built from labeled key. |
| Description | This allows you to define the title of your action, which might differ from the name of the key assigned to it - Key = search_object_query, title = "Search object via query" |
| Expected Output | String i.e. "Search object via query" |
| UI reference | 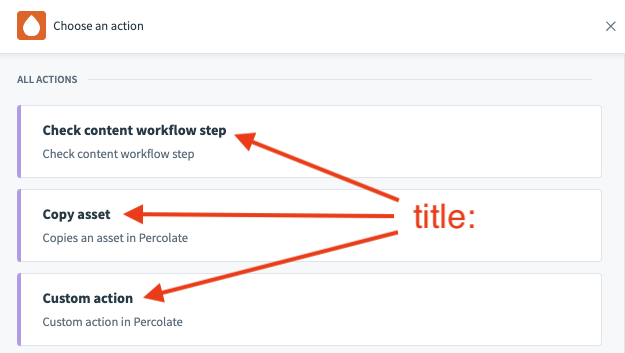 |
TIP
In Workato, we generally advise the following structure "[Verb] [Object]" - "Create lead" or "Search object" rather than "Lead created".
# subtitle
| Attribute | Description |
|---|---|
| Key | subtitle |
| Type | String |
| Required | Optional. Defaults to subtitle inferred from connector name and action title. |
| Description | This allows you to define the subtitle of your action. |
| Expected Output | String i.e. "Use complex queries to search objects in Percolate" |
| UI reference | 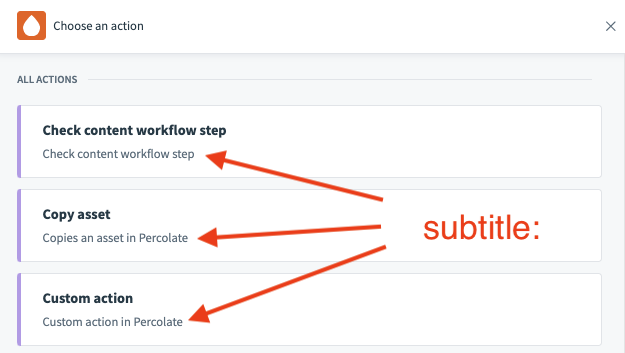 |
TIP
To make your subtitles meaningful, try to provide more information in here whilst keeping your titles concise. For example, your title could be "Create object" whereas your subtitle could be "Create objects like leads, customers, and accounts in Salesforce." When users search for a specific action, Workato also searches for matches in the subtitle.
# description
| Attribute | Description |
|---|---|
| Key | description |
| Type | lambda function |
| Required | Optional. Defaults to description inferred from connector name and action title. |
| Description | This allows you to define the description of your action when viewed in the recipe editor. This can be a static description or a dynamic one based on your needs. |
| Possible Arguments | input - Hash representing user given inputs defined in input_fields picklist_label - Only applicable for picklists where a user's answer consist of both a picklist label and value. This Hash represents the label for a user's given inputs for picklist fields. See below for use cases. |
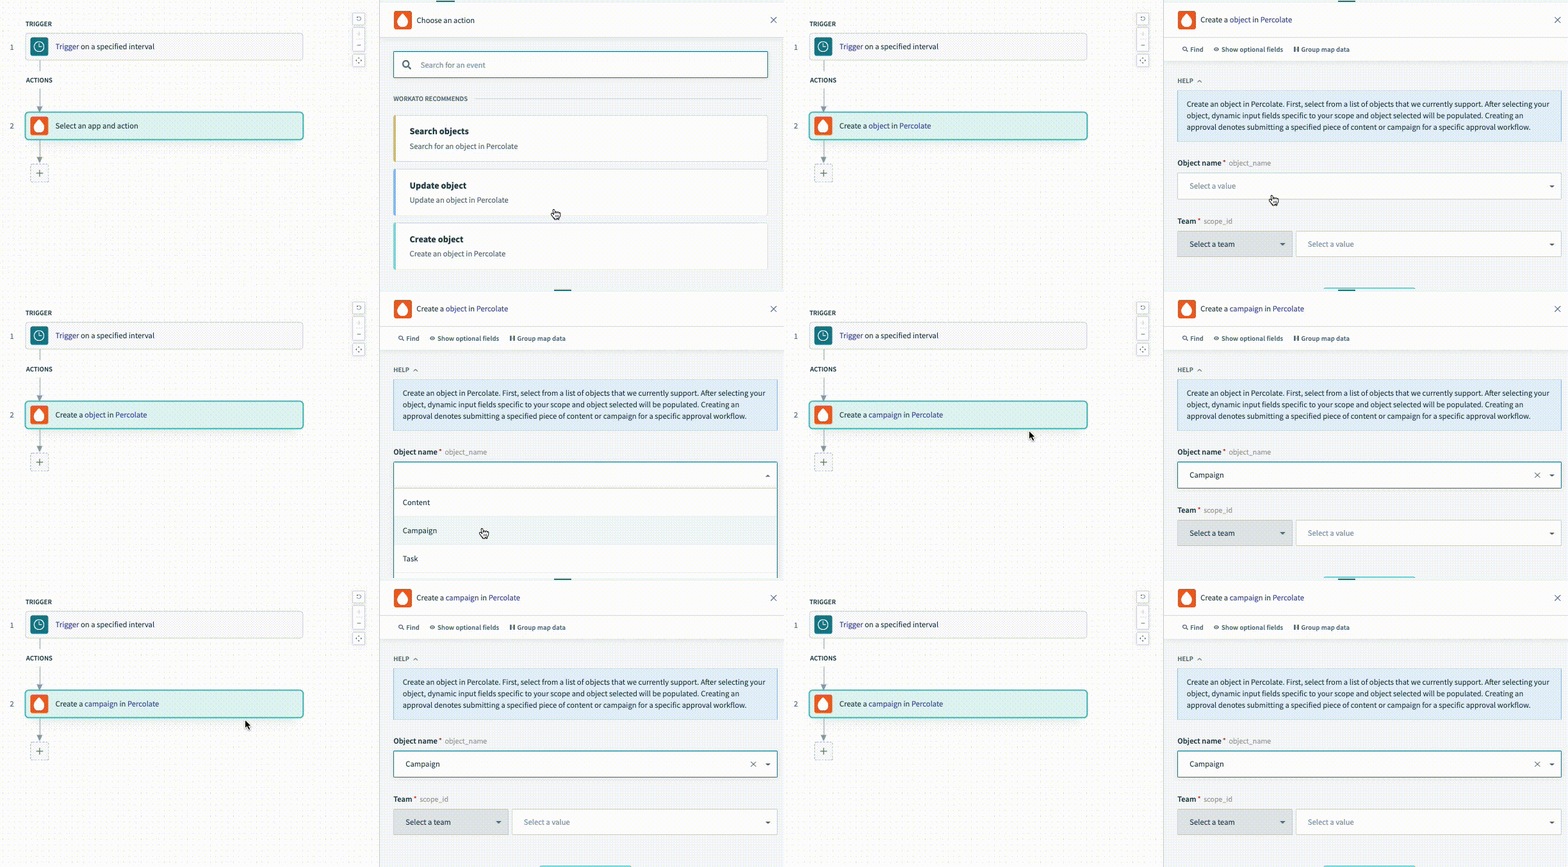
| Expected Output | String i.e. "Create a <span class='provider'>campaign</span> in <span class='provider'>Percolate</span>" Add the <span> HTML tags to add weight to your description text. |
| UI reference |
Example - description:
For the description lambda function, you have access to two arguments to make your descriptions dynamic. This is useful when you want to change your description based on how a given user has configured the action. These changes can be incredibly useful for your users to ensure they know what this action is doing without having to click and view the action's configuration to understand what it does.
    create_object: {
      description: lambda do |input, picklist_label|
        "Create a <span class='provider'>#{picklist_label['object'] || 'object'}</span> in " \
        "<span class='provider'>Percolate</span>"
      end,

      config_fields: [
        {
          name: 'object',
          control_type: 'select',
          pick_list: 'object_types',
          optional: false
        }
      ]

      # More keys to define the action
    }
In the example above, this action is a generic object action. What this means is that the action is made to allow the user to create multiple types of objects which the user will select later on when he configures the recipe. This is done by the user selecting what object they wants to create. Since we want the description to change to what object he wants to have selected, the description can be changed to the object selected by referencing the picklist_label argument.
# help
| Attribute | Description |
|---|---|
| Key | help |
| Type | lambda function |
| Required | Optional. No help is displayed otherwise. |
| Description | The help text that is meant to guide your users as to how to configure this action. You can also point them to documentation. |
| Possible Arguments | input - Hash representing user given inputs defined in input_fields picklist_label - Only applicable for picklists where a user's answer consist of both a picklist label and value. This Hash represents the label for a user's given inputs for picklist fields. See below for use cases. |
| Expected Output | Hash or String See below for examples. |
| UI reference |
Example - help:
The output of the help lambda function can either be a simple String or a Hash. Below we go through the two examples:
- String
    help: lambda do |input, picklist_label|
      'Create an object in Percolate. First, select from a list of ' \
      'objects that we currently support. After selecting your object,' \
      ' dynamic input fields specific to your scope and object selected ' \
      'will be populated.' \
      ' Creating an approval denotes submitting a specified piece of content' \
      ' or campaign for a specific approval workflow.'
    end,
- Hash
    help: lambda do |input, picklist_label|
      {
        body: "First, filter by the object you want then fill up the input fields " \
        "which appear based on the object you have selected. Amongst other things, " \
        "you’ll be able to search for contacts in your company and cloud recordings from the past. ",
        learn_more_url: "https://docs.workato.com/connectors/zoom/event-actions.html#search-event-details",
        learn_more_text: "Learn more"
      }
    end,

# display_priority
| Attribute | Description |
|---|---|
| Key | display_priority |
| Type | Integer |
| Required | Optional. Defaults to zero, otherwise to the alphabetical ordering of actions titles. |
| Description | This allows you to influence the ordering of the action in the recipe editor so that you can highlight top actions. The higher the integer, the higher the priority. If two actions have the same priority, they are ordered by their titles. |
# batch
| Attribute | Description |
|---|---|
| Key | batch |
| Type | Boolean |
| Required | Optional. |
| Description | This presents a "Batch" tag next to your action to indicate that this action works with multiple records. Normally used in batch triggers or batch create/update/upsert actions where users can pass a list of records. |
| UI reference |
# bulk
| Attribute | Description |
|---|---|
| Key | bulk |
| Type | Boolean |
| Required | Optional. |
| Description | This presents a "Bulk" tag next to your action to indicate that this action works with a large flat file of records. Normally used bulk create/update/upsert actions where users pass a CSV of records. |
| UI reference |  |
# deprecated
| Attribute | Description |
|---|---|
| Key | deprecated |
| Type | Boolean |
| Required | Optional. |
| Description | This presents a "deprecated" tag next to your action to indicate that this action has been deprecated. Recipes which used to use this action will continue to work but future recipes will not be able to search and select this action. |
| UI reference |  |
TIP
Deprecation is a great way to move users to new actions when changes are not backwards compatible. This gives you more freedom to make your actions more usable or cater for upcoming API changes.
# config_fields
| Attribute | Description |
|---|---|
| Key | config_fields |
| Type | Array |
| Required | Optional. |
| Description | This key accepts an array of hashes which show up as input fields shown to a user. Config fields are shown to a user before input fields are rendered and can be used to alter what set of input fields are shown to an end user. This is often used in generic object actions where config fields prompt a user to select the object and input fields are rendered based on that selection. To know more about how to define config fields in Workato, click here. |
| Expected Output | Array of hashes. Each hash in this array corresponds to a separate config field. |
| UI reference | 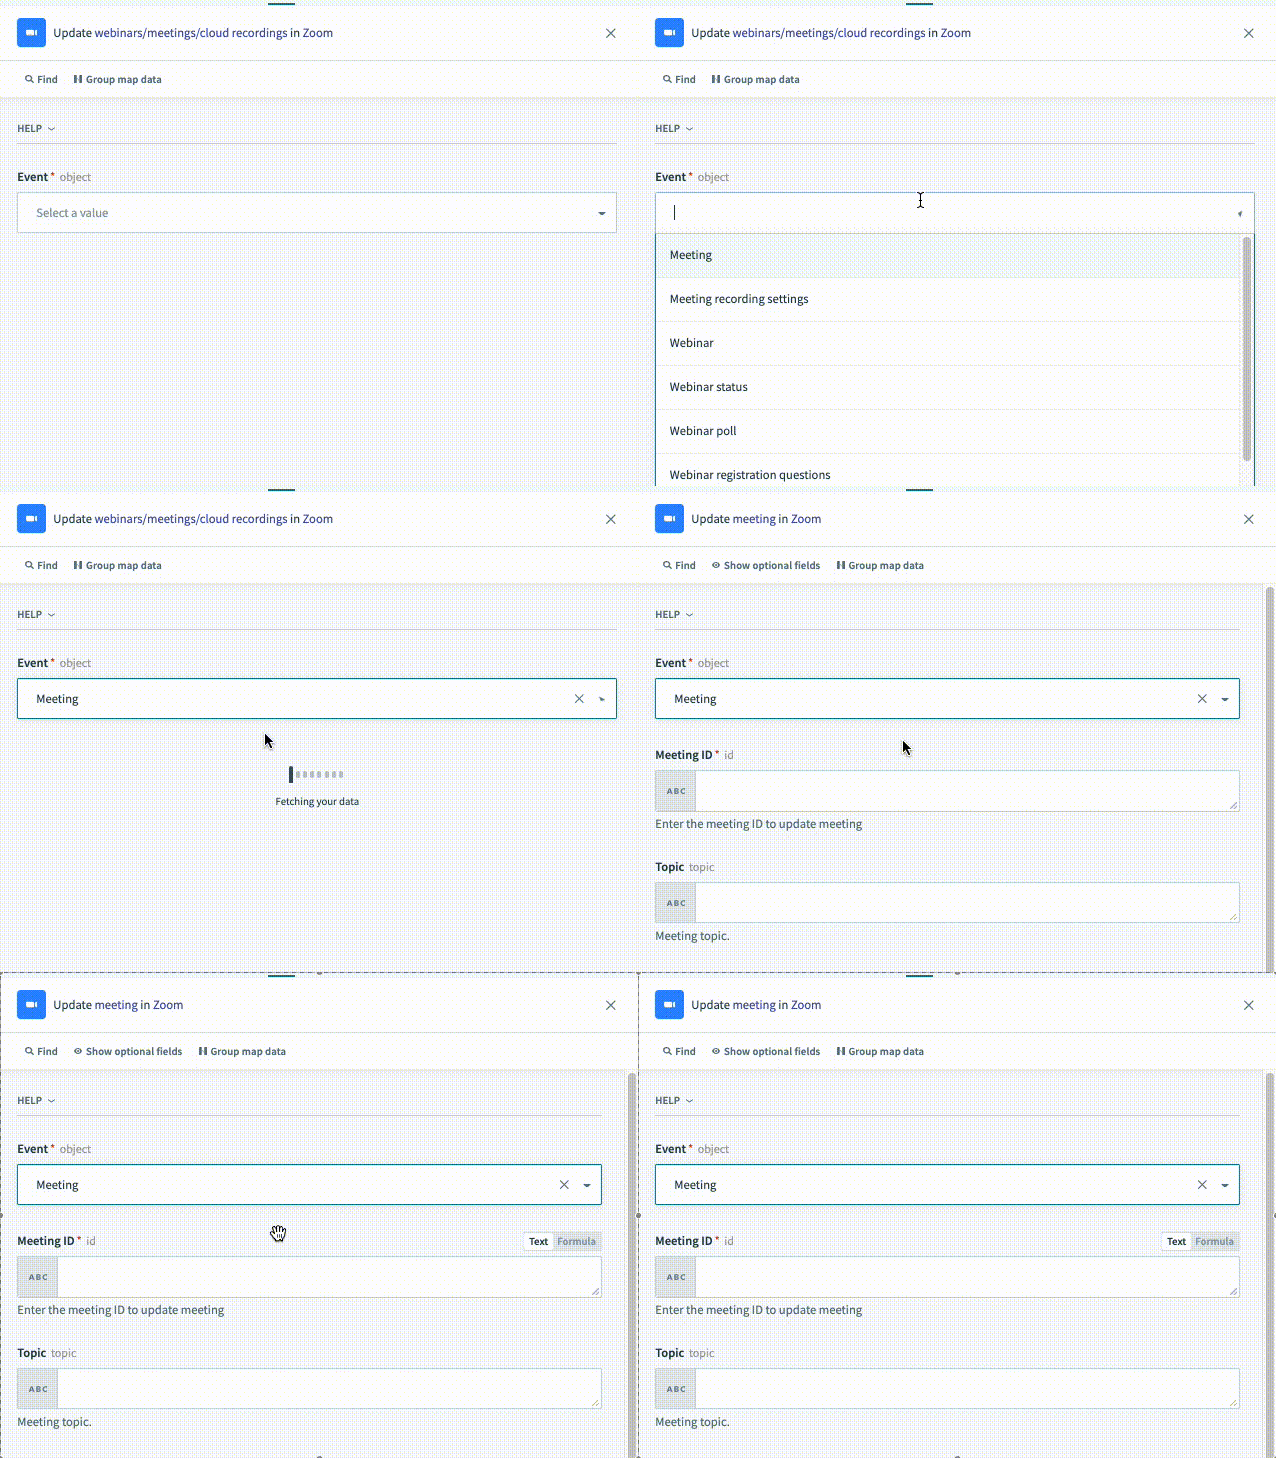 |
TIP
Config fields are powerful tools to introduce dynamic behavior to your actions. Use them to make your connector easier to use and discover new features. In the example gif above, you can see that the input "Event" actually causes more input fields to render. These input fields are rendered based on the selection of the value "Meeting".
# input_fields
| Attribute | Description |
|---|---|
| Key | input_fields |
| Type | lambda function |
| Required | True |
| Description | This lambda function allows you to define what input fields should be shown to a user configuring this action in the recipe editor. Output of this lambda function should be an array of hashes, where each hash in this array corresponds to a separate input field. To know more about how to define input fields in Workato, click here. |
| Possible Arguments | object_definitions - Allows you to reference an object definitions. Object definitions are stores of these arrays hashes which may be used to represent both input fields or output fields (datapills). These can be referenced by any action or trigger. connection - Hash representing user given inputs defined in connection. config_fields - Hash representing user given inputs defined in config_fields, if applicable. |
| Expected Output | Array of hashes. Each hash in this array corresponds to a separate input field. |
| UI reference | 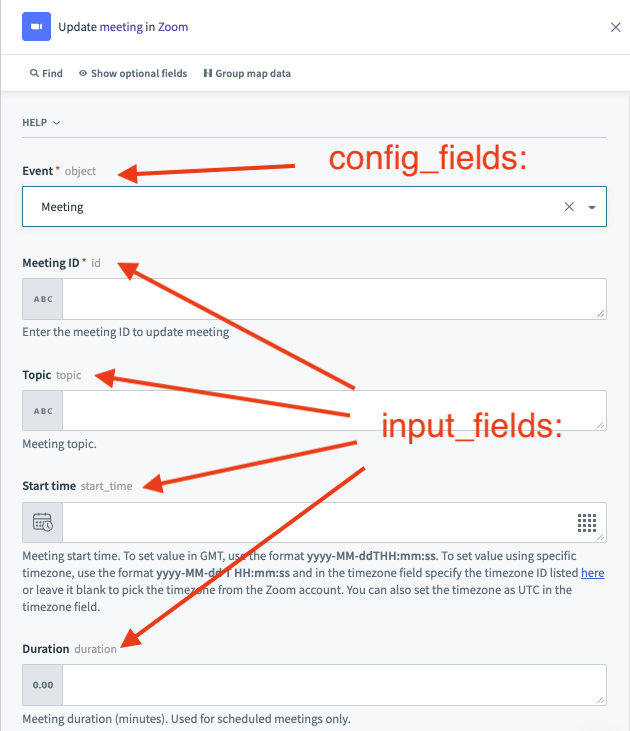 |
# execute
| Attribute | Description |
|---|---|
| Key | execute |
| Type | lambda function |
| Required | True |
| Description | This lambda function allows you to define what this action does with the inputs that have been passed to it from an end user. These inputs may be static values or datapills from upstream actions or the trigger. These are then used to send a HTTP request to retrieve data that can be presented as datapills. Optionally, you can also use the execute lambda function to do any pre-processing of input data before sending it as a request and post-processing of response data before passing it out as datapills. |
| Possible Arguments | connection - Hash representing user given inputs defined in Connection input - Hash representing user given inputs defined in input_fields extended_input_schema - See below for examples. extended_output_schema - See below for examples continue - Hash representing cursor from the previous invocation of execute. OPTIONAL and used for asynchronous actions. See below for examples. |
| Expected Output | Hash representing the data to be mapped to the output datapills of this action. |
Example - execute: - extended_input_schema and extended_output_schema
Extended input and output schema is any schema from object_definitions that is used in your action. This information is often useful when you dynamically generate schema and you want to use it to do data pre- or post-processing. These arguments do not include config_fields.
For example, you may use extended_input_schema to know which inputs are datetimes and should be transformed to Epoch time which is accepted by the target API. In the same fashion, you may use extended_output_schema to take the response and transform Epoch variables into ISO8601 datetimes again.
    create_object: {
      description: lambda do |input, picklist_label|
        "Create a <span class='provider'>#{picklist_label['object'] || 'object'}</span> in " \
        "<span class='provider'>Percolate</span>"
      end,

      config_fields: [
        {
          name: 'object',
          control_type: 'select',
          pick_list: 'object_types',
          optional: false
        }
      ],

      input_fields: lambda do |object_definitions, connection, config_fields|
        object = config_fields['object']
        object_definitions[object].ignored('id')
      end,

     execute: lambda do |connection, input, extended_input_schema, extended_output_schema|
       puts extended_input_schema
       # [
       #   {
       #     "type": "string",
       #     "name": "status",
       #     "control_type": "select",
       #     "label": "Status",
       #     "hint": "Status is required for creating Content",
       #     "pick_list": "post_statuses",
       #     "optional": false
       #   },
       #   ...
       # ]

       puts extended_output_schema
       # [
       #   {
       #     "type": "string",
       #     "name": "id",
       #     "control_type": "text",
       #     "label": "Content ID",
       #     "hint": "The Content ID, Example: <b>post:45565410</b>.",
       #     "optional": true
       #   },
       #   {
       #     "type": "string",
       #     "name": "status",
       #     "control_type": "select",
       #     "label": "Status",
       #     "hint": "Status is required for creating Content",
       #     "pick_list": "post_statuses",
       #     "optional": false
       #   },
       #   ...
       # ]
     end,

     output_fields: lambda do |object_definitions, connection, config_fields|
       object = config_fields['object']
       object_definitions[object]
      end,
    }
Example - execute: - continue
When working with asynchronous APIs to kickstart a long running job or process in a target application, often times you'll send a request and expect an ID that corresponds to that job or process. Your action would then want to constantly check back with the API to see if the job is completed before retrieving results or moving on to the next step in the recipe.
For example, when you send a request to Google BigQuery to start a query, Google BigQuery might send you back the job ID. Your task would be to now regularly check back with Google BigQuery to see if the query is completed before retrieving the rows.
Rather than having the user configure this logic in the recipe, you can now embed this entire logic into a single action with "multi-step" actions on your custom connector. To use "multi-step" actions, the continue argument is used in conjunction with a dedicated method called reinvoke_after. Below, we go through some examples of what the continue argument might be.
To learn more about creating your "multistep" actions, read our guide here.
    multistep_action_sample: {
      input_fields: lambda do |object_definitions, connection, config_fields|

      end,

     execute: lambda do |connection, input, e_i_s, e_o_s, continue|

      if !continue.present? #continue is nil on the first invocation of the execute
        puts continue
        # nil
        reinvoke_after(seconds: 100, continue: { current_step: 1 })
      elsif continue['current_step'] == 1 #first reinvocation
        puts continue
        # {
        #   "current_step": 1
        # }
        reinvoke_after(seconds: 100, continue: { current_step: continue['current_step'] + 1 })
      else
        puts continue
        # {
        #   "current_step": 2
        # }
      end

     end,

     output_fields: lambda do |object_definitions, connection, config_fields|

      end,
    }
# before_suspend
| Attribute | Description |
|---|---|
| Key | before_suspend |
| Type | lambda function |
| Required | False |
| Description | This lambda function is exclusive to Wait for resume actions. It is invoked after the suspend method is called in the execute lambda. It allows you to define an authenticated API request based on the apply to an external system to register a callback to resume the job. |
| Possible arguments |
|
| Expected output | N/A |
# before_resume
| Attribute | Description |
|---|---|
| Key | before_resume |
| Type | lambda function |
| Required | False |
| Description | This lambda function is exclusive to Wait for resume actions. It is invoked after the external system has dispatched the API request to resume the job. It enables you to control the state of the continue hash, which is transmitted back to the execute lambda when the job resumes. Additionally, it grants access to the data value in the API request. |
| Possible arguments |
|
| Expected output | N/A However, the lambda allows you to edit the value of the continue hash. |
Example- Edit the value of the continue hash
This example demonstrates how to edit the value of the continue hash.
If the continue method passed from the suspend method is:
{
  "state": "suspended",
  "job_id": "abc_123"
}
and the before_resume lambda is:
before_resume: lambda do |data, input, continue|
  if continue["state"] == "suspended"
    continue["state"] = "resumed"
    continue["payload"] = "important data"
  else
    { "result" => "Unexpected state" }
  end
end,
Then the continue argument passed to the execute lambda looks like this:
{
  "state": "resumed",
  "job_id": "abc_123",
  "payload": "important data"
}
# before_timeout_resume
| Attribute | Description |
|---|---|
| Key | before_timeout_resume |
| Type | lambda function |
| Required | False |
| Description | This lambda function is exclusive to Wait for resume actions. It is invoked when the expires_at time has passed and Workato has not received an API request to resume the job. It allows you to manage the state of the continue hash which is passed back to the execute lambda when the job resumes. |
| Possible arguments |
|
| Expected output | N/A However, the lambda allows you to edit the value of the continue hash. Refer to the before_resume example to learn more. |
# output_fields
| Attribute | Description |
|---|---|
| Key | output_fields |
| Type | lambda function |
| Required | True |
| Description | This lambda function allows you to define what output fields (datapills) should be shown to a user configuring this action in the recipe editor. The output of this lambda function should be an array of hashes, where each hash in this array corresponds to a separate output field (datapill). To know more about how to define input fields in Workato, click here. |
| Possible Arguments | object_definitions - Allows you to reference an object definitions. Object definitions are stores of these arrays which can represent either input and output fields. These can be referenced by any action or trigger. connection - Hash representing user given inputs defined in connection. config_fields - Hash representing user given inputs defined in config_fields, if applicable. |
| Expected Output | Array of hashes. Each hash in this array corresponds to a separate input field. |
| UI reference | 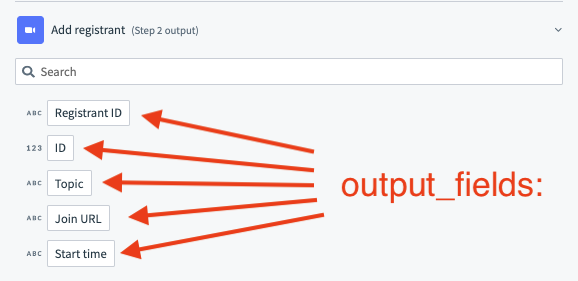 |
Example - output_fields:
Output fields relate directly to the datapills that users see in the recipe editor. The definition of these output fields are mapped to the output of the execute lambda function which is a hash.
    create_object: {
     execute: lambda do |connection, input, extended_input_schema, extended_output_schema|
       post("/object/create", input)
       # JSON response passed out of the execute: lambda function.
       #  {
       #    "id": 142414,
       #    "title": "Newly created object",
       #    "description": "This was created via an API"
       #  }
     end,

     output_fields: lambda do |object_definitions, connection, config_fields|
       [
         {
           name: "id",
           type: "integer"
         },
         {
           name: "title",
           type: "string"
         },
         {
           name: "description",
           type: "string"
         }
       ]
      end,
    }
# sample_output
| Attribute | Description |
|---|---|
| Key | sample_output |
| Type | lambda function |
| Required | False. |
| Description | This lambda function allows you to define a sample output that is displayed next to your output fields (datapills). |
| Possible Arguments | connection - Hash representing user given inputs defined in connection. input - Hash representing user given inputs defined in input_fields |
| Expected Output | Hash. This hash should be a stubbed output of the execute lambda function. |
| UI reference | 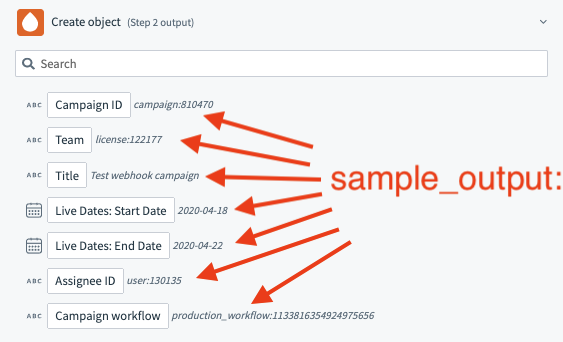 |
# retry_on_response
| Attribute | Description |
|---|---|
| Key | retry_on_response |
| Type | Array |
| Required | False. |
| Description | Used in conjunction with retry_on_request: and max_retries: Use this declaration to implement a retry mechanism for certain HTTP methods and responses. This guards against APIs which may sometime return errors due to server failure such as 500 Internal Server Error codes. When supplying this array, we will accept what error codes to retry on as well as entire string or regex expressions. In cases where no error code is defined, Workato will only search the message body for any given regex or plain string IF the error codes fall under a default list of codes: (429, 500, 502, 503, 504, 507). When supplying an entire string instead of regex, this will give only retry if the entire response matches exactly. If entire strings or regex match and error codes are defined, both the error codes and strings must match for retries to be triggered |
| Expected Output | Array. For example, [500] or [500,/error/] or [‘“error”’, 500] |
# retry_on_request
| Attribute | Description |
|---|---|
| Key | retry_on_request |
| Type | Array |
| Required | False. |
| Description | Used in conjunction with retry_on_request: and max_retries: Use this declaration to implement a retry mechanism for certain HTTP methods and responses. This guards against APIs which may sometime return errors due to server failure such as 500 Internal Server Error codes. Optional. When not defined, it defaults to only “GET” and “HEAD” HTTP requests. |
| Expected Output | Array. For example, [“GET”] or [“GET”, “HEAD”] |
# max_retries
| Attribute | Description |
|---|---|
| Key | max_retries |
| Type | Int |
| Required | False. |
| Description | Used in conjunction with retry_on_request: and max_retries: Use this declaration to implement a retry mechanism for certain HTTP methods and responses. This guards against APIs which may sometime return errors due to server failure such as 500 Internal Server Error codes. The number of retries. A maximum of 3 allowed. If more than 3, action retries 3 times. Workato waits 5 seconds for the first retry and increases the interval by 5 seconds for each subsequent retry. |
| Expected Output | Int. For example, 1 or 2 |
TIP
- We recommend using only one HTTP method per action if possible
- Multiple GET requests within a single action are also possible
- Since we retry on an action level, actions should be defined to only at most only one POST request. This guards against cases where the first post request succeeds and the second post request fails.
Example - Implementing the retry mechanism
Retrying an API request is very useful in ensuring that your actions (and recipes) are tolerant to any inconsistencies in the target App. To implement this, you will need to use a combination of the retry_on_response:, retry_on_request: and max_retries: keys.
    actions: {
      custom_http: {
        input_fields: lambda do |object_definitions|
          [{ name: 'url', optional: false }]
        end,

        execute: lambda do |_connection, input|
          {
            results: get(input['url'])
          }
        end,

        output_fields: lambda do |object_definitions|
          []
        end,

        retry_on_response: [500, /error/] # contains error codes and error message match rules

        retry_on_request: ["GET", "HEAD"],

        max_retries: 3
      }
    }
# summarize_input
| Attribute | Description |
|---|---|
| Key | summarize_input |
| Type | Array |
| Required | False. |
| Description | Use this to summarize your input which contain long lists. Summarizing your input is important to keep the jobs page lightweight so it can load quickly. In general, when your input has lists that are longer than 100 lines, they should be summarized. |
| Expected Output | Array. For example, ['leads'] or ['report.records', 'report.description'] |
# summarize_output
| Attribute | Description |
|---|---|
| Key | summarize_output |
| Type | Array |
| Required | False. |
| Description | Use this to summarize your actions output which contain long lists. Summarizing your output is important to keep the jobs page lightweight so it can load quickly. In general, when your output has lists that are longer than 100 lines, they should be summarized. |
| Expected Output | Array. For example, ['leads'] or ['report.records', 'report.description'] |
| UI reference |  |
Example - Summarizing inputs and outputs in job data
When working with large arrays or data, Workato tries to show all the data in the input and output tabs of the job for each action. Sometimes, this can get confusing when we are working with a large numbers of records or large strings. You can use the summarize_input and summarize_output keys to summarize the data in your job input and output tabs to make it more human readable for users of your connector.
    input_fields: lambda do
      [
        {
          name: 'report',
          type: 'object',
          properties: [
            {
              name: 'records',
              type: :array,
              of: :object,
              properties: [
                {
                  name: 'item_name',
                  type: 'string'
                }
              ]
            },
            {
              name: 'description',
              type: 'string'
            },
            {
              name: 'comment',
              type: 'string'
            }
          ],
        }
      ]
    end,

    summarize_input: ['report.records', 'report.description'],
Last updated: 4/2/2024, 11:42:24 PM