# HTTP connection setup
In order to interact with an API, we first need to set up our connection to the app to interact with. Click the Link your account button and the connection popup appears.
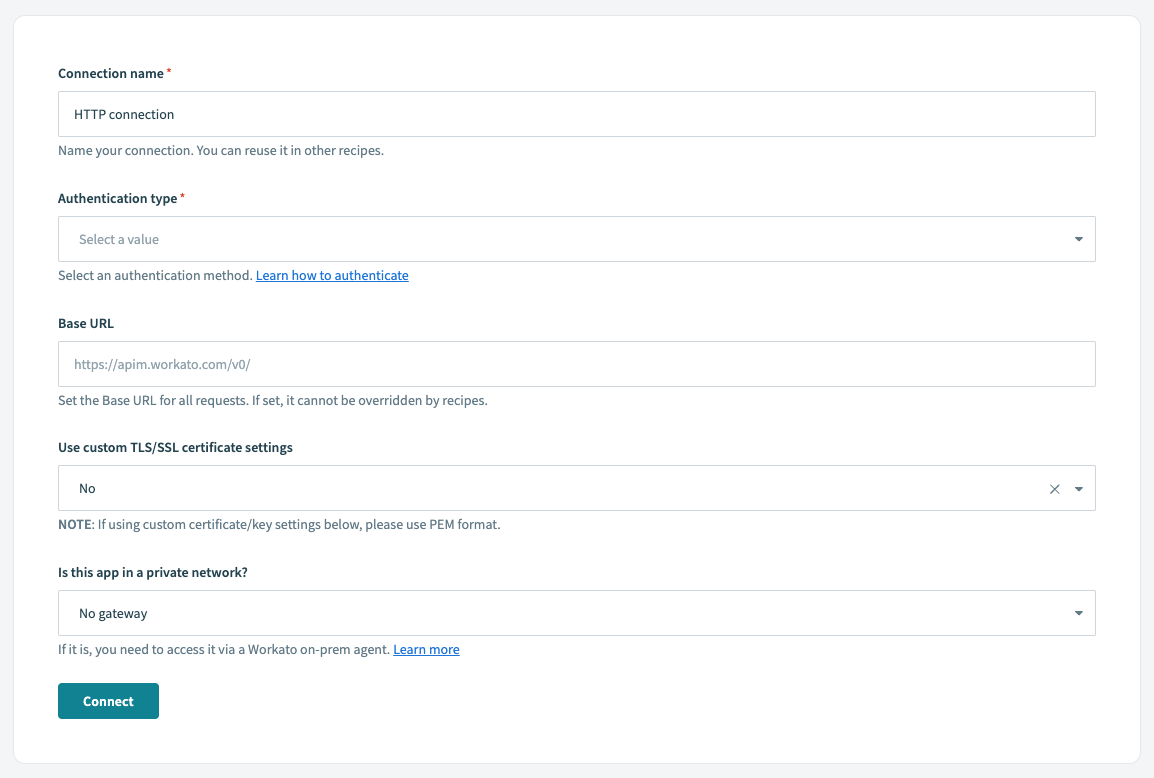 Connection popup for HTTP connector
Configure the following input fields to connect successfully. Apart from authentication type and fields subsequently generated when a type is selected, most fields can usually be left to their default values.
| Input field | Description |
|---|---|
| Connection name | Give your HTTP connection a name to identify this connection. |
| Authentication type | Type of authentication used to connect to your app. Refer to the API documentation of the app you are connecting to for more information. |
| Base URL | Set the base URL for all requests using this connection. If set, it can't be overridden by recipes. Learn more about HTTP base URLs. |
| Use client SSL certificate | Yes if your API requires client SSL certificates. No if it does not require client SSL certificates. |
| Is this app in a private network? | Yes if you're connecting to an on-premise app behind the firewall. This requires an on-premise agent to be set up in Workato. No if you're connecting to an app on the public cloud. |
# Authentication types
The following section details the different authentication types and how to set them up. They include:
- None
- Basic
- Header auth
- Query params
- Custom
- OAuth2 (authorization code grant)
- OAuth2 (client credentials grant)
- AWS access key auth
- AWS IAM role auth
The process of setting up a non-OAuth 2.0 connection on Workato is similar regardless of the authentication type. This is because after setting up the non-OAuth 2.0 connection, you would need to test it out to ensure that it's valid. To do that, you would need to send out a test API request - a simple one would be a GET request. If it succeeds, you know that the connection is valid.
In this article, we provide a basic auth example as an example of a non-OAuth 2.0 connection and an OAuth2 example.
# Authentication type: None
This allows you to create a connection without providing any authentication details. This is usually the case when you wish to just receive a webhook trigger from the app. Workato generates a URL for you to direct your webhooks to, and retrieves information from the webhook payload sent in.
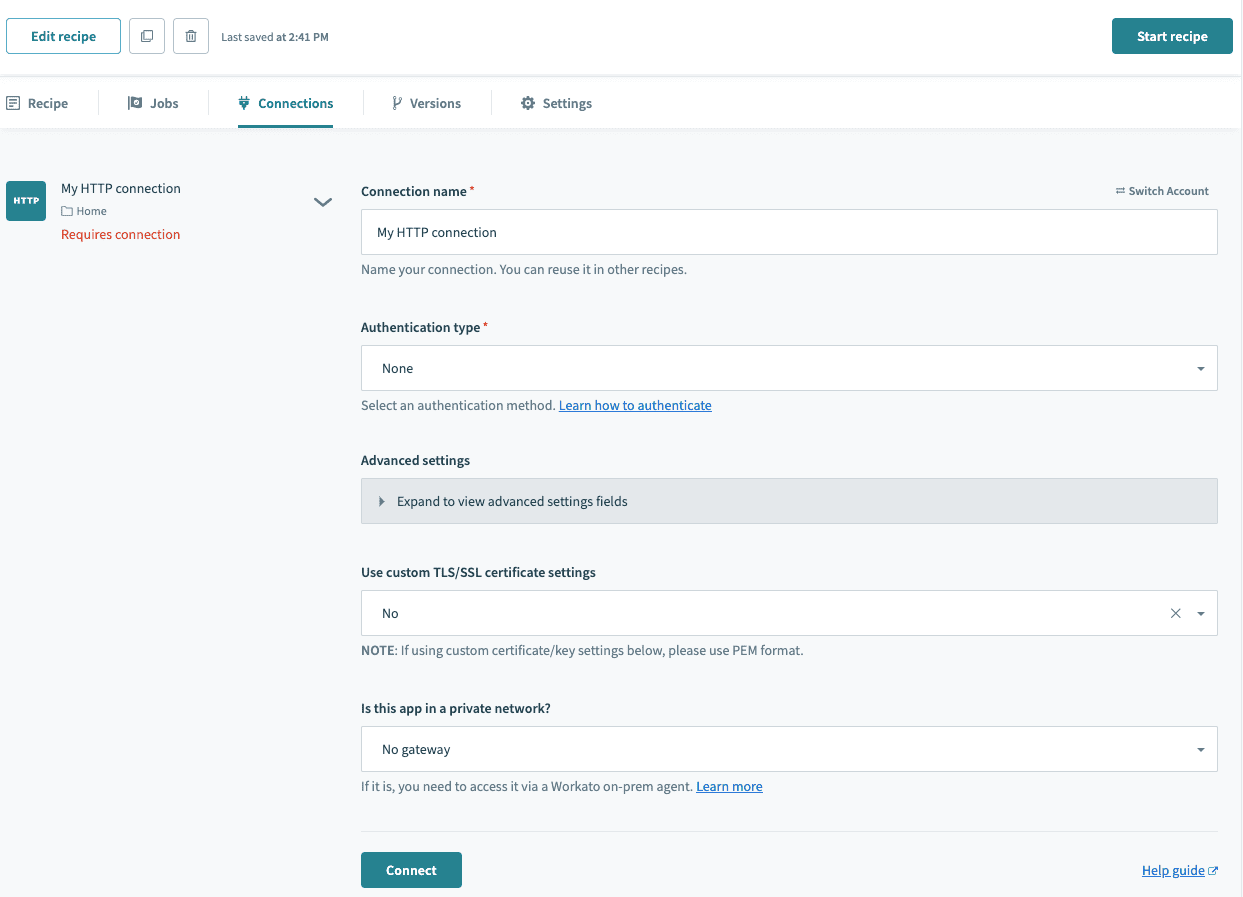 HTTP connector authentication type: None
# Authentication type: Basic
This requires your username and password. An alternative to your username and password would be an API key or API token, retrieved from your account settings. This is encoded with Base64 in transit, over SSL. This is a common authentication flow.
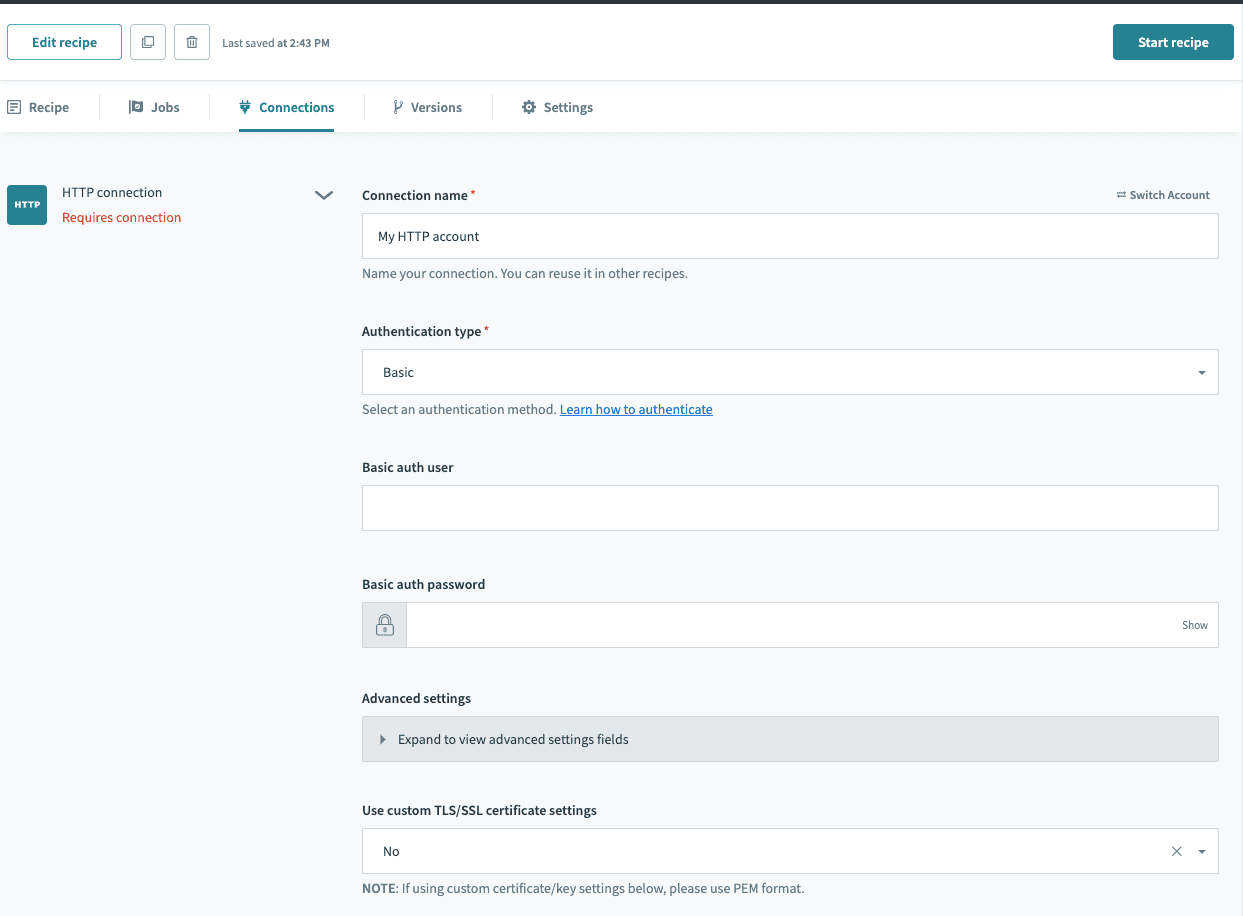 HTTP connector authentication type: Basic
# Example - connecting to Jira via basic authentication and testing the connection via a GET action
Let’s try to connect to Jira using basic authentication - Jira's documentation for basic authentication can be found here (opens new window). In the case of Jira, we need to provide several things: subdomain (which tells us what Jira company instance to connect to, essentially - your company’s Jira database), username, and password.
For this example, I’ve created a company instance in Jira with a company name Workato321, and Jira has automatically assigned my subdomain to be workato321.atlassian.net (opens new window)
I’ve also created a project in my new Jira instance, named PPP, to be used for testing out my connection later.
# Setting up your Jira connection
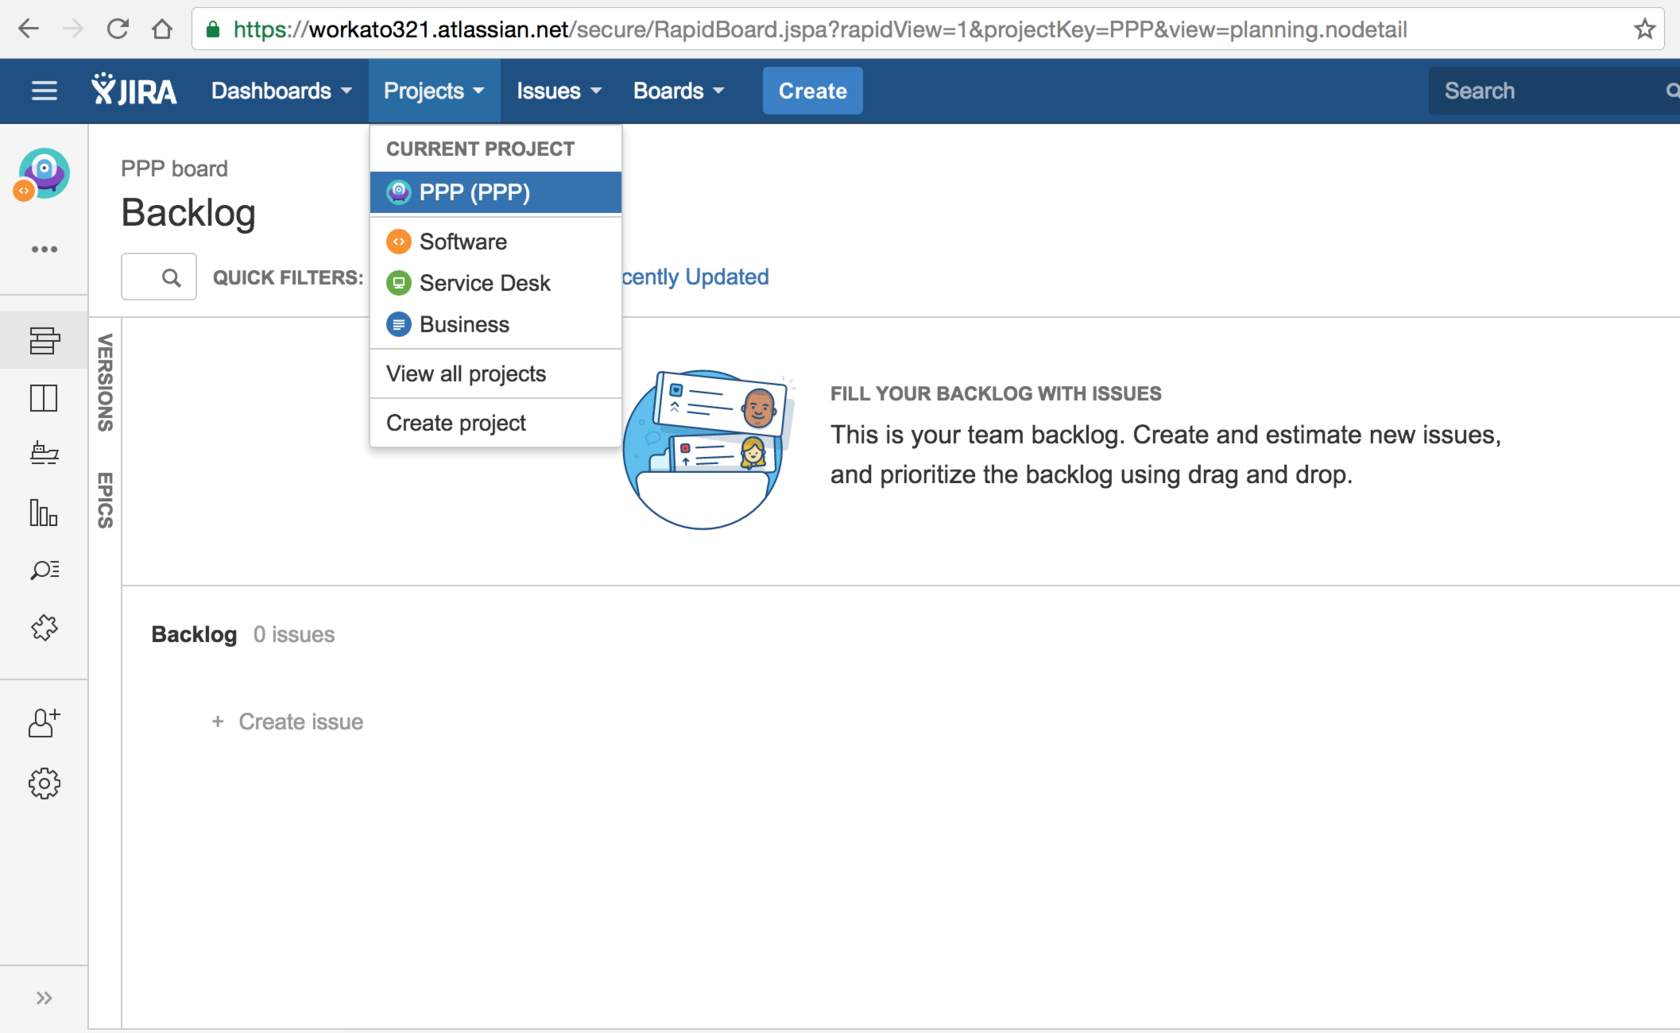 Jira screenshot with subdomain workato321.atlassian.net (opens new window) and existing project PPP
We can provide our username and password in the connection settings as below. The field Is the app in a private network asks if the HTTP client is secured through OPA. Since Jira is on the cloud, No gateway is selected.
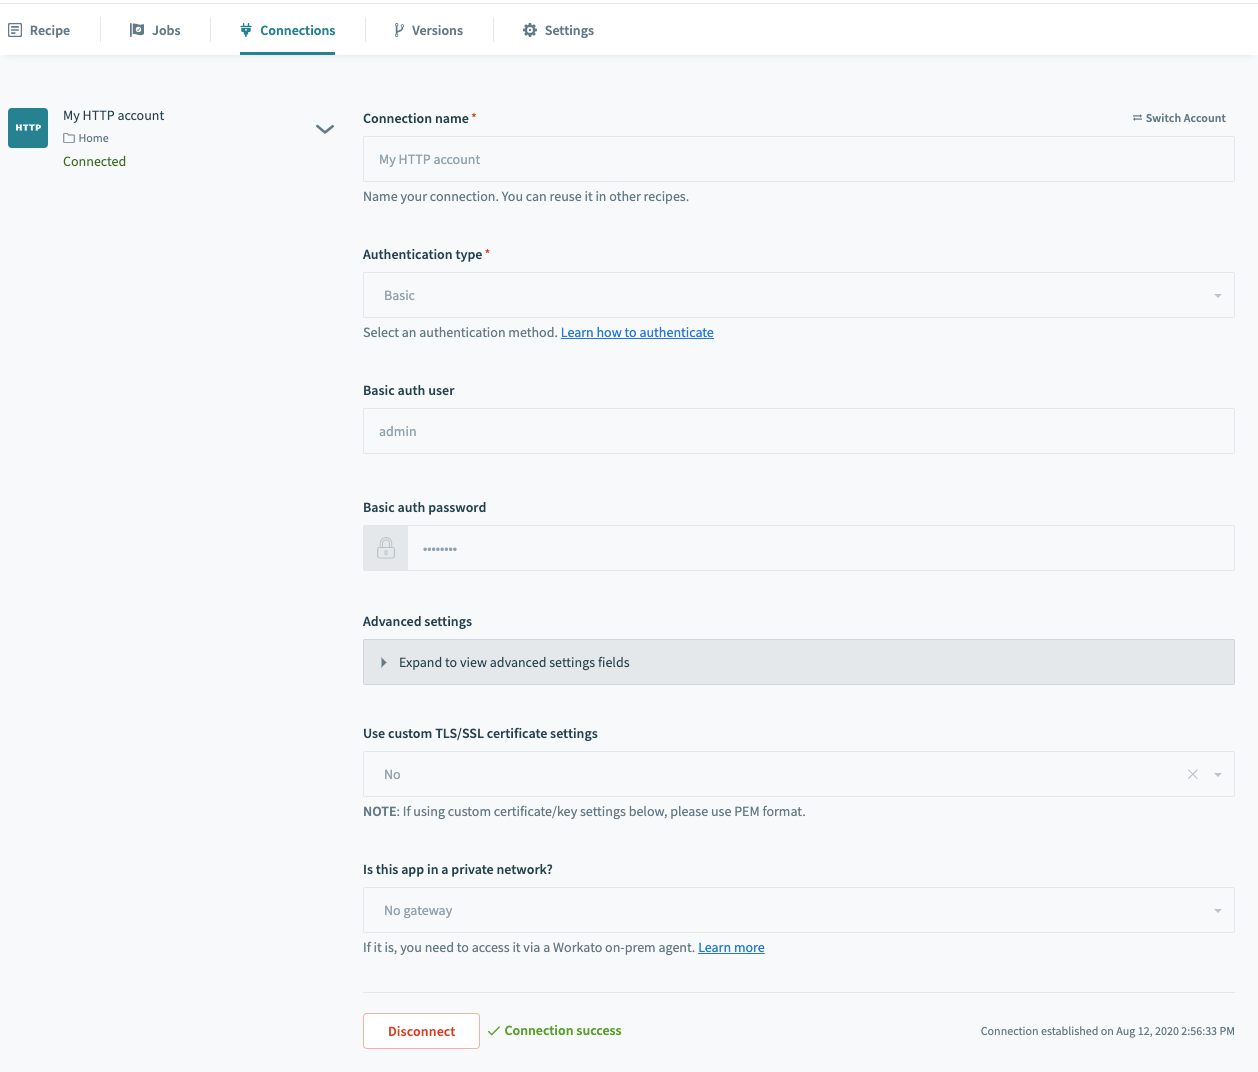 Jira connection settings
Click Connect. For non-OAuth 2.0 connections, remember to send a quick test request, for example, a GET request, to verify that you are successfully connected to the app.
# Authentication type: Header auth
For applications which require additional headers outside of the usual username and password or API key, or if you want to customize the headers sent in the request. Header authentication can be used when you have a generated token ready for use.
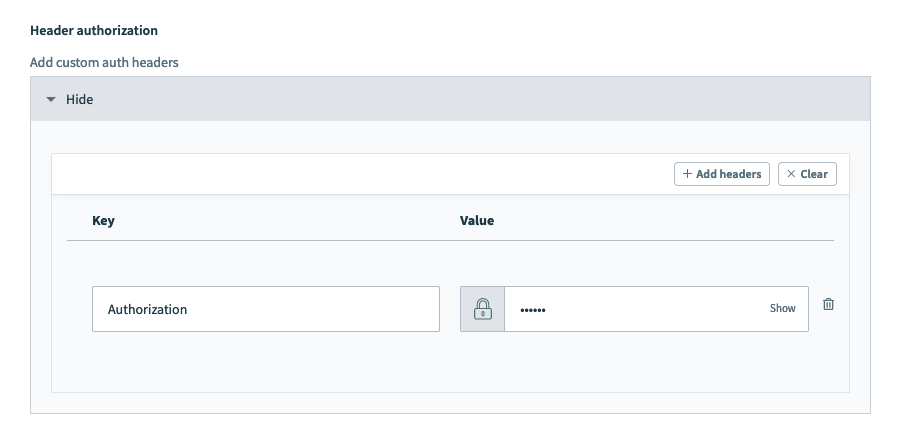 HTTP connector authentication type: Header authorization
# Authentication type: Query params
For applications where the authentication structure is based on validating an API key as a parameter. What you need to do is to add the parameter key/value pair in the params authorization field.
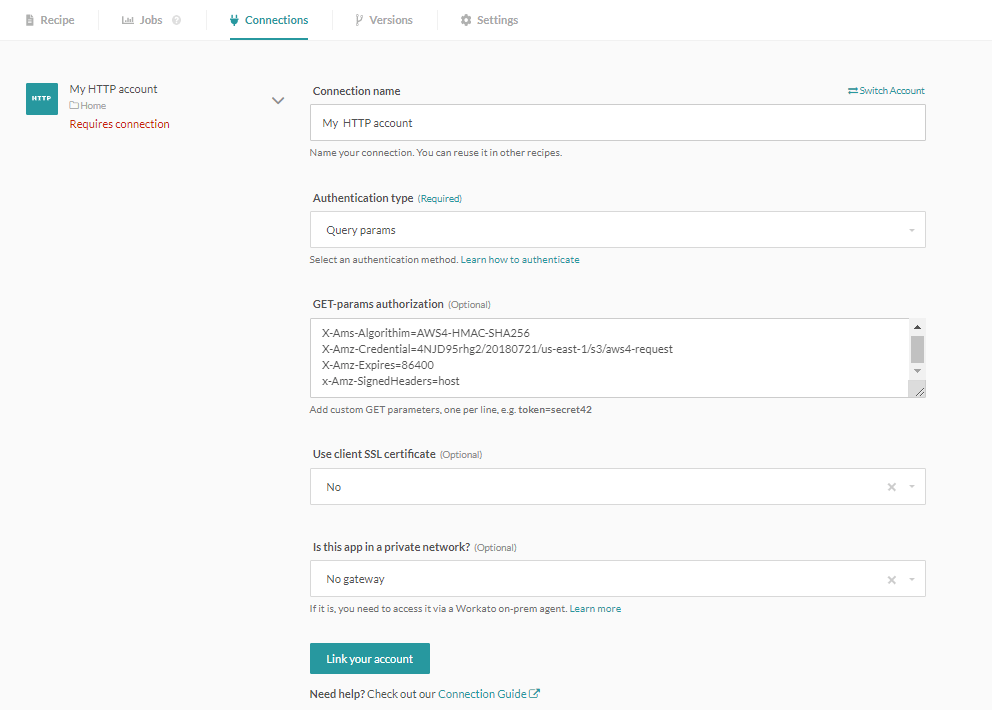 HTTP connector authentication type: Query params
# Authentication type: Custom
Custom allows you to use a combination of input fields as needed.
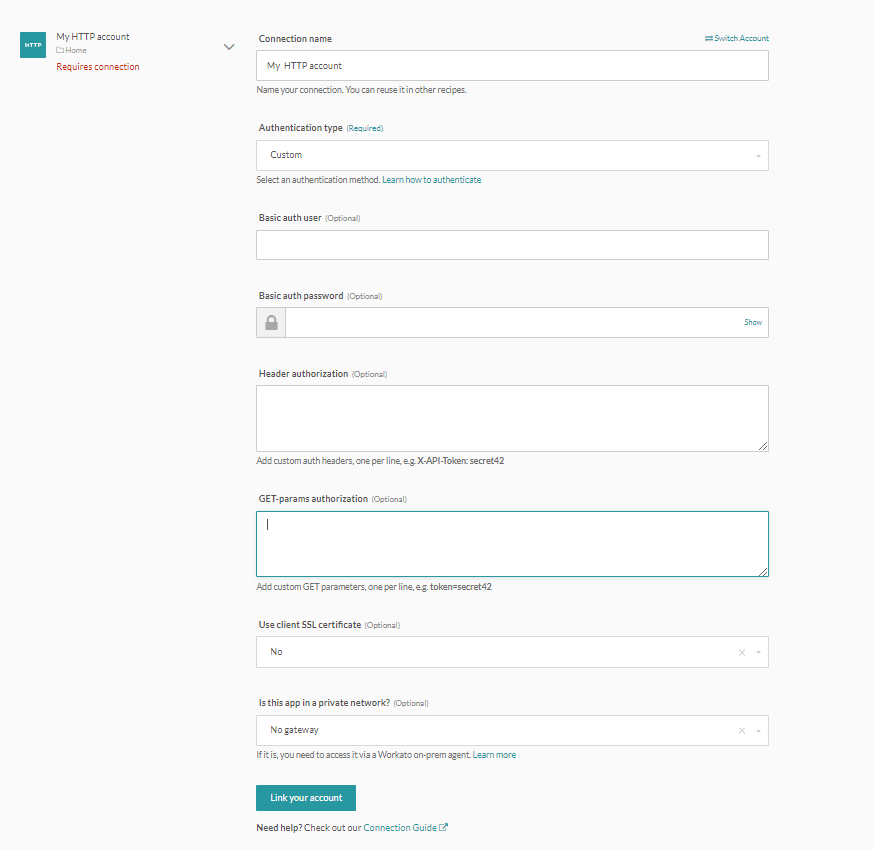 HTTP connector authentication type: Custom
# Authentication type: OAuth 2.0 (authorization code grant)
OAuth2 is the authentication standard adopted by a number of cloud apps. It’s widely adopted because it allows you to give third parties access to your apps without having to disclose your username and password to the third party. In this case, Workato simply redirects you to your app, where you key in your login credentials, and that’s sufficient for the app to trust that Workato is acting on your behalf when it makes API requests. The Authorization Code grant type is used by confidential and public clients to exchange an authorization code for an access token. In addition, it requires you to have the following information ready.
| Input field | Description |
|---|---|
| Authorization URL | URL that Workato redirects you to when you select the ‘Connect’ button. This usually brings you to the login screen of your app. Some APIs require that you include certain parameters in the authorization URL. Common examples are response_type (code or token) and scope (read, write, admin, etc.). This should be publicly available from the API documentation of the app you’re connecting to, under the Authentication section. |
| Token URL | URL that Workato will retrieve an auth token from. This auth token is used to verify that we have permission to access your app and its data. This should be publicly available from the API documentation of the app you’re connecting to, under the Authentication section. |
| Client ID and client secret | The client ID identifies you as the user who’s sending these API calls, while the client secret authenticates that you as this user. This is usually found in the Settings or Integrations page (or equivalent) of your logged in app account that you wish to connect to. This is specific to your account and should be kept secret. |
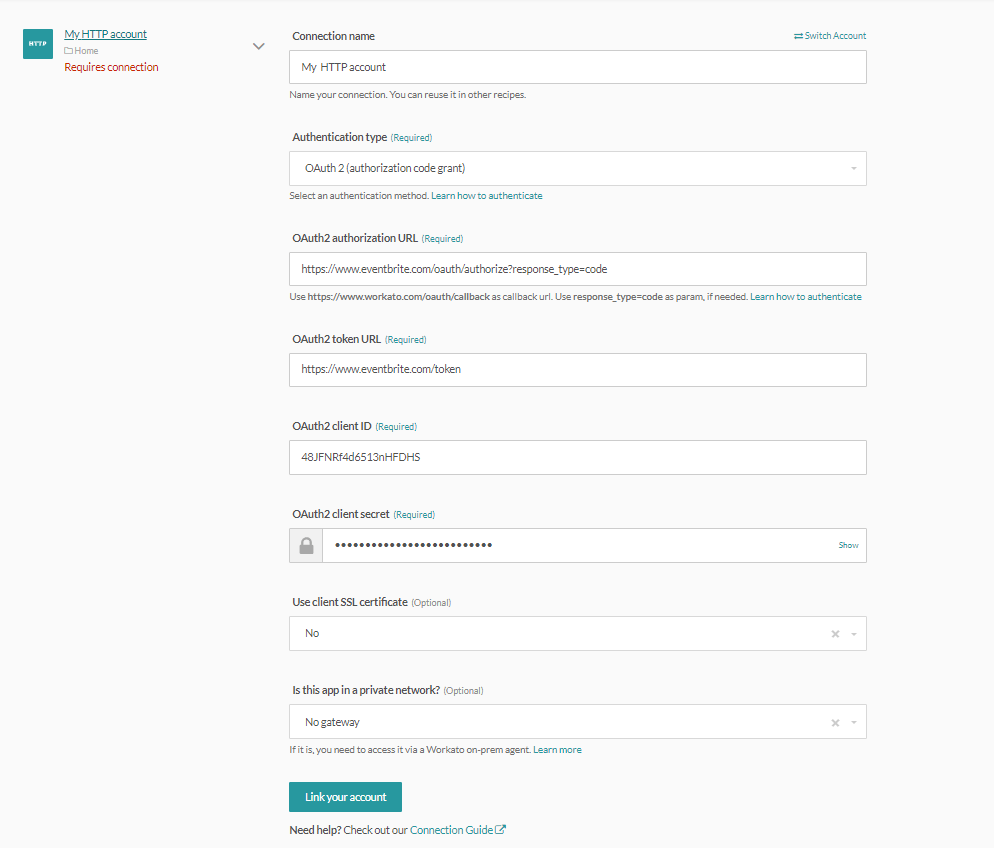 HTTP (OAuth2 authorization code grant) connector's connection fields
# Authentication type: OAuth 2.0 (client credentials grant)
Using the client credentials grant, the client can request an access token using only its client credentials. This is usually used when the client is requesting access to the protected resources under its control or for machine-to-machine authentication where a specific user’s permission to access data is not required.
The client credentials grant type must only be used by confidential clients.
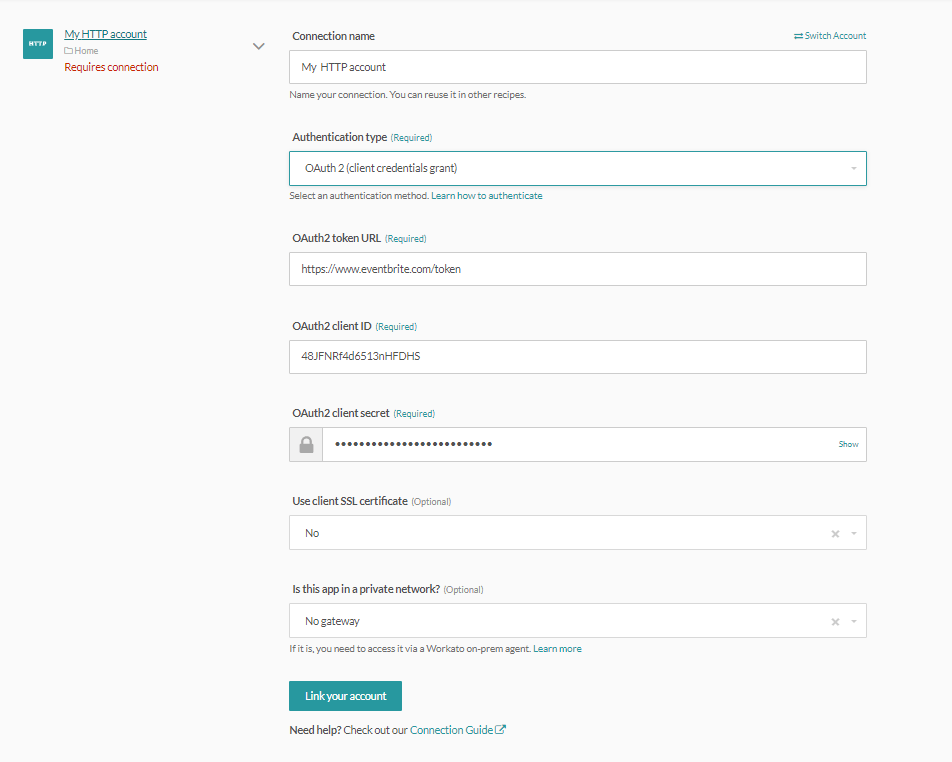 HTTP (OAuth2 client credentials grant) connector's connection fields
OAuth2 authentication type requires the following fields.
| Information | Description |
|---|---|
| Credentials | A set of username and password for logging into your app to give permission for Workato to access the data in the app. This user (to whom the credentials belong) should have the correct permissions to read/write to the records (for example, customer records, sales invoice records) you want to access. |
| Redirect/callback URL (to be configured in the app) | The URL provided to the app for redirection back to Workato after going through the authentication flow and credentials/token exchange. Provide this URL https://www.workato.com/oauth/callback to the app if it asks for it in the Integration setup screen. |
# Example - connecting to Eventbrite via OAuth2
Let us run through an example of how we can connect to an OAuth 2.0 application. In this case, we’ll use Eventbrite, an events management and ticketing application.
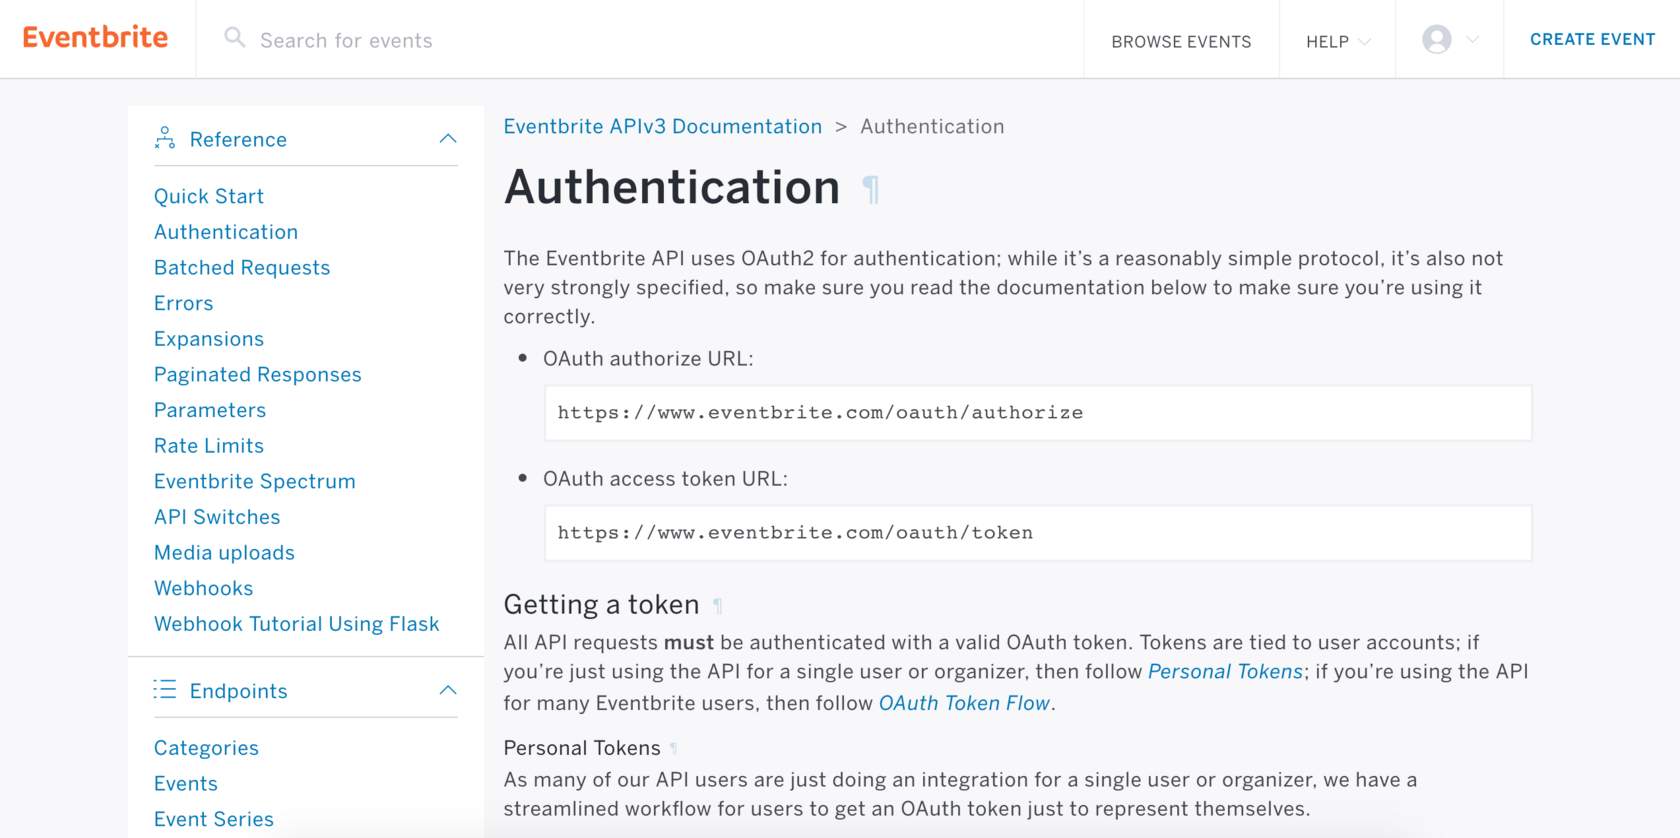 Eventbrite OAuth 2.0 authentication page
From the documentation page, we can obtain 2 of the required fields for our connection - the authorization URL and the access token URL. We would need to append further parameters to the URL. Eventbrite's documentation mentions that we'd need to post to this URL: https://www.eventbrite.com/oauth/authorize?response_type=code&client_id=YOUR_CLIENT_KEY
But as Workato will handle the client key, the following is what's needed in the input field to connect.
Eventbrite authorization URL:
https://www.eventbrite.com/oauth/authorize?response_type=code
Eventbrite access token URL:
https://www.eventbrite.com/oauth/token
In order to connect to your Eventbrite account successfully, you would also need a set of client ID and client secret. To obtain this, you will need to register an app with Eventbrite so that they can assign the app with a client ID and secret. Log into Eventbrite and navigate to Account Settings > App Management.
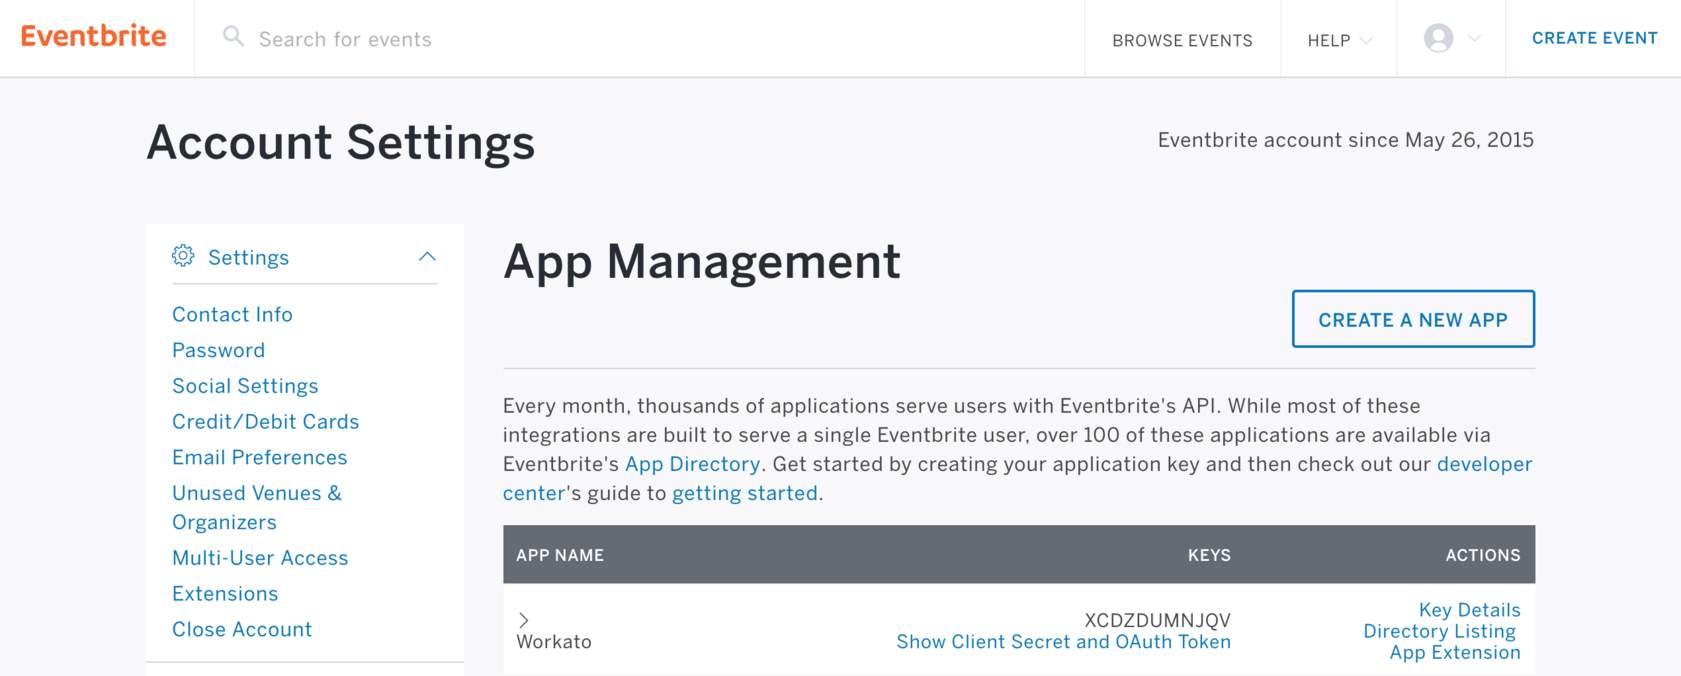 Eventbrite's app management screen
In the app management page, you will be able to find your client ID (also called key). Expand the Show Client Secret and OAuth Token section to retrieve the client secret, and navigate to the App Extension section to input the callback URL https://www.workato.com/oauth/callback into Eventbrite.
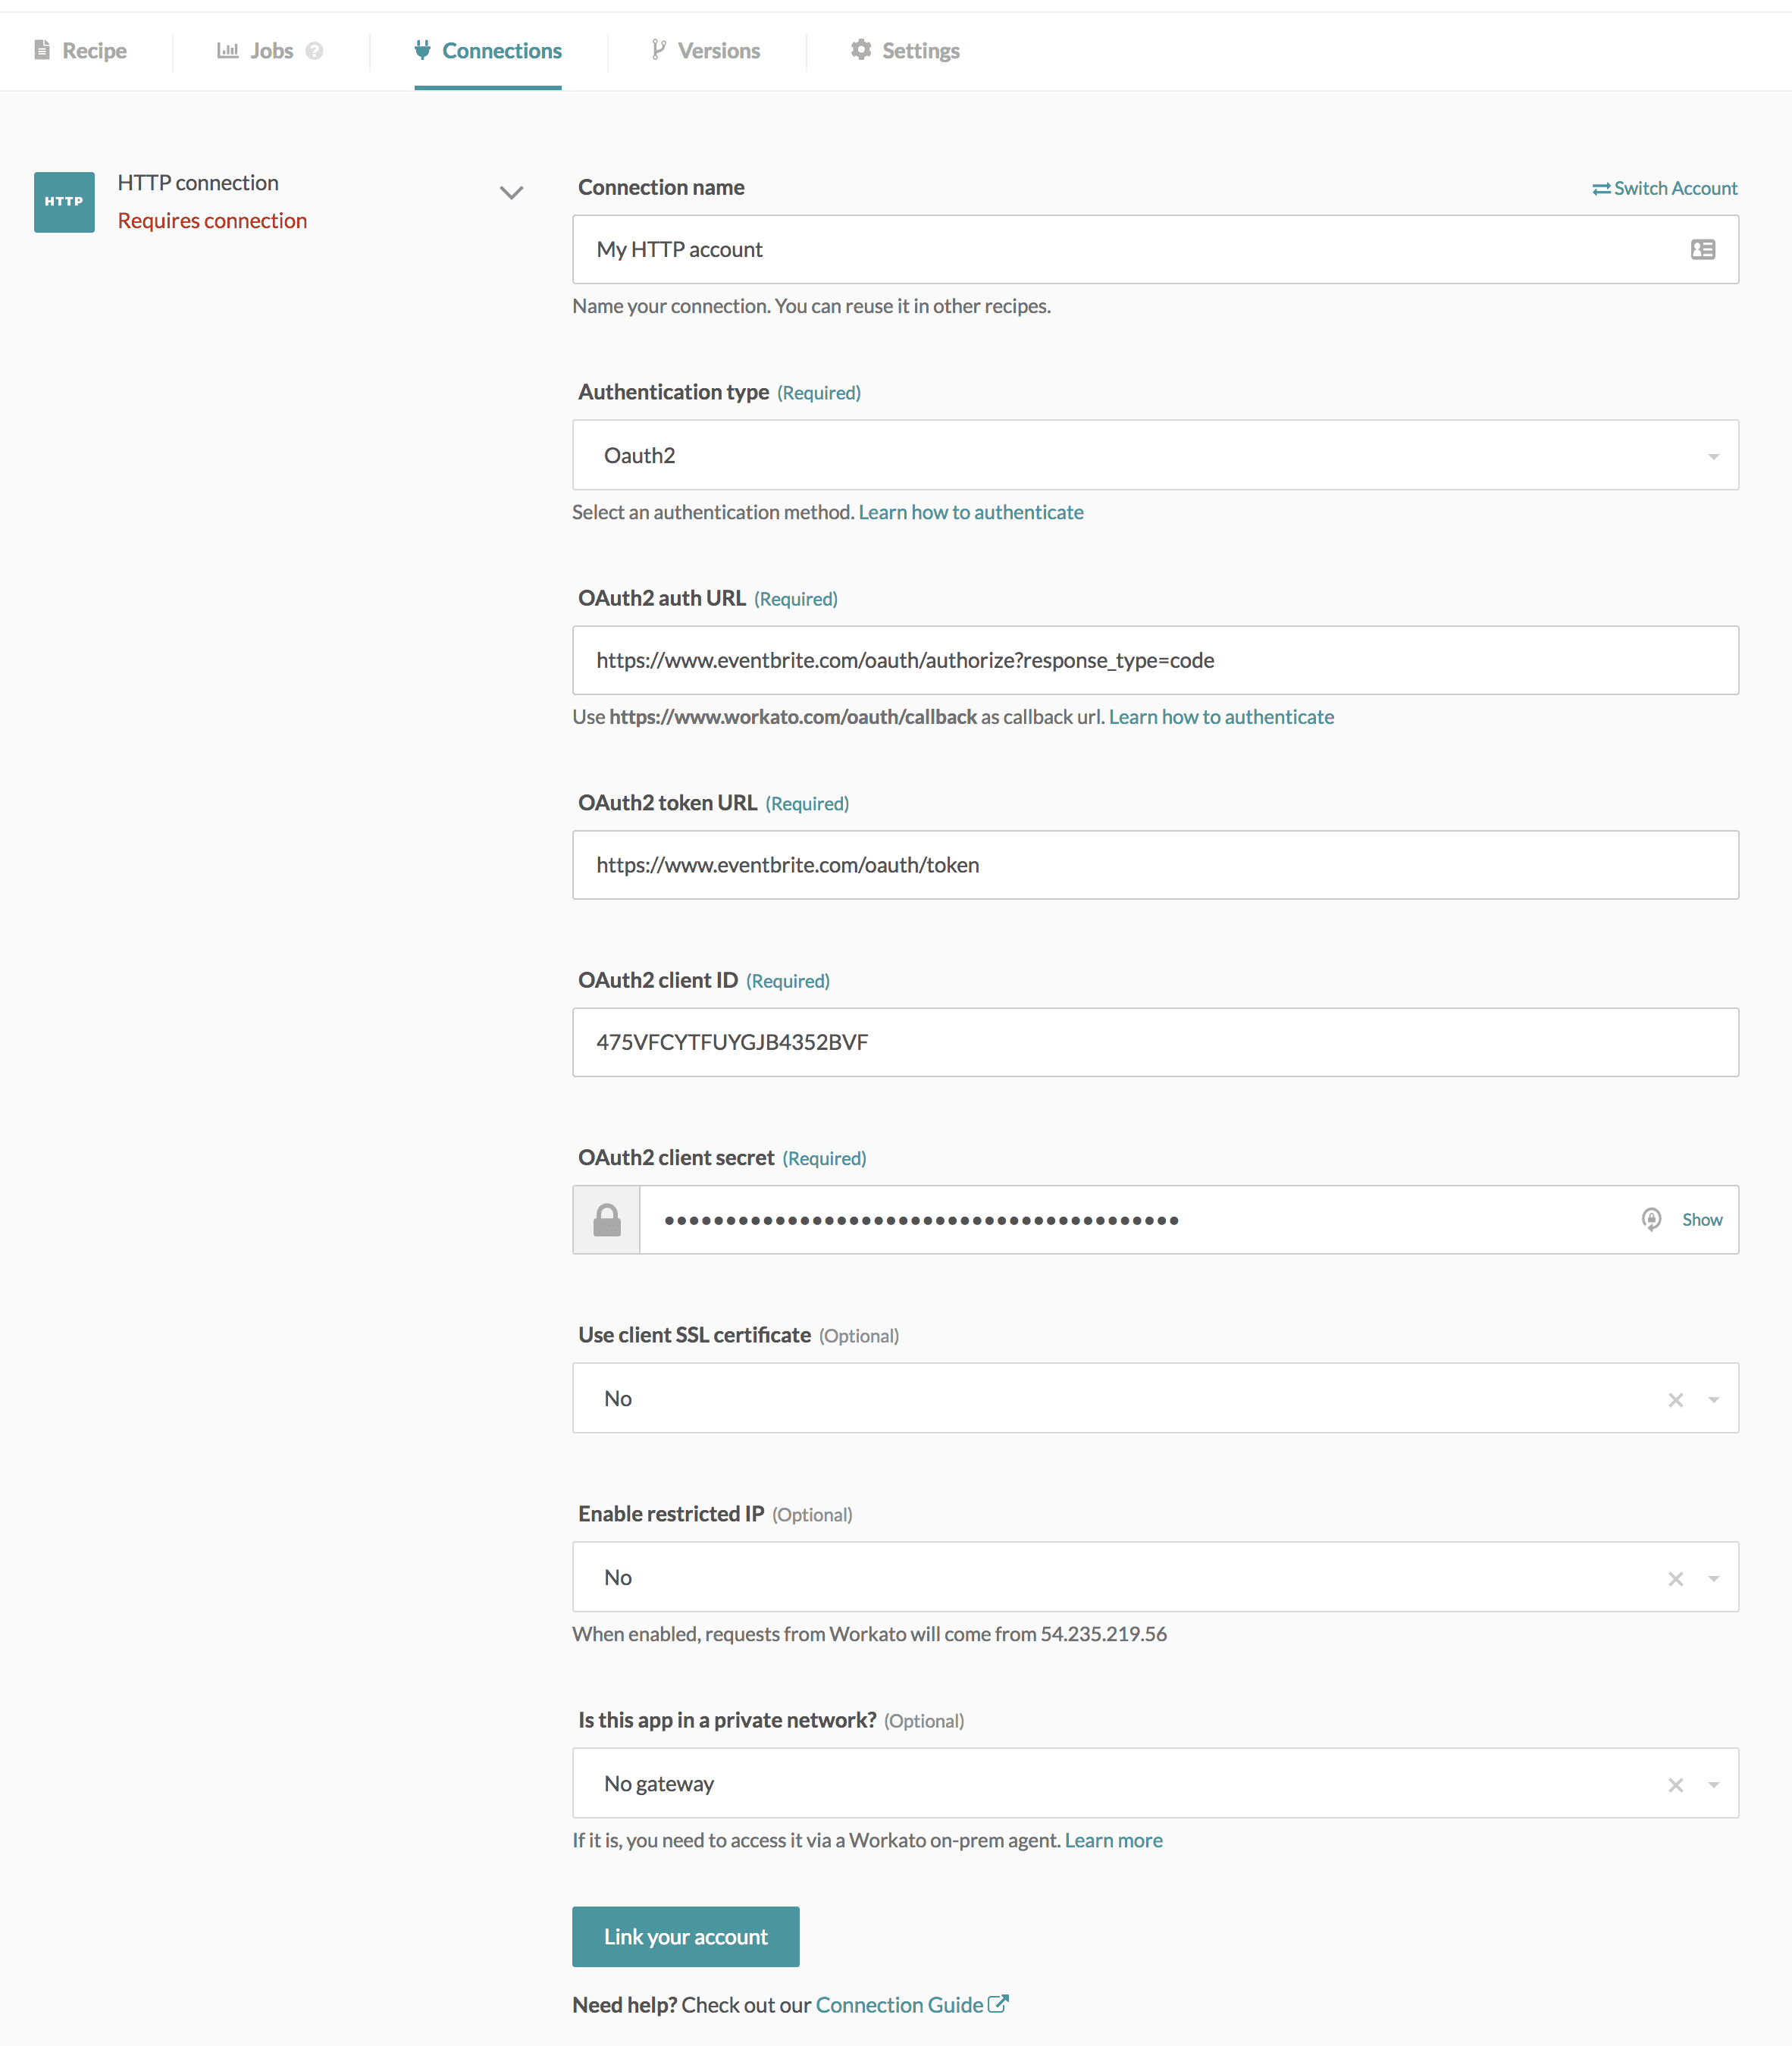 Completed Eventbrite connection
# Authentication type: AWS access key auth
AWS Access key authentication allows you use access keys you have created as either a root user or an IAM user in AWS. You can only assign up to two access keys per user (root user or IAM user). When each key is disabled, you can't use it but it counts towards your limit of two access keys. When you delete an access key, it is gone forever but can be replaced with a new access key. Learn more here. (opens new window)
TIP
We generally recommend the usage of AWS IAM authentication instead of access key authentication.
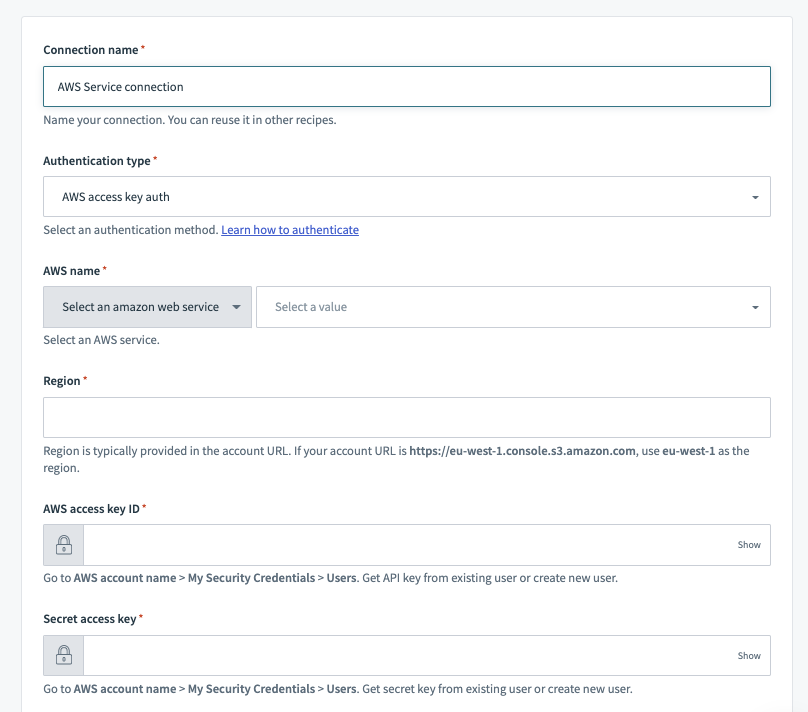 HTTP (AWS Access key auth) connector's connection fields
AWS Access Key authentication type requires the following fields.
| Information | Description |
|---|---|
| AWS Name | The name of the AWS service. You can either select from the dropdown or enter in your own AWS service name. The dropdown only supports a subset of all AWS services. When typing in the AWS service name, be sure to use the API internal name of the service. This can normally be found prepended to the API endpoints of the AWS service. |
| Region | Region is typically provided in the account URL. If your account URL is https://eu-west-1.console.s3.amazon.com (opens new window), use eu-west-1 as the region. |
| AWS access key ID | Go to AWS account name > My Security Credentials > Users. Get API key from existing user or create new user. |
| Secret access key | Go to AWS account name > My Security Credentials > Users. Get secret key from existing user or create new user. |
# Authentication type: AWS IAM role auth
AWS IAM role authentication allows you to provide a dedicated role in your AWS instance for Workato to use. By provisioning a dedicated IAM profile, the owner of the AWS instance can grant Workato access to AWS resources without sharing AWS security credentials. It also helps to maintain permission boundaries, including controlled access to specific AWS services and actions that are permitted by the third-party application (for example, Workato).
We recommend to grant only the required permissions and avoid using AllAccess policies whenever possible.
TIP
We generally recommend the usage of AWS IAM authentication instead of access key authentication.
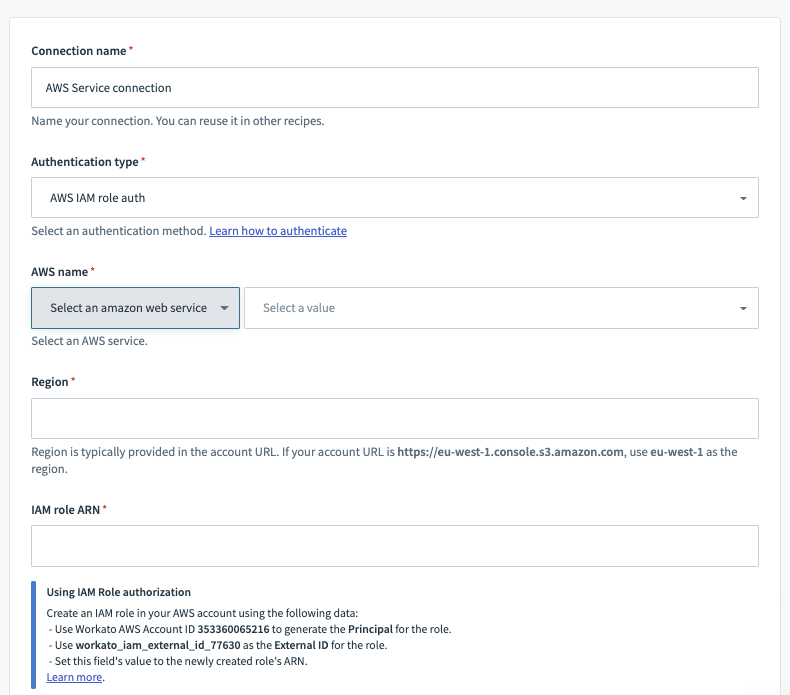 HTTP (AWS IAM role auth) connector's connection fields
AWS IAM role authentication type requires the following fields.
| Information | Description |
|---|---|
| AWS Name | The name of the AWS service. You can either select from the dropdown or enter in your own AWS service name. The dropdown only supports a subset of all AWS services. When typing in the AWS service name, be sure to use the API internal name of the service. This can normally be found prepended to the API endpoints of the AWS service. |
| Region | Region is typically provided in the account URL. If your account URL is https://eu-west-1.console.s3.amazon.com (opens new window), use eu-west-1 as the region. |
| IAM role ARN | The Amazon Resource Name (ARN). Learn how to create an IAM role and obtain the ARN below. |
# How to retrieve IAM role ARN
Follow these steps to retrieve the Role ARN required for the connection setup. Remember to use the Workato generated external ID found on the connection page.
| Steps | Description |
|---|---|
| 1. | Head over to IAM on AWS and create a new role. Select Roles > Create role.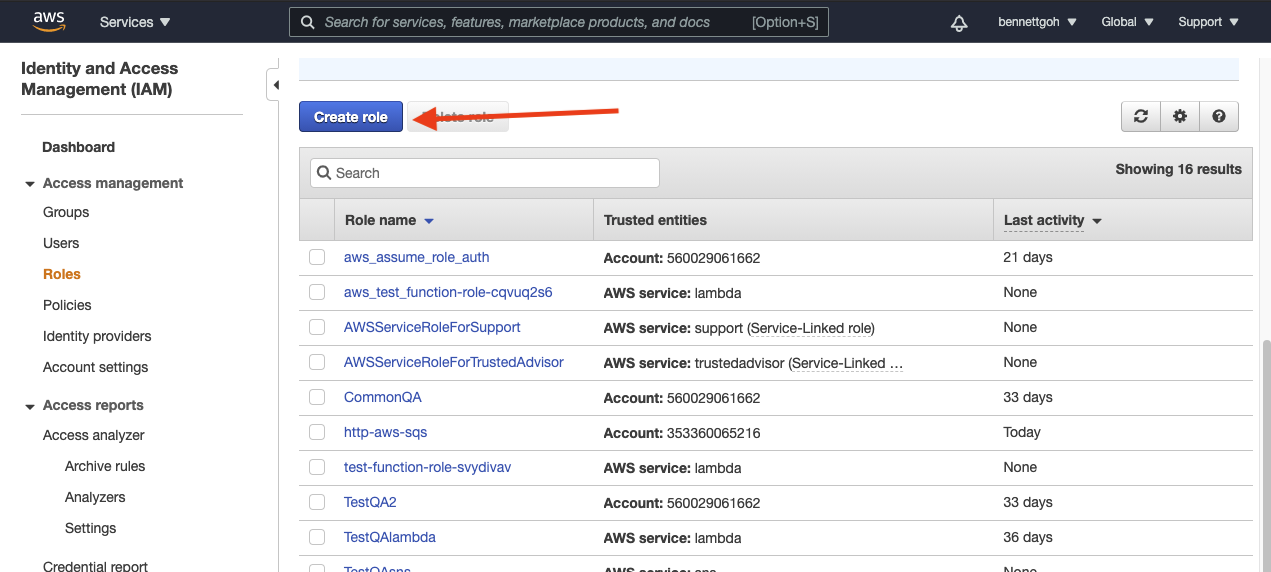 |
| 2. | Select Another AWS account. Input Workato's Amazon S3 Account ID (353360065216).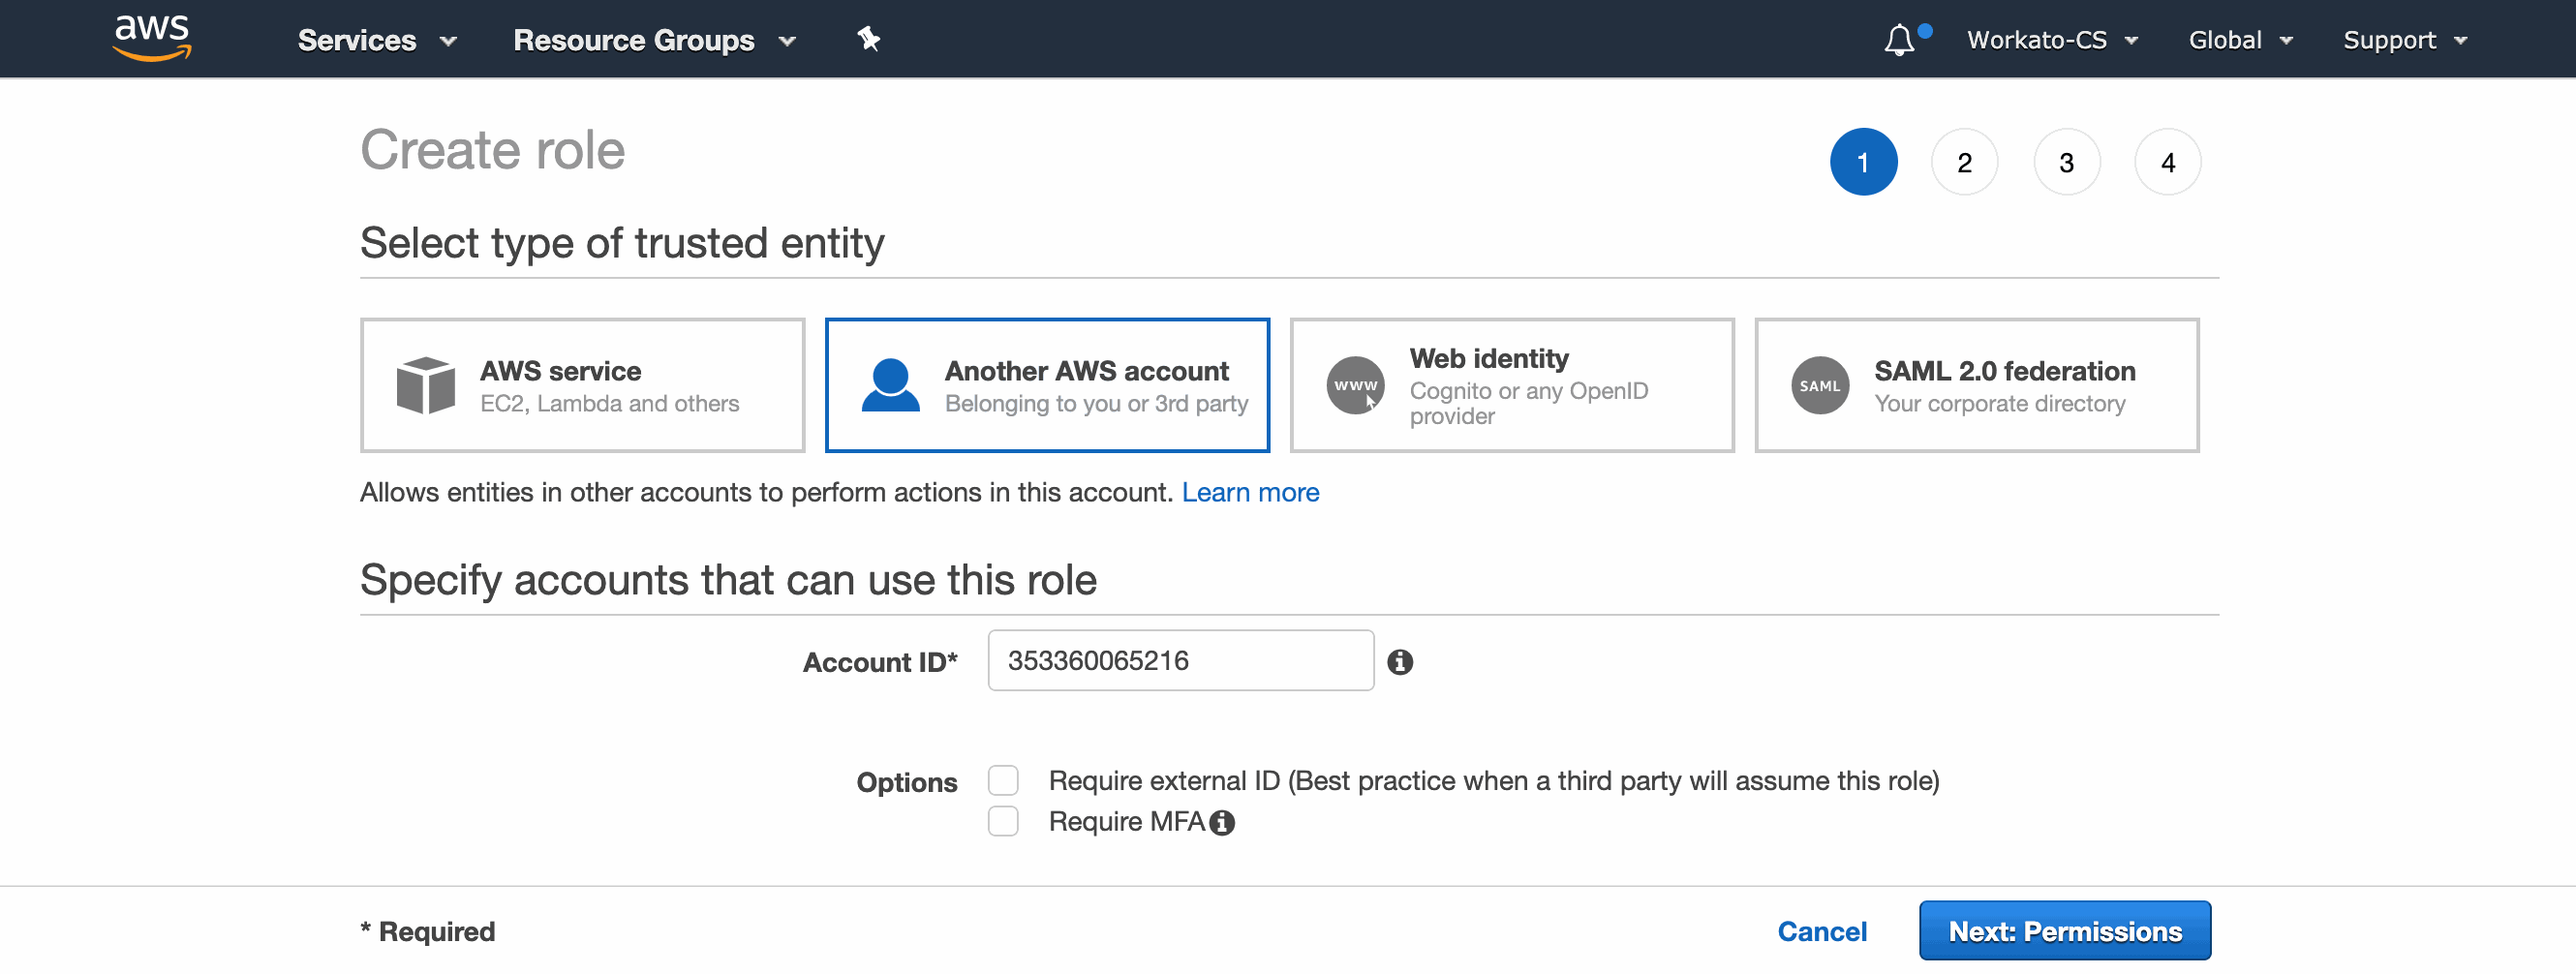 |
| 3. | Select Require external ID and provide the Workato generated External ID. Every Workato user will have a unique External id (for example, workato_iam_external_id_77630). You can find this value in the IAM role ARN portion of the connection setup.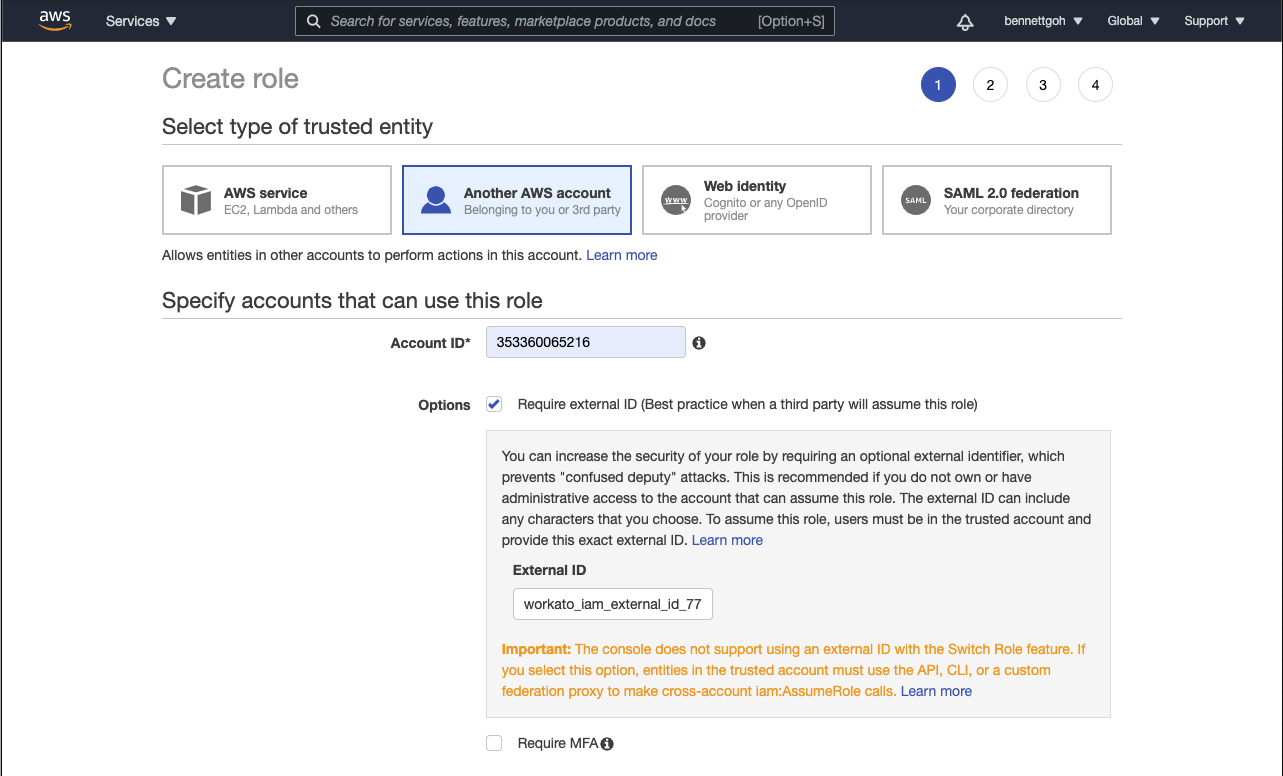 If you would like more granular control of how your HTTP connector is used in Workato, you may choose to configure the connection at the project level by changing the scope of the external ID, learn more If you would like more granular control of how your HTTP connector is used in Workato, you may choose to configure the connection at the project level by changing the scope of the external ID, learn more |
| 4. | You will be prompted to attach permission policies to this role. This is where you can provide fine-grained permission controls for Workato. The policies that you attach to this role should be as narrow as possible. In our case, we will be providing this connection AWSLambdaSQSQueueExecutionRole to receive messages to our SQS service. In most cases, you should grant scopes only based on your use case.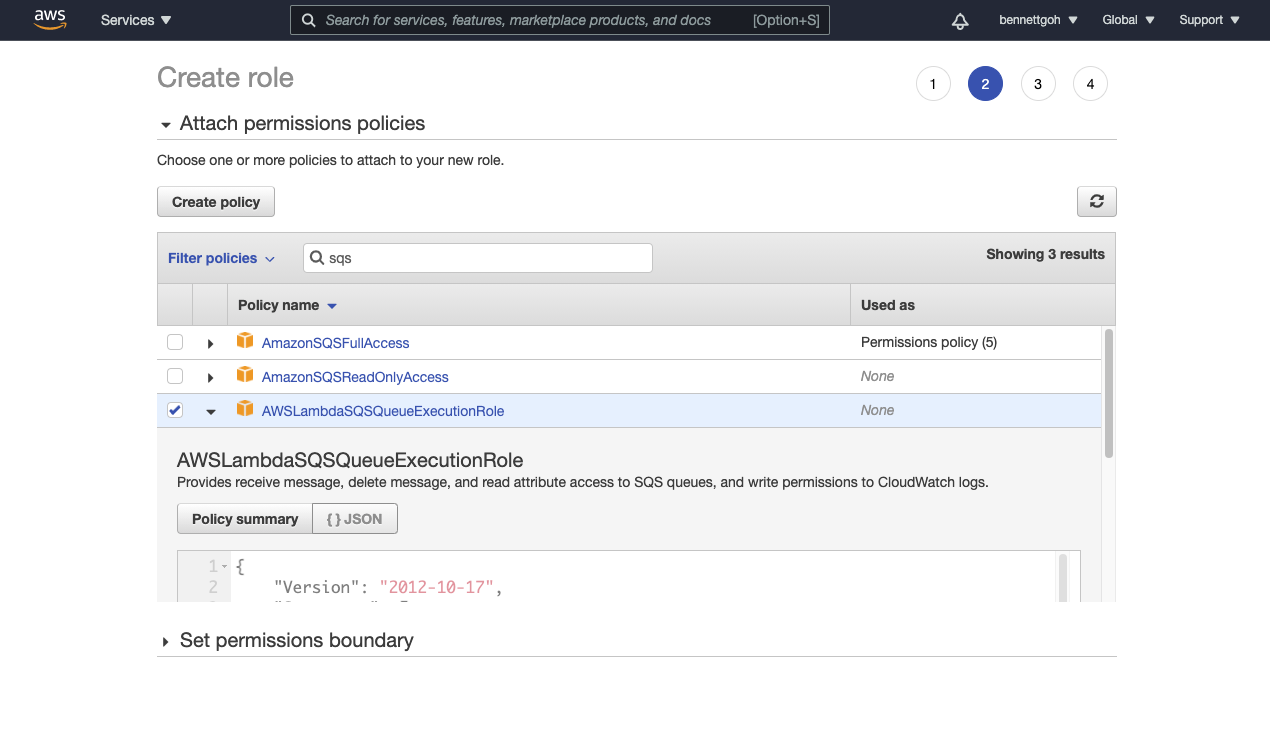 |
| 5. (optional) | If you are using object tagging, select an appropriate tag for this IAM role.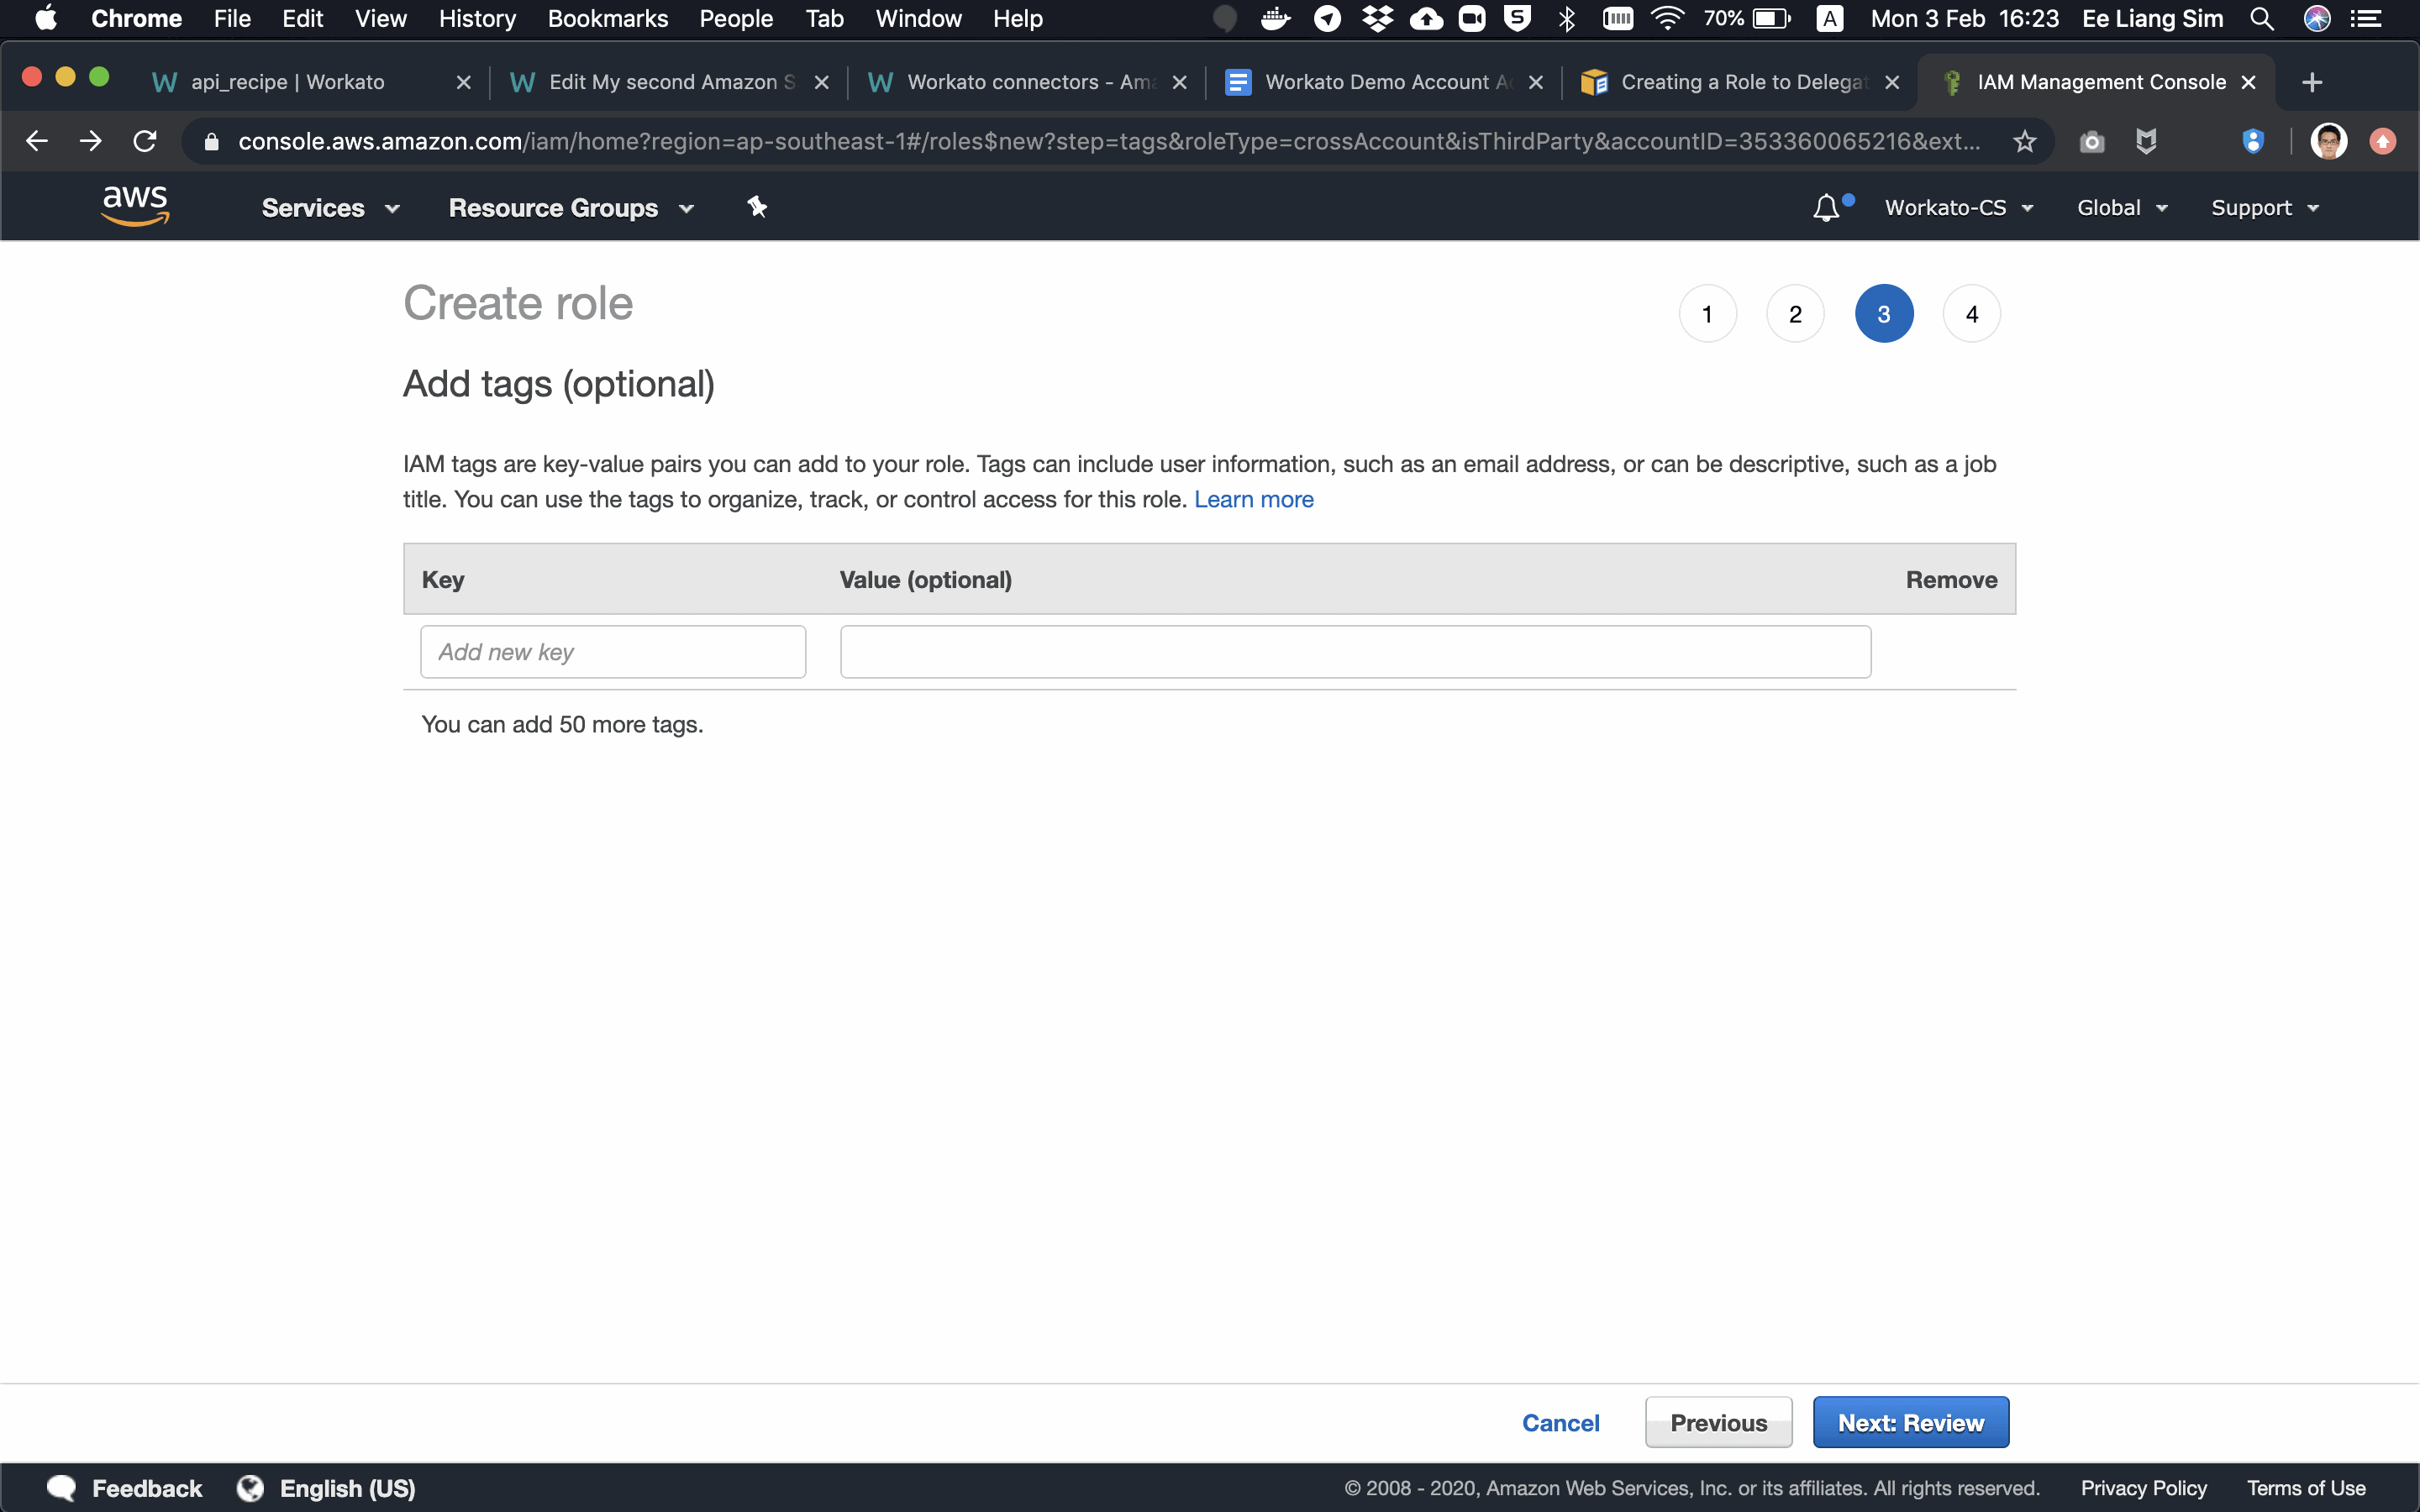 |
| 6. | Give this IAM Role an appropriate name and description. Workato recommends that the role name avoids using a non-guessable resource-id in the urn and does not include the external id.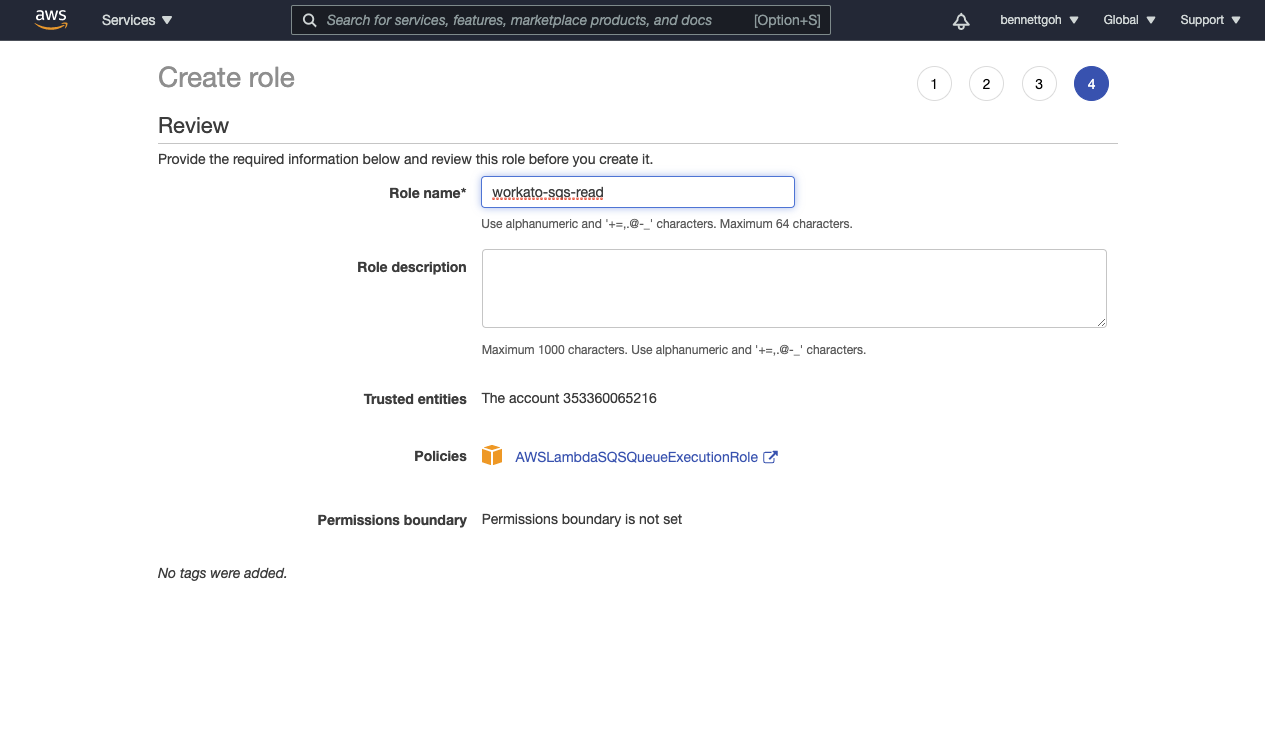 |
| 7. | The IAM Role is now created. Find your Role ARN in the summary page of the Role you have just created.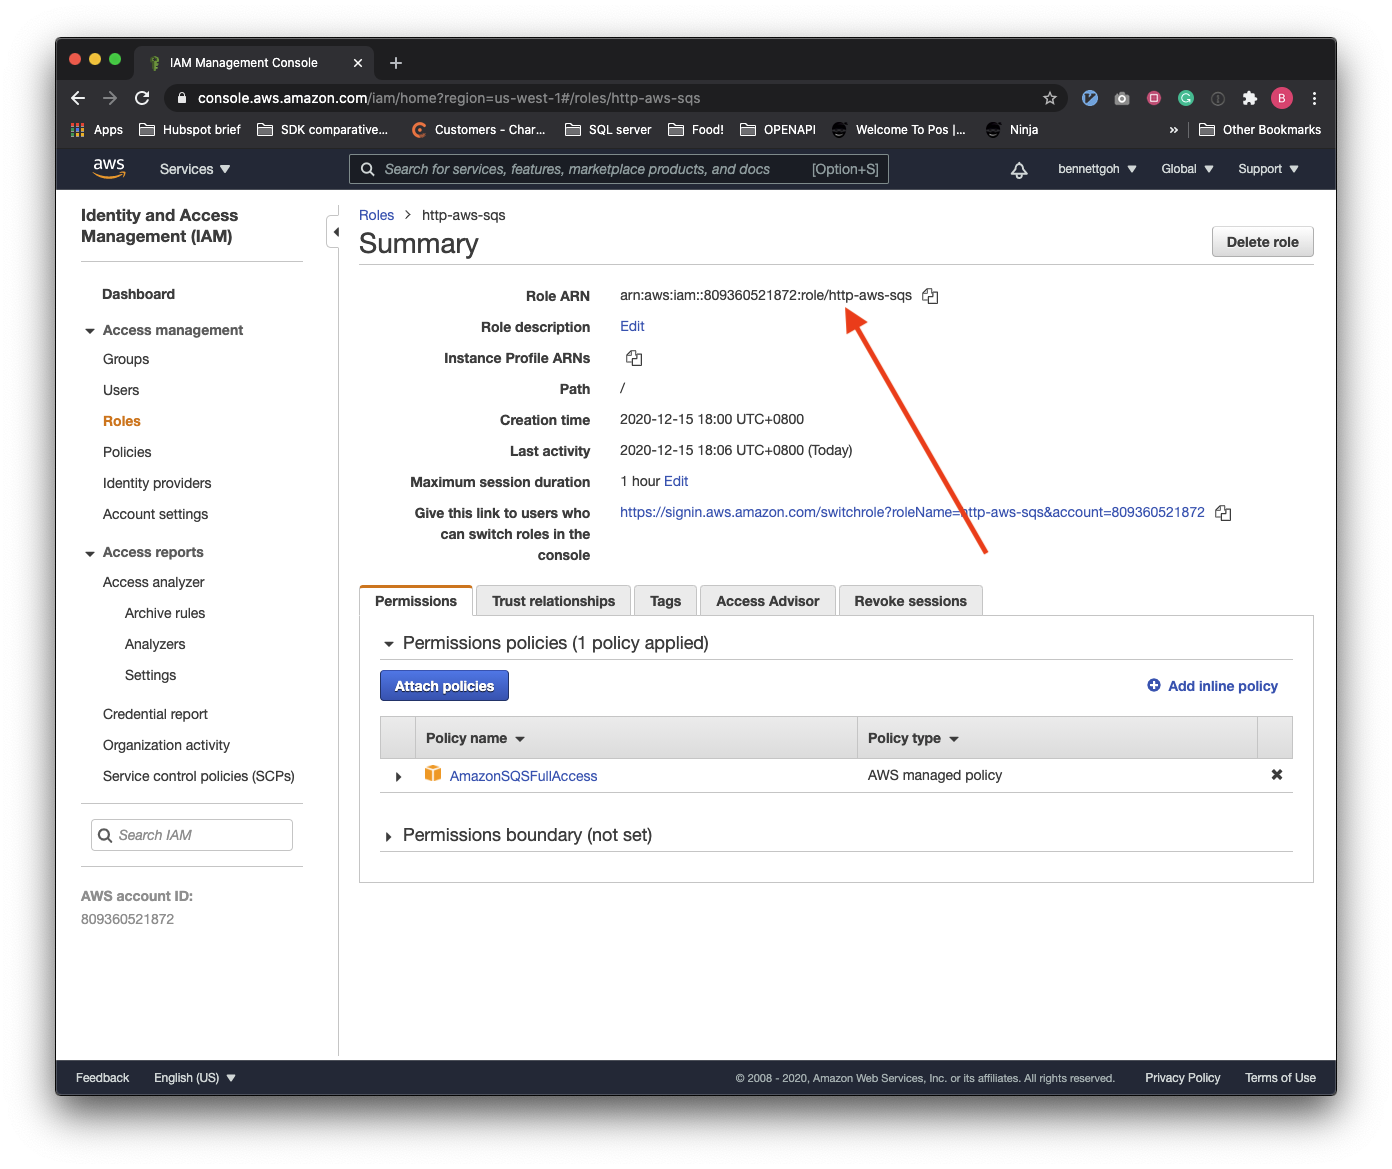 |
| 8. | Take this Role ARN and place it inside it inside the connection setup fields in Workato. |
# HTTP setup documentation
Next, learn more about triggers and actions:
Last updated: 10/16/2023, 8:59:49 PM