# Snowflake
SUMMARY
- To connect to Snowflake on Workato, you can use OAuth 2.0 or username/password.
- The Snowflake connector supports operations such as SELECT, INSERT, UPDATE, and DELETE, among others.
- Create custom roles to restrict Workato's access to only the Snowflake objects you want to build recipes with.
- You can use parameters in conjunction with
WHEREconditions for security against SQL injection.
Snowflake is a relational ANSI SQL data warehouse in the cloud. Due to its unique architecture designed for the cloud, Snowflake offers a data warehouse that is faster, easier to use, and far more flexible than traditional data warehouses
# How to connect to Snowflake on Workato
The Snowflake connector uses OAuth 2.0 or a username and password to authenticate with Snowflake. If your Snowflake instance has network policies that restrict access based on IP address, you will need to add Workato IP addresses to the allowlist to successfully create a connection.
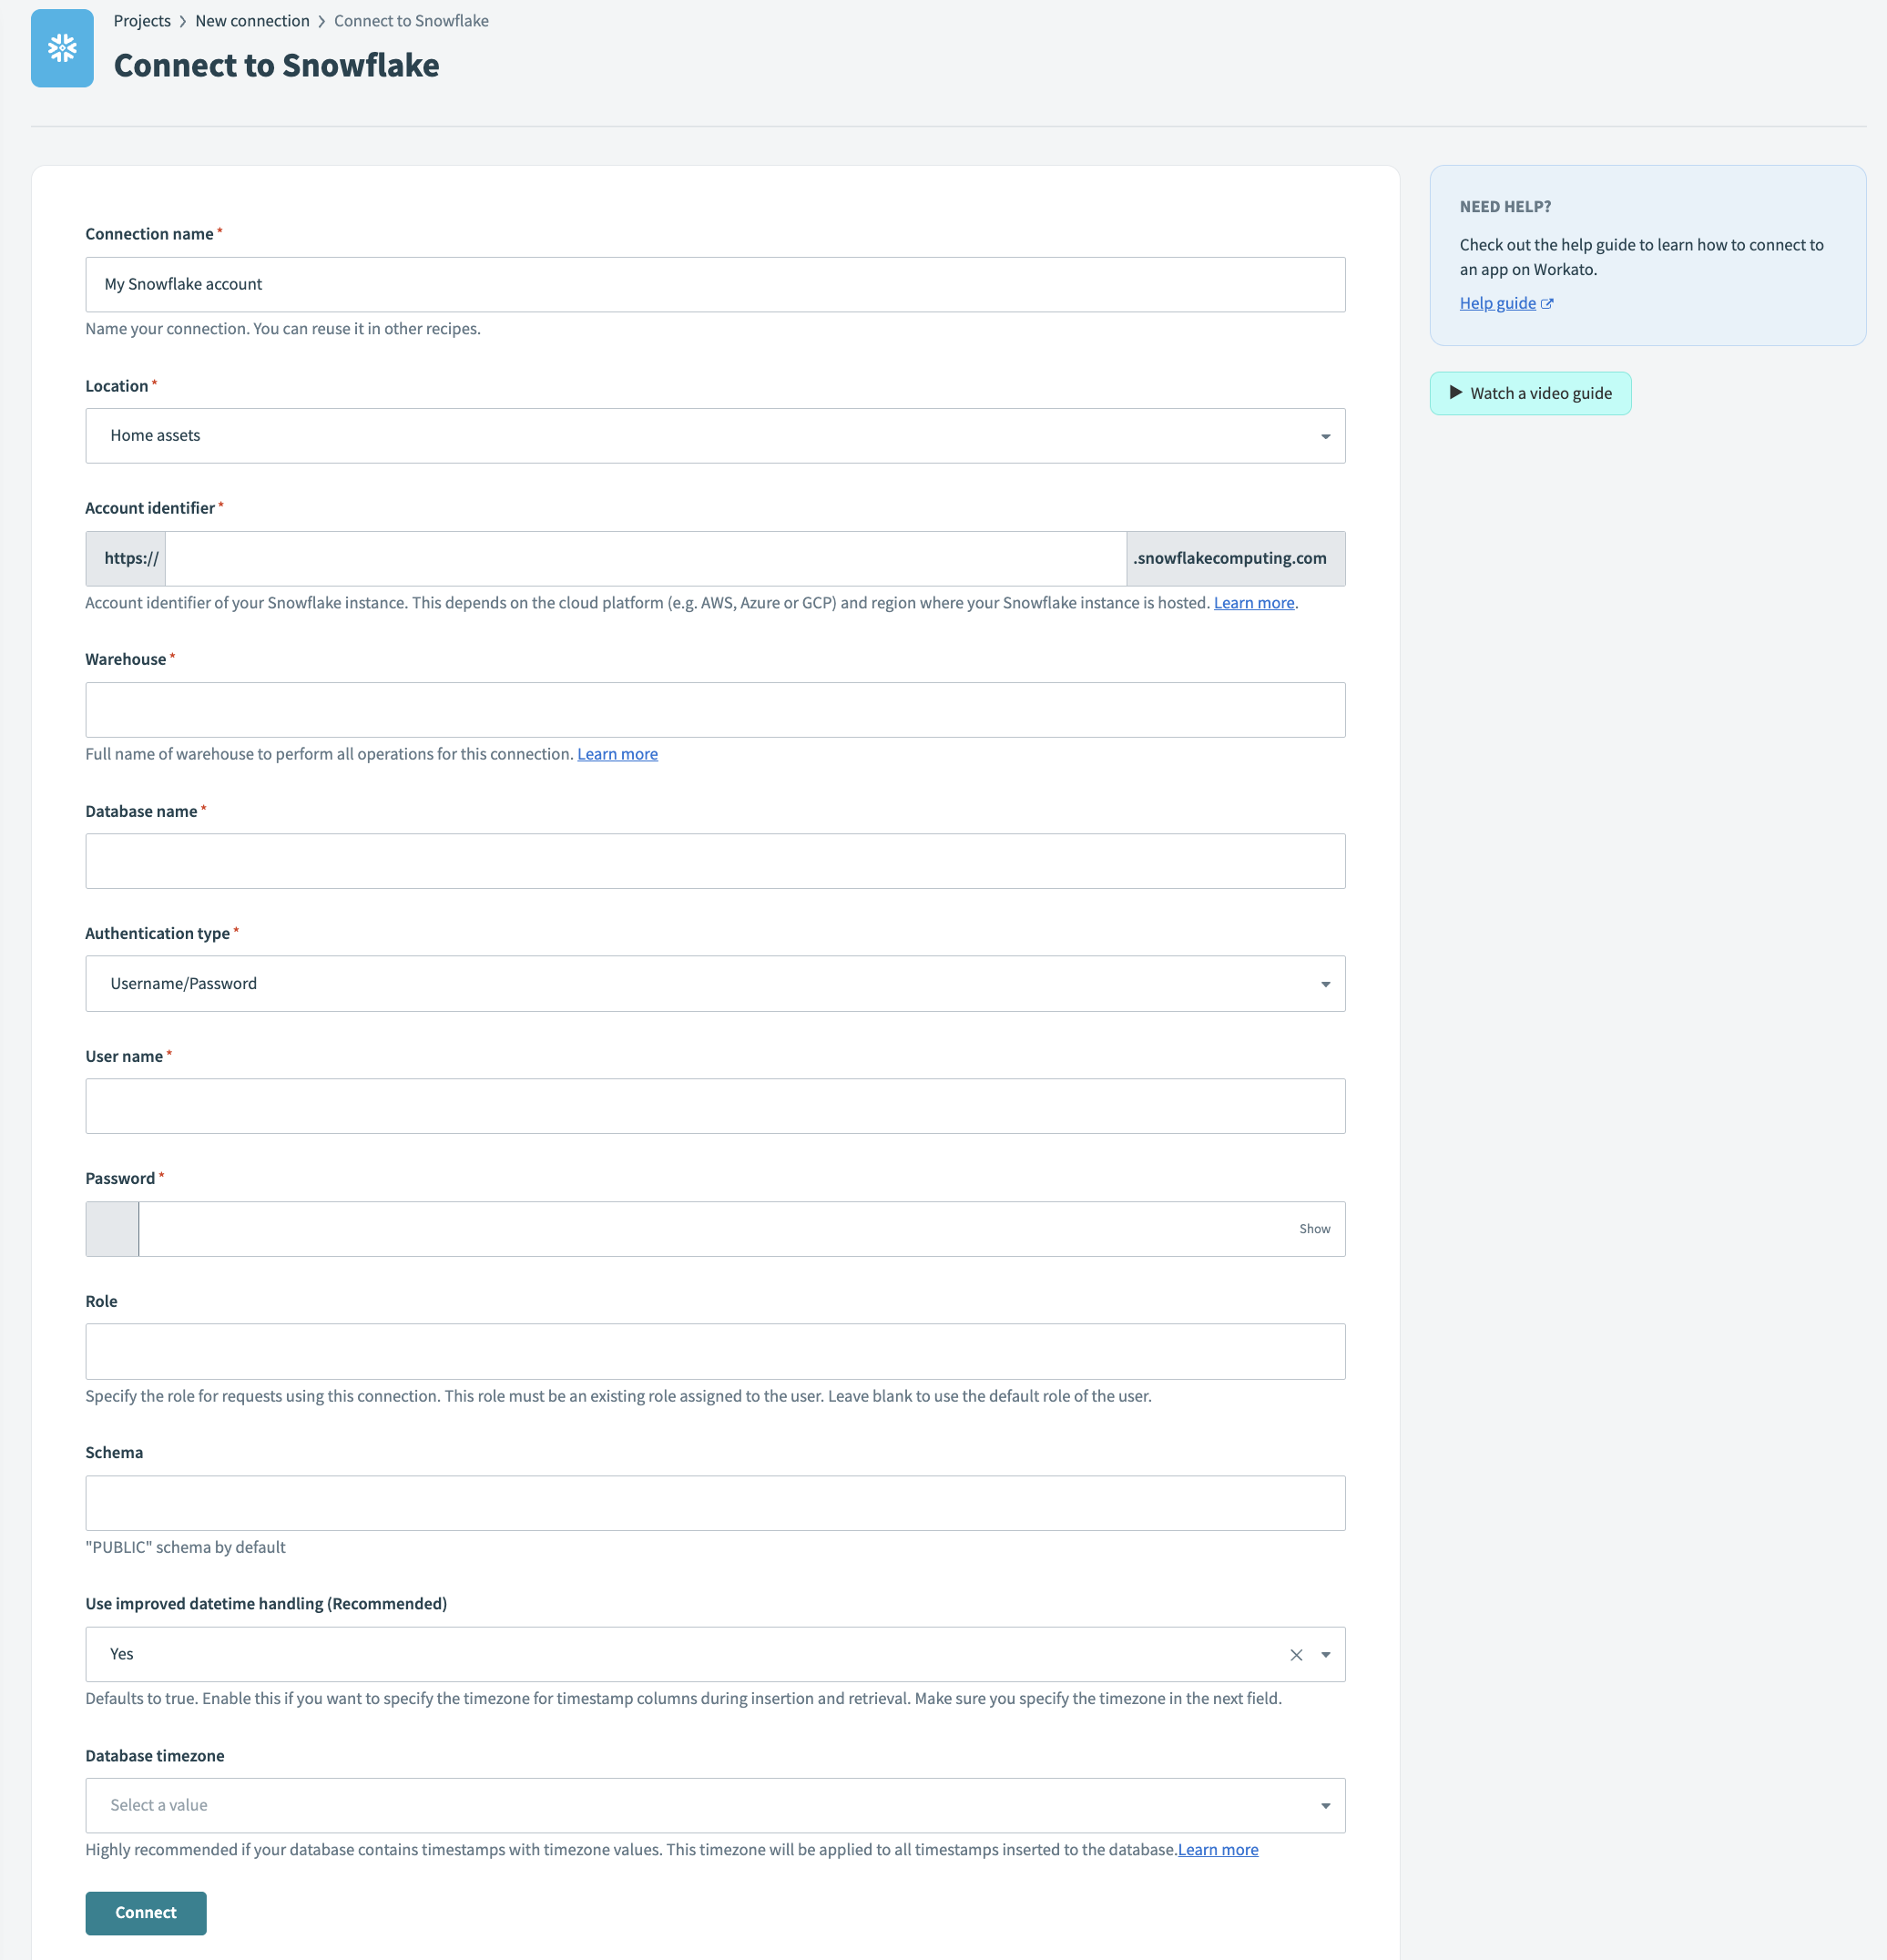 Snowflake connection
| Field | Description |
|---|---|
| Connection name | Give this Snowflake connection a unique name that identifies which Snowflake instance it is connected to. |
| Account identifier | Account identifier of your Snowflake instance. Snowflake has multiple methods of identifying an account. Workato supports all methods: account name, connection name, and account locator.
If you're using the account locator, note that
Find out more about connecting to your Snowflake account. |
| Authentication type | Choose an authentication type for this connection. Select between Username/Password and OAuth 2.0. |
| Warehouse | Name of the warehouse to use for performing all compute for this connection. See Warehouse considerations for more information. |
| Database | Name of the Snowflake database you wish to connect to. |
| Username | Username to connect to Snowflake.
The role granted to the User should have SYSADMIN privileges or lower. Required if you selected Username/Password authentication type. |
| Password | Password to connect to Snowflake.
The role granted to the User should have SYSADMIN privileges or lower. Required if you selected Username/Password authentication type. |
| Client ID | Client ID to be used for the OAuth 2.0 authorization flow and token request. Learn more about OAuth 2.0 setup.
Required if you selected OAuth 2.0 authentication type. |
| Client secret | Client secret to be used for the OAuth 2.0 token request.
Required if you selected OAuth 2.0 authentication type. |
| Schema | Optional. Name of the schema within the Snowflake database you wish to connect to. Defaults to public. |
| Database timezone | Optional. Apply this to all timestamps without timezone. |
Workato connected Snowflake accounts should keep in line with the security considerations detailed here (opens new window). As a general guideline, SYSADMIN privileges can be used but custom roles should be created to restrict Workato access to only Snowflake objects which you want to build recipes with. Do not connect users with ACCOUNTADMIN privileges to Workato as this would throw errors and also represent a security concern.
# Working with the Snowflake connector
# Configuring OAuth 2.0
To use the OAuth 2.0 authentication type for a Snowflake connection, you must first create a set of client ID and secret. To do so, you will need to create a custom integration record. Here is an example including the appropriate redirect URL to use:
CREATE SECURITY INTEGRATION WORKATO_OAUTH
  TYPE = OAUTH
  ENABLED = TRUE
  OAUTH_CLIENT = CUSTOM
  OAUTH_CLIENT_TYPE = CONFIDENTIAL
  OAUTH_REDIRECT_URI = 'https://www.workato.com/oauth/callback'
  OAUTH_ISSUE_REFRESH_TOKENS = TRUE;
After successfully creating this integration record, you can retrieve the Client ID and secret using this SQL command:
SELECT SYSTEM$SHOW_OAUTH_CLIENT_SECRETS('WORKATO_OAUTH');
Require privilege
To execute these SQL commands, you must use the ACCOUNTADMIN role or a role with the global CREATE INTEGRATION privilege.
Refer to the Snowflake documentation (opens new window) for more information.
# Warehouse considerations
Snowflake utilizes per-second billing for all compute (loading, transforming, and query). Here are some things to consider when setting up a warehouse for a Snowflake connection. There is a 60-second minimum each time a warehouse starts, so there is no advantage of suspending a warehouse within the first 60 seconds of resuming
When choosing the following warehouse properties, consider the frequency and time between queries, the number of concurrent active recipes and complexity of each query.
# Warehouse size
For most use cases, X-Small warehouse is sufficient. A larger warehouse has more servers and does more work proportional to the per-second cost. This means that a larger warehouse will complete a query faster while consuming the same number of credits.
If your use case involves long and complex queries it is recommended to use a larger warehouse to prevent timeouts.
# Multi-cluster warehouses
A multi-cluster warehouse with auto-scale enabled is able to create multiple warehouses (of the same size) to meet temporary load fluctuation.
Use a multi-cluster warehouse if you expect concurrent jobs or jobs with large queries. Learn more about multi-cluster warehouses (opens new window).
# Auto-suspend and auto-resume
Warehouses used in the connection must have auto-resume enabled. Otherwise, recipe jobs will fail when trying to run on a suspended warehouse.
Warehouses can be configured to auto-suspend after a period of inactivity. This specified period of time depends on your business process.
A running warehouse maintains a cache of table data. This reduces the time taken for subsequent queries if the cached data can be used instead of reading from the table again. A larger warehouse has a larger cache capacity. This cache is dropped when the warehouse is suspended. As a result, performance for initial queries on a warehouse that was auto-resumed will be slower.
Use cases with high frequency and low down time in between queries will benefit from a longer period of time before auto-suspend.
# Database timezone
Snowflake supports TIMESTAMP_NTZ data type ("wallclock" time information without timezone). This creates a challenge trying to integrate with external systems. When sending or reading data from these columns, it needs to be converted to a default timezone for APIs of other applications to process accurately.
Select a timezone that your database operates in. This timezone will only be applied to these columns. Other timestamp columns with explicit timezone values will be unaffected.
If left blank, your Workato account timezone will be used instead.
When writing timestamp values to these columns in a table, they are first converted to the specified timezone (DST offset is applied when applicable). Then, only the "wallclock" value is stored.
When reading timestamp without timezone values in a table, the timestamp is assigned the selected timezone and processed as a timestamp with timezone value. DST offset will be applied whenever applicable.
# Table and view
The Snowflake connector works with all tables and views available to the username used to establish the connection. These are available in pick lists in each trigger/action, or you can provide the exact name.
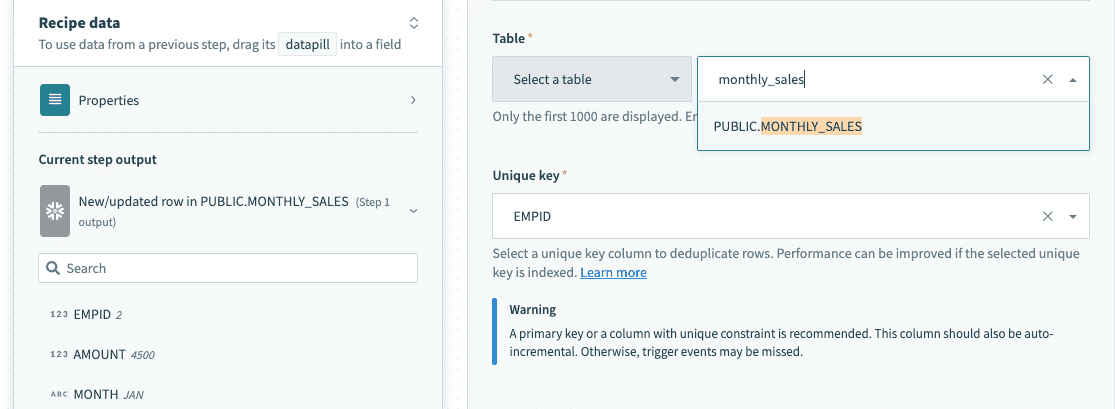 Select a table/view from pick list
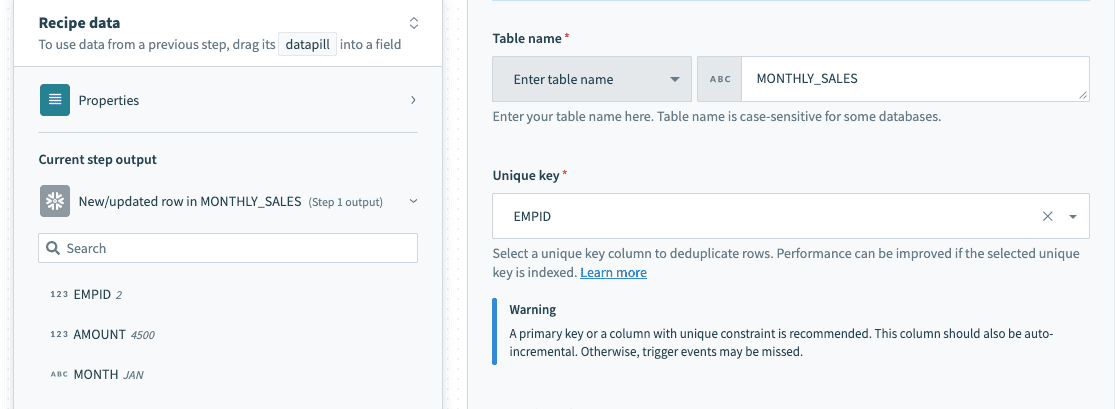 Provide exact table/view name in a text field
# Single row vs batch of rows
Snowflake connector can read or write to your database either as a single row or in batches. When using batch triggers/actions, you have to provide the batch size you wish to work with. The batch size can be any number between 1 and 100, with 100 being the maximum batch size.
Besides the difference in input fields, there is also a difference between the outputs of these 2 types of operations. A batch trigger returns a list datapill (i.e. an array of rows).
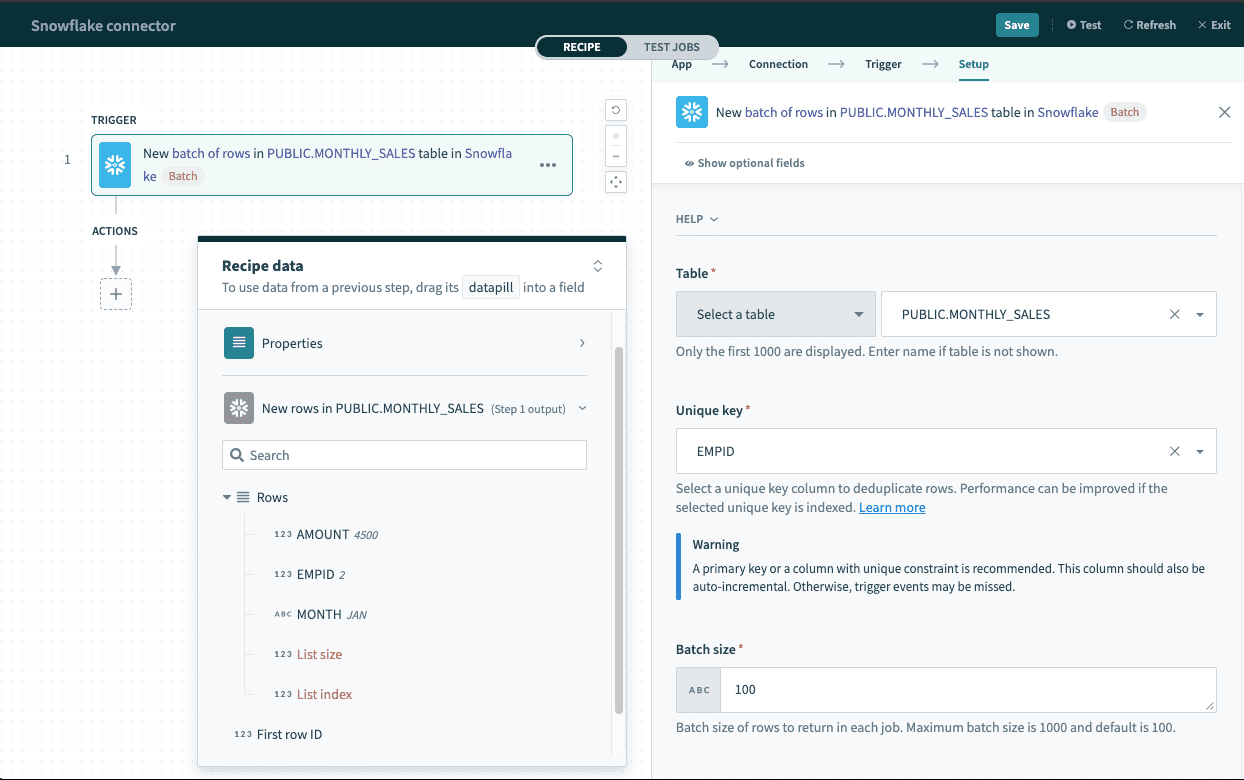 Batch trigger output
List datapill
The Rows datapill indicates that the output is a list containing data for each row in that batch.
However, a trigger that processes rows one at a time will have an output datatree that allows you to map data from that single row.
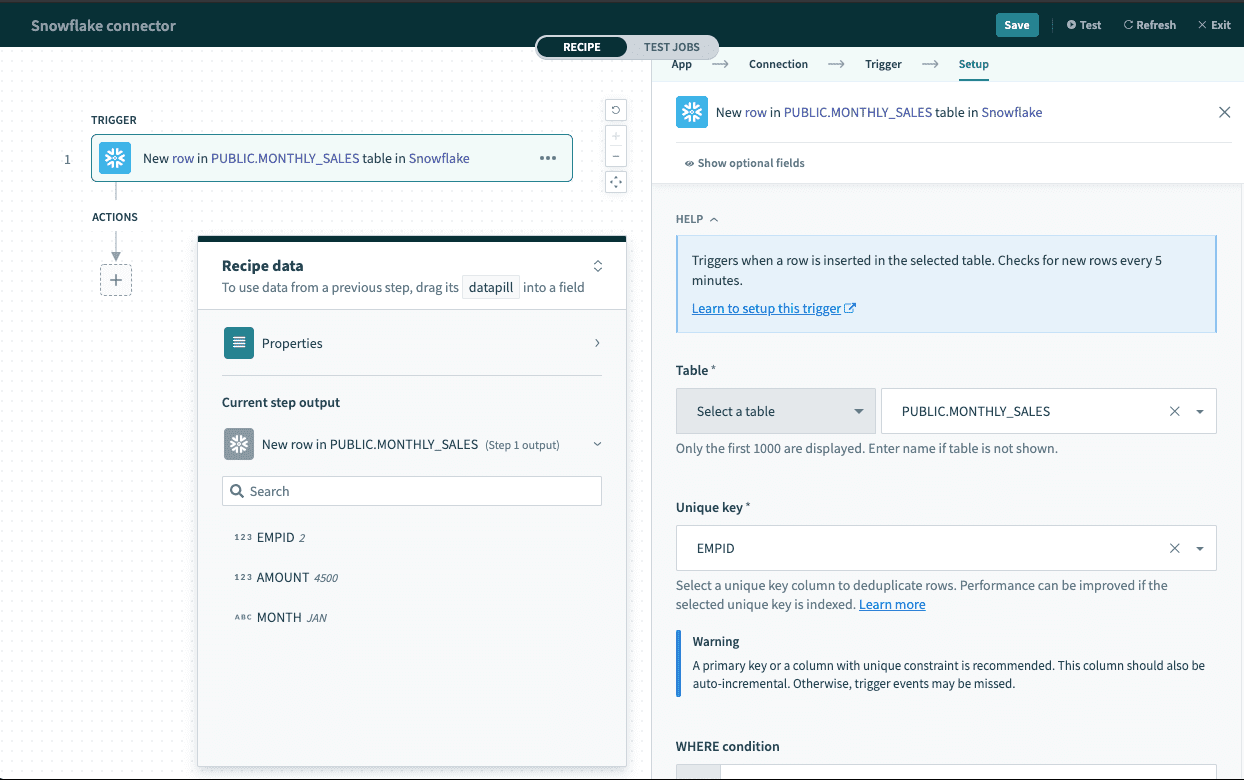 Single row output
As a result, the output of batch triggers/actions needs to be handled differently. The output of the trigger can be used in actions with batch operations (like Salesforce Create objects in bulk action) that requires mapping the Rows datapill into the source list. Learn how to work with lists in Workato.
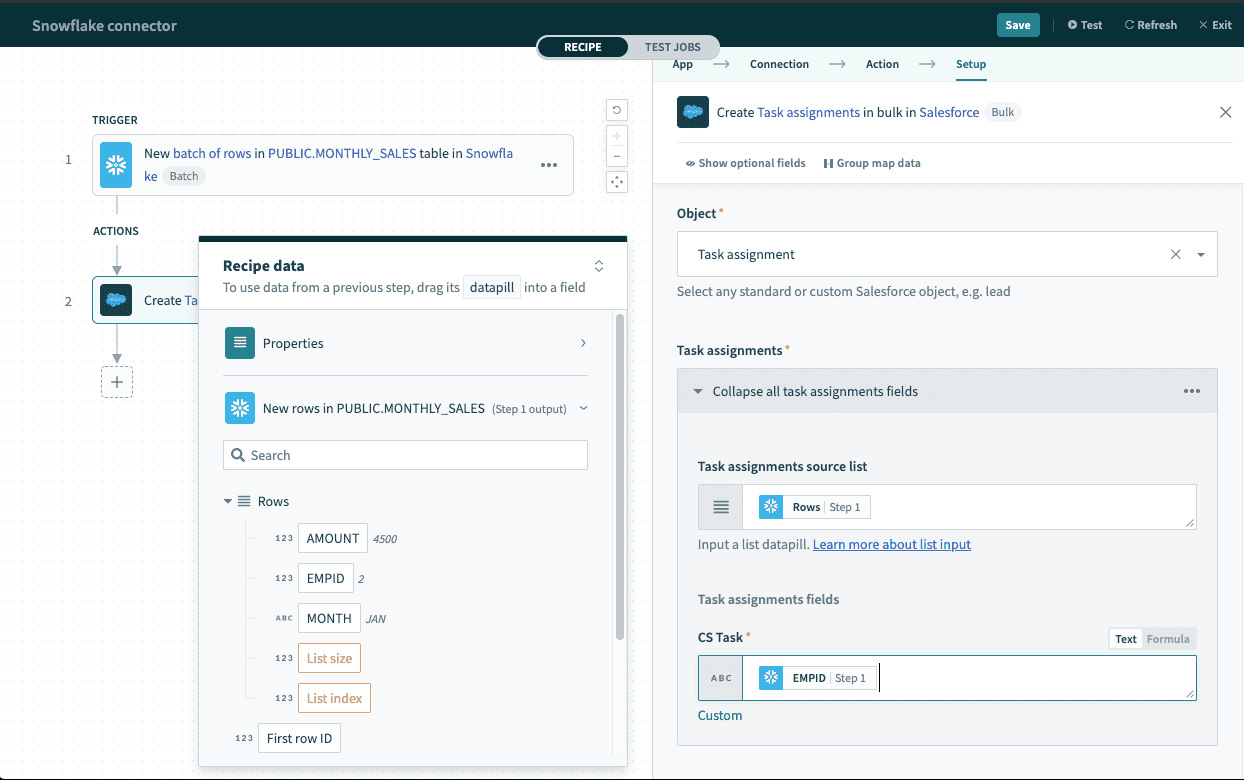 Using batch trigger output
# WHERE condition
This input field is used to filter and identify rows to perform an action on. It is used in multiple triggers and actions in the following ways:
- filter rows to be picked up in triggers
- filter rows in Select rows action
- filter rows to be deleted in Delete rows action
TIP
Examples below showcase how to use WHERE conditions directly with user input. For added security, use WHERE conditions with parameters to prevent SQL injection. Learn more
This clause will be used as a WHERE statement in each request. This should follow basic SQL syntax.
# Simple statements
String values must be enclosed in single quotes ('') and columns used must exist in the table/view.
A simple WHERE condition to filter rows based on values in a single column looks like this.
email = 'John@acme.com'
If used in a Select rows action, this WHERE condition will return all rows that has the value 'John@acme.com' in the email column. Just remember to wrap datapills with single quotes in your inputs.
Using datapills wrapped with single quotes in
WHERE condition
If your columns contains spaces, remember to used the column identifier - double quotes (""). For example, currency code must to enclosed in brackets to be used as an identifier.
"email address" = 'John@acme.com'
WHERE condition with column identifier enclosed with double quotes
# Complex statements
Your WHERE condition can also contain subqueries. The example below selects active users from the USERS table.
ID IN(SELECT USER_ID FROM USERS WHERE ACTIVE = TRUE)
When used in a Select rows action, this will select all rows from your main query that are related to rows in the USERS table that are active (ACTIVE = TRUE).
Using subquery in WHERE condition
# Using Parameters
Parameters are used in conjunction with WHERE conditions to add an additional layer of security against SQL injection. To use parameters in your WHERE conditions, you will first need to declare bind variables in your input. Bind parameters must be declared in the form :bind_variable where the variable name is preceded with a :. After this is done, declare the parameter in the section directly below using the exact name you have given.
TIP
Bind variables should only be used in place of column values and not column names.
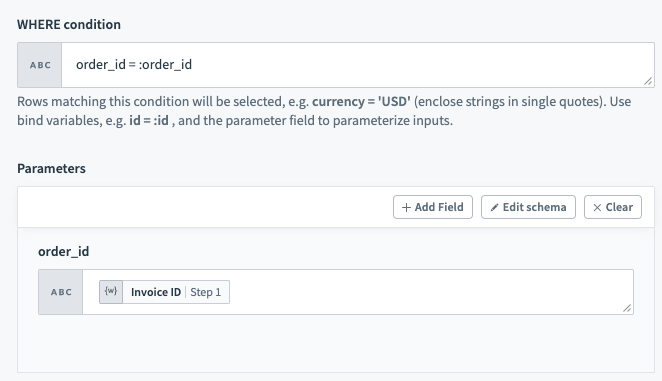
WHERE condition with bind variableYou can provide as many bind variables as you'd like and each one should have a unique name. We distinguish bind variables from column names and static values by ignoring any : inside single quotes ('), double quotes (") and square brackets ([]).
# Additional Notes
# Handling special characters
When column names are defined with special characters, datapills for such columns are not mapped correctly to the original column and will return null. The most commonly used special characters are whitespace and -. Examples of such definitions are "column name" and "column-name".
There are several workarounds available for such situations.
# Workaround 1
Use an appropriate alias in the SQL Statement. Datapills will then be mapped correctly to the alias.
SELECT ID, NAME
"whitespace column" as whitespace_column,
"dashed-column" as dashed_column
FROM CUSTOMERS
# Workaround 2
Access the value directly using the row index and column name.
Accessing data via row index and column name
Last updated: 3/6/2024, 6:35:31 AM