# Managing Your Workspace Collaborators With Role-Based Access Control
PERMISSION REQUIREMENTS
To perform the tasks in this guide, you must meet one of the following requirements:
- Be logged in with the root login of the workspace
- Have either the Admin system role or a custom role with the Workspace admin and Custom workspace roles privileges
The ability to assign granular, comprehensive roles to workspace collaborators is essential to working in a workspace.
Role-based access control (RBAC) is a key feature of Workato Collaborators that allows workspace admins to fully define the permissions of every collaborator in the workspace through the creation of custom roles.
In this guide, we'll cover:
- How RBAC works
- How to create custom roles
- How to assign roles to team collaborators
- How to clone roles
- How to delete roles
# How Role-Based Access Control Works
Role-based access control (RBAC) allows you to restrict access to Workato features, functions, and folders, based on a team collaborator's role in a team.
Access can be based on the criteria you define, such as:
- Authority, such as manager versus entry-level
- Responsibility, such as engineer versus Quality Assurance (QA)
- Department, such as IT versus marketing
- Employee type, such as permanent versus contractor
Allowing collaborators to only access the features they need to do their jobs ensures that your organization's sensitive data and applications remain secure. Using roles to control access can be helpful for monitoring activity, but also if there are third parties working in your account.
In addition to controlling access to features in Workato, roles also allow you to define the type of access collaborators have to those features. For example: Collaborators may be able to View connections but not Create them.
# Role Types
All Workato accounts contain a few built-in system roles that can be assigned to collaborators.
You can also create and assign custom roles.
# Creating Custom Roles
CUSTOM ROLES IS AN ADD-ON
Custom roles is available as an add-on. Contact your Customer Success Manager for more info.
Using custom roles allows you to create roles with appropriate privileges for the various people and teams collaborating in your workspace.
To create a custom role:
In your Workato account, navigate to Workspace admin > Roles (opens new window).
Click + Add role.
Name the role by clicking the New role copy in the top-left corner of the page, entering a name, and clicking the checkmark to save.
Using the tabs on the left side of the page, assign privileges to the role. Refer to the Privileges reference for more information about what each privilege does.
When assigning privileges, note that:
New roles have a few pre-selected permissions. By default, new roles are automatically granted View privileges for Recipes, Connections, and Folders. If not required for the role, de-select the privileges.
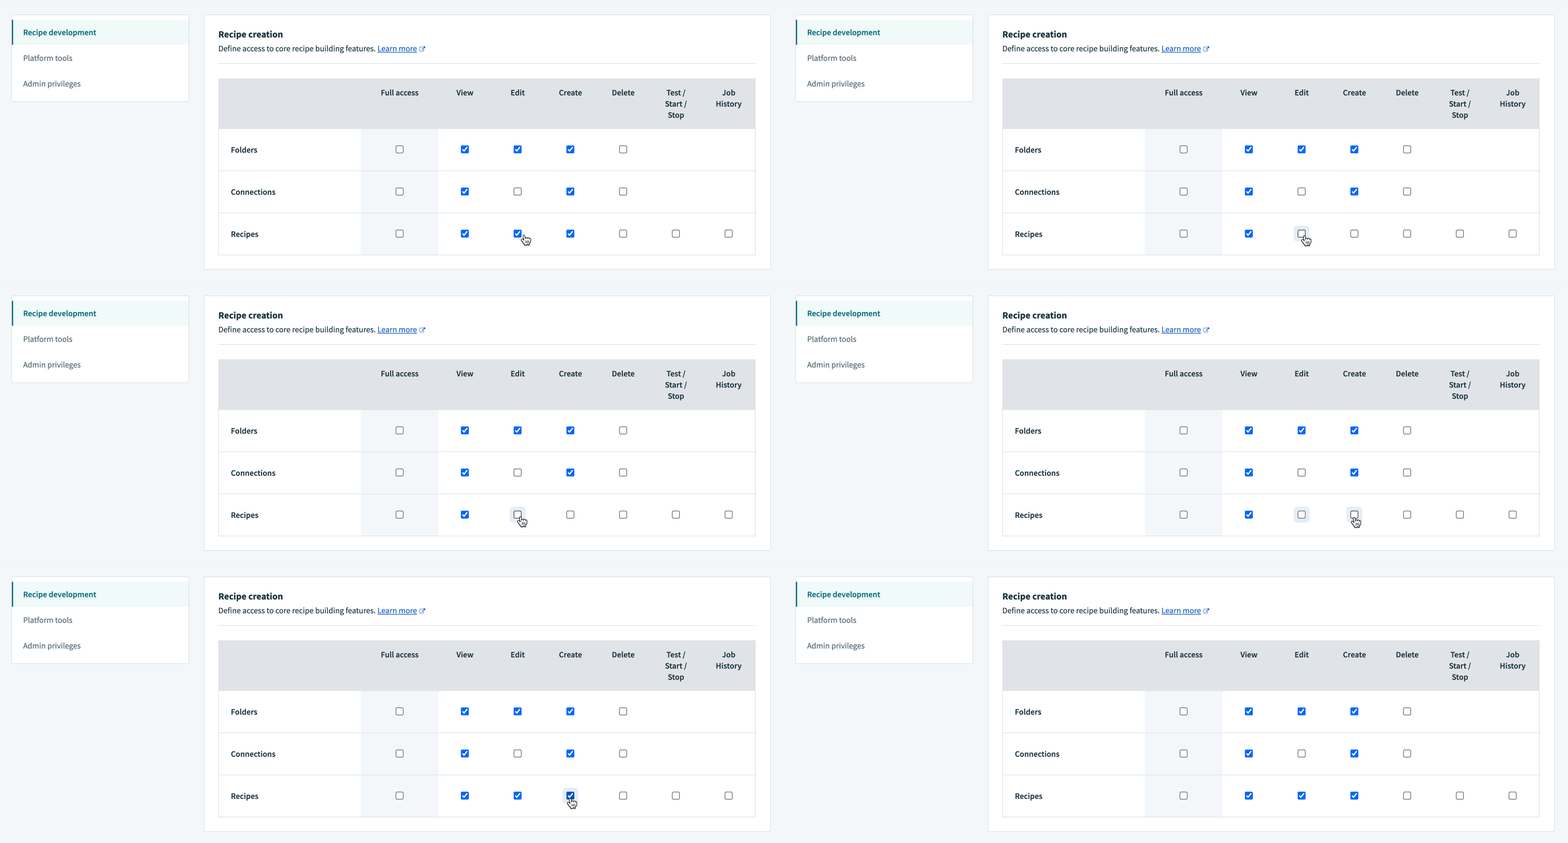
Some privileges are interdependent on other privileges. For example: The View folders permission is required to allow viewing Recipes and Connections, as these assets are contained in Folders.
If a privilege has dependencies, these dependencies will be highlighted when you hover over a privilege:
 Autoselecting interdependent privileges
When a privilege with dependencies is selected or de-selected, its dependencies will also be selected or de-selected.
When finished, click Save changes.
# Assigning Roles To Team Collaborators
PREFER VIDEOS?
Get the quick version in this video!
Roles are assigned to collaborators when they're initially invited to the team, but they can also be changed at any time.
# Cloning Roles
TIP
Roles can be programmatically cloned through the Workato API.
Cloning a role makes a copy of the role that can be modified without affecting the original.
To clone an existing system or custom role in the Workato app:
In your Workato account, navigate to Workspace admin > Roles (opens new window).
Click on the role you want to clone. This will open Edit role page.
Click the Clone role button in the top-right corner of the page.
Re-name and modify the role as needed.
Click Save changes when finished.
CLONING AN ADMIN ROLE
In Workato, you can clone all system and custom roles within your workspace. However, when you clone the Admin role, the unique permissions for managing advanced workspace settings do not transfer to the newly-created role. To grant collaborators the ability to manage workspace settings, they must be assigned to the Admin system role.
# Deleting Roles
NOTE
Only custom roles may be deleted.
We recommend migrating collaborators to new roles before deleting a role to prevent accidental access issues.
When a role is deleted:
If Environments is not enabled in the workspace, all collaborators with the role will lose access to the team. These collaborators must be assigned to new roles before they'll be able to access the team again.
If Environments is enabled in the workspace, all collaborators with the role will lose access to the environment where the role was assigned.
For example: A collaborator has access to DEV and TEST environments. In DEV, they're assigned the HR - Dev custom role and in TEST, the Tester role. If the HR - Dev role is deleted, the collaborator will lose access to the DEV environment until they're assigned a new role.
To delete a role:
In your Workato account, navigate to Workspace admin > Roles (opens new window).
Click on the role you want to delete. This will open Edit role page.
Click the trash can icon in the top right corner of the page.
When prompted to confirm, click Delete role.
Last updated: 3/20/2024, 9:13:08 PM